Prologue: A world of punched cards and calculation
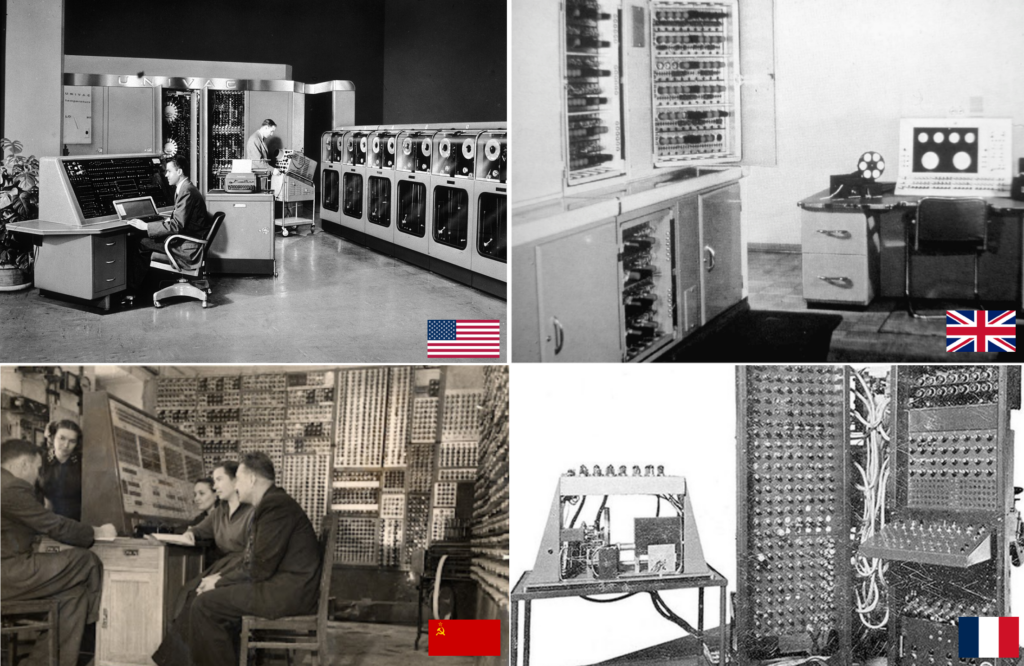
The origin of computing is usually told as a simple story: before the Second World War, there were no computers; after the Second World War there were, with maybe discussion about whether some of the machines built during the war like the Colossus or the Zuse Z3 were transitional curiosities or already full-fledged computers. That narrative is largely correct, yet it obscures the remarkable progress in automatic calculation that unfolded from the nineteenth century to the interwar years. This omission matters little when speaking of pioneers like Aiken or von Neumann, who would rethink everything once electronic computing became possible; however one cannot understand the French postwar failure in computing without first grasping the technical and intellectual paradigms the French scientists were working with before the war, and from which most of them were unable to break free.
The Industrial Revolution summons images of factories, locomotives, steamboats and of course coal, an ungodly amount of coal to feed the steam Moloch. Yet the same revolution also created a world almost as hungry for calculation as it was for energy. Banking expanded exponentially, and with it came the need to compute interest, risk, and repayments. Engineers, insurers, architects, and scientists all faced problems too complex to solve “on the fly”; calculating had to become a specialized task to organize and optimize. As so, the need for computation was addressed much like the need for textiles, houses or frying pans: with technology and division of labor.

Division of labor in calculation can be traced back to the celestial calculation of the late 18th century, for instance Royal Astronomer Nevil Maskelyne‘s British Nautical Almanac (1767), a yearly collection of pre-calculated star positions allowing the sailors to know their longitude. The calculation method was chosen by a chief mathematician, and then the thousands of hours of calculation required were divided in tiny manageable parts and distributed to human computers. A comparer would then checking the accuracy of the calculation by comparing the same calculation done by two different persons. This organization became standard in the calculation offices of the 19th and 20th century, either as departments of large organizations or as work-for-hire. Over time, calculation would be massively accelerated by mechanical counting machines, which can be traced back to 1645 (the Pascaline), but really became mass produced with the comptometer (1887). Before long, its use became so widespread in accounting departments and insurance/banking companies that by the First World War the occupation “comptometrist” made it into job boards.

Comptometers and their equivalents could only do the simplest calculations, but innovation kept marching on and in the years that followed analog computers – purpose-built computing machines – would equip calculation offices to tackle increasingly complex operations. This being most of the times a wargaming blog, the analog computer we all know about is the fire director: large analog computers deployed on warships starting from WWI, which calculated fire solutions by taking into account (eventually) the range, the ship’s speed and bearing, the Coriolis effect and the expected position of the target – itself another complex calculation.
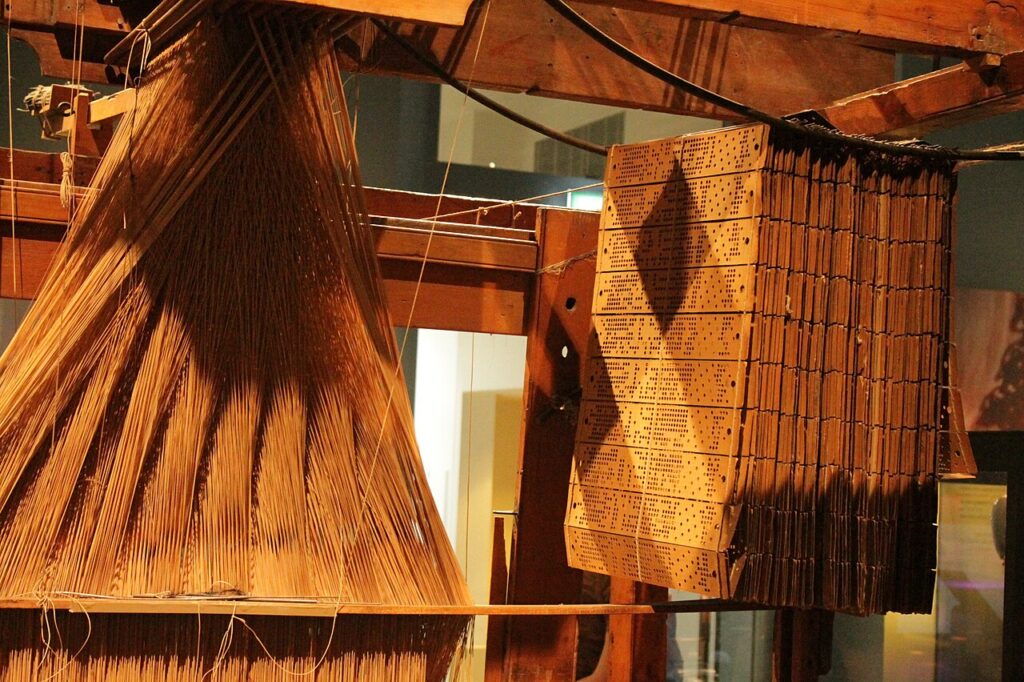
The other decisive technological innovation for computing is the punched card. Once again, the technology is older than one would expect: glossing over precursors from as far back as 1725, the first successful punched card operated machine was the Jacquard looming machine (1804), which could weave complex patterns according to the program written on the cards. In the 1820s there were tens of thousands of Jacquard machines in operation in the world, which in addition to the massive economic and social impact of the machines themselves, triggered a conceptual epiphany: every industry and service wanted its punched card operation.
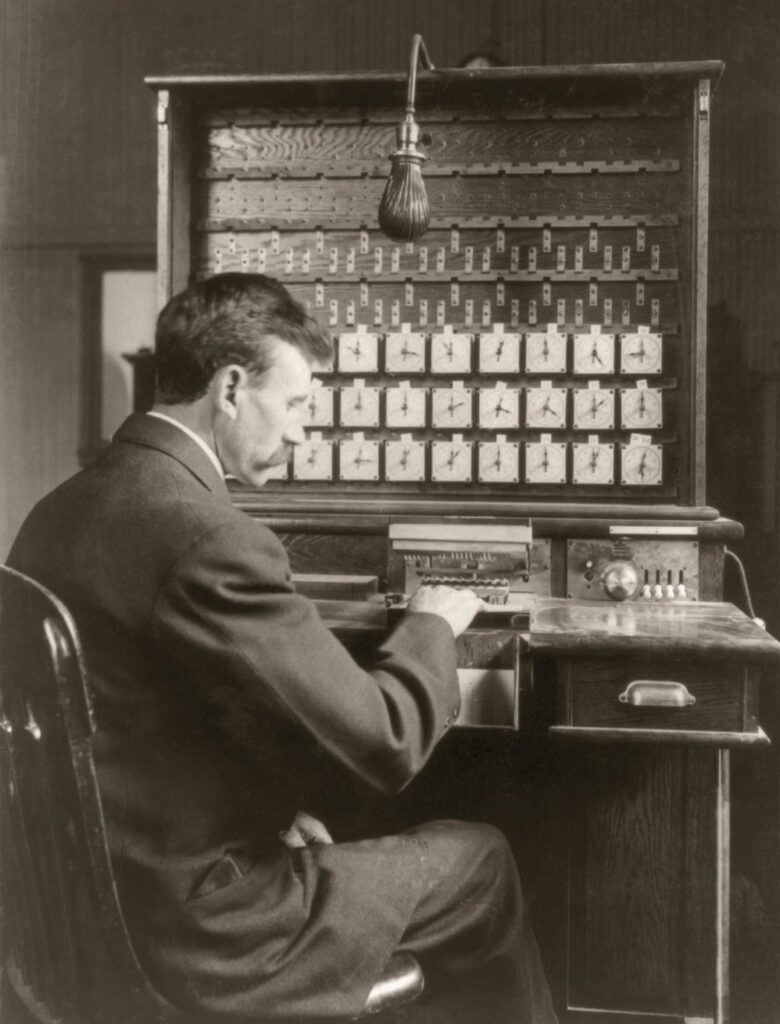
It is the Jacquard machine that inspired computing pioneer Charles Babbage to imagine his (unbuilt) punched card operated analytical engine that would execute sequentially the arithmetic operations it would have been programmed to do. To really expand into services however, the punched cards needed one last invention: the tabulator, which converted punched cards into human-readable data. The first tabulator had been invented by Herman Hollerith in 1884 and famously used for the 1890 US Census, reducing the time needed to parse through the survey from 8 years (1880 census) to “only” 6 years. Hollerith had created the new field of data processing, which he immediately dominated through his company – the Tabulating Machine Company in 1896, which became in 1911 the Computing-Tabulating-Recording Company, which became in 1924 International Business Machines, or IBM.
The tabulator changed everything. Insurance companies, with their massive amount of data to process, were the first to jump on the bandwagon, with Prudential leasing its first tabulator in 1891. Others followed quickly, and soon entire services and administrations moved from paper to punched cards and adapted their process to the tabulator. The use of punched cards in calculation, however, had advanced timidly, with the first calculating machines that used punched cards in input and/or output only arriving on the market in the interwar period, and even then they were usually single-purpose, for instance the IBM 601 Multiplying Punch (1931) could only multiply, and the IBM Type 405 Alphabetical Accounting Machine (1934) could only add and substract. It is in this technological universe that the main protagonist of this article grew up.
The Price of Defeat
In January 1938, mathematician Louis Couffignal (1902-1966) published his thesis “L’analyse mécanique, application aux machines à calculer et à la mécanique céleste“, [Mechanical Analysis, application to calculation machine and celestial mechanics]. His claims were visionary, as he described with some details and schematics a machine controlled by punched cards that would do “Multiplication, division, and sign computation; Sequencing; Comparison; Printing; Recording and documentary control; Mechanical Tables [= short term memory]; Perfect pre-control of the preparation of printing and control documents“, in a word a machine that we would call Turing-completish in its purpose – though as we will see not in its specifics. Couffignal, who was familiar with the works of Babbage, was obsessed about calculation machines; he had designed a few (mechanical) of his own before being recruited, in 1937, by the Centre National de la Recherche Scientifique (CNRS) to work on mechanical calculation. In his thesis L‘analyse mécanique, Couffignal proposed two designs to automate calculation: one was an incredibly complex mechanical machine working on a decimal basis, the second one was more interesting to us: an electro-mechanical machine counting in binary. Couffignal stated in his thesis his preference for the latter solution: faster and safer.
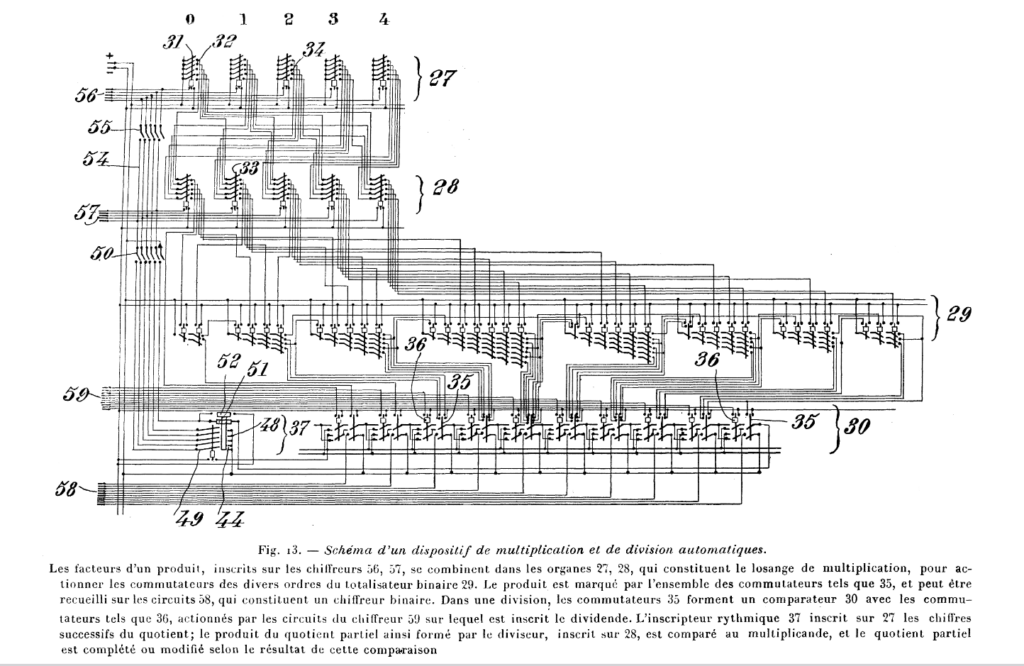
This is not to say that Couffignal was ahead of his time, merely at the frontier; Charles Eryl Wynn-Williams for instance had designed a scale-of-two counter in 1932 at the latest. Furthermore, the Couffignal machine was closely inspired by mechanical machines, and so addition/substraction and multiplication/division were managed by different parts of the machine, as if several non-Turing complete machines had been stapled together. But in 1938, the main issue with Couffignal’s proposal was that it was purely theoretical – to build it he would need someone to foot the bill.
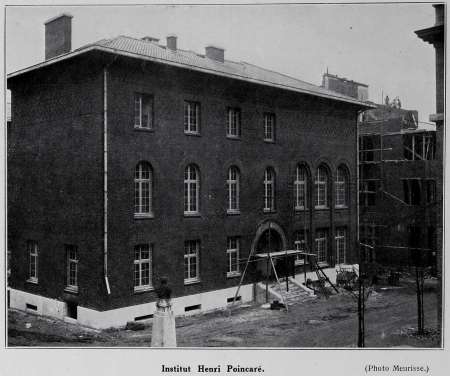
Earlier in WWI, the French had experienced what they considered a technical German superiority, particularly in the field of ballistics. To bridge the gap, the French founded in 1915 the Direction des Inventions intéressant la Défense nationale, headed by mathematician Émile Borel – more famous nowadays for his parables of monkeys statistically typing all of Shakespeare. After the war, the Republic kept a keen interest in applied mathematics, and Borel created in 1928 the Institut Henri Poincaré with four laboratories: Mathematics, Calculation, Theoretical Physics and Statistics & Probabilities. As the risk of a new war increasingly loomed over France, the needs of the French military for calculation grew exponentially: aerodynamic, optics and above all ballistics, what with the increase of the gun range and the specific problems of hitting air targets from the ground and ground targets from the air. In this context, Couffignal had frequently worked with the military and had been among others tasked in 1936 with an aiming device for heavy bombers. In 1939, when the Institut Henri Poincaré became swamped by requests for calculs (three times more demands than could be served, according to the director), it created two new laboratories – ballistics and mechanical calculation – with Couffignal appointed as head of the second. Couffignal was quick to point out that the existing mechanical machines were slow and error-prone for complex calculation, as the user had to keep manually inputting intermediate results for the next calculation. A solution existed, of course, in that thesis he had written one year earlier – maybe not the complete machine, but close enough: an electro-mechanical connection between the keyboard of a calculating machine and an accounting (tabulating?) machine, their interaction being programmed by punched cards. In theory, the output of the calculating machine would have been fed back into it by the tabulating machine, allowing to chain operation without human input. The military understood the impact such automation could have, and gave the greenlight.
Alas, the débâcle interrupted those promising developments, and the members of the Institut, after having to relocate several times in front of the advancing German armies, eventually dispersed. The débâcle similarly swallowed less documented projects that could have been a path to computing, particularly a project by Georges Vieillard and Franklin Maurice of Bull, who were commissioned by the Chiffre (the French cryptology service) to build machines that could decipher the Enigma code. In April 1940, they finished their two (or three? sources vary) machines: W1, W2 and possibly W3. Alas, just like the other machines, they had to be destroyed before the Germans could find them, along with any documentation there was for the project.
Ideological isolation
As the war ended, France was in ruins, its industrial production in tatters, and a good number of its top mathematicians and engineers had lost their lives during the war, deported for their race or for being part of the Résistance. Countless others could not devote fully to their work, whether because they were prisoners of war, active and surviving members of the Résistance or under Free French uniforms. In the latter case, they had no opportunity to receive the practical computing experience that their British and American equivalents could enjoy. And so, when in 1946 the CNRS created the Institut Blaise Pascal with the mission to build a French computer, it chose as the head of the project the most obvious candidate: Louis Couffignal.
Neither hero nor villain, Couffignal had passed the war years in relative normalcy as the world collapsed around him. He kept his cushy position at the CNRS, and convinced the Vichy government to let him finish his machine – though this authorisation did not have any practical impact by lack of funding and available parts. His transition from France de Vichy to France occupée to France libérée was seamless, and in the beginnings of 1945, he was given the grade of Commandant, a jeep and a driver to join a mission that tagged along with the 1st French Army and grabbed whatever technical tools and machines the Germans had left behind. A chunk of this loot would be the starting lab equipment of the Institut Blaise Pascal.
The Institut Blaise Pascal was one of the many initiatives of the CNRS to recoup the lost years in various scientific domains. This drive was supported by the Americans, who invited Couffignal in 1946 to tour their most advanced labs : he met Howard Aiken, saw the ENIAC and Mark I and was introduced to the Von Neumann architecture. After returning to France, Couffignal proceeded with the next logical thing: ignore whatever Von Neumann was saying and build an improved version of his pre-war machine.

While Couffignal transitioned to an all-electronic design after visiting the Americans, he did not understand the paradigm shift allowed by a fully electronic machine, and kept his vision of a machine with specialized parts. As he explained: “the problem of organizing a calculation is essentially the same as the problem of organizing an assembly line”. His plan also matched his odd vision of “artificial evolution” according to which, just like with natural evolution, machines would become increasingly complex over time. More practically, he argued that the Von Neumann architecture was too slow (his 1936 architecture allowed several operations in parallel so in theory it could work faster) and more importantly too memory-consuming, which of course was a real limitation of early computers. Couffignal believed that adding memory to ease calculation would be a never-ending treadmill: “memory can record 5,000 results in certain machines currently being studied, [but] an examination of the mathematical physics problems that are intended to be solved with these machines shows that this number will be insufficient; it will have to be increased to 10,000, 20,000, and perhaps even 50,000 in order to solve certain problems involving the integration of partial differential equations.” No, it was simply better to organize the calculation in a way that required as little memory as possible. Even worse, because he minimized the importance of memory in computers, he did not understand the interest of having programs directly in memory: some basic functions like the binary-decimal conversion had dedicated circuits, for everything else punched cards would be enough!
In any normal situation, Couffignal’s peers would have stepped in, but in this case Couffignal was working in a perfect echo chamber. The directors of the CNRS (up to 1946 the Nobel-prized physicist Frédéric Joliot-Curie, then Georges Teissier) were high-ranking members of the French Communist Party, and they saw Couffignal’s proposal as a French answer to an American design. In addition to the geopolitical rivalry, Couffignal’s architecture was ideologically stronger: Couffignal’s design replicated the scientific organization of labor found in well-run offices and factories, whereas Von Neumann’s simple architecture was closer to the workshops of old where each worker was supposed to produce items from start to finish. And so Joseph Pérès, the director of the Institut Blaise Pascal, could confidently state in June 1947 that “thanks to the work of M. Couffignal, we are still ahead [of the Americans] from the theorical point of view“. The CNRS would never fail to mention that the ENIAC was still using decimal numbers, and didn’t Couffignal invent binary counting back in 1938? The French media ate it up, and created of whole cloth a rivalry between the French approach and the American approach, a rivalry the Americans were I suppose never aware of. The Couffignal machine would be, anytime soon, the pride of France.
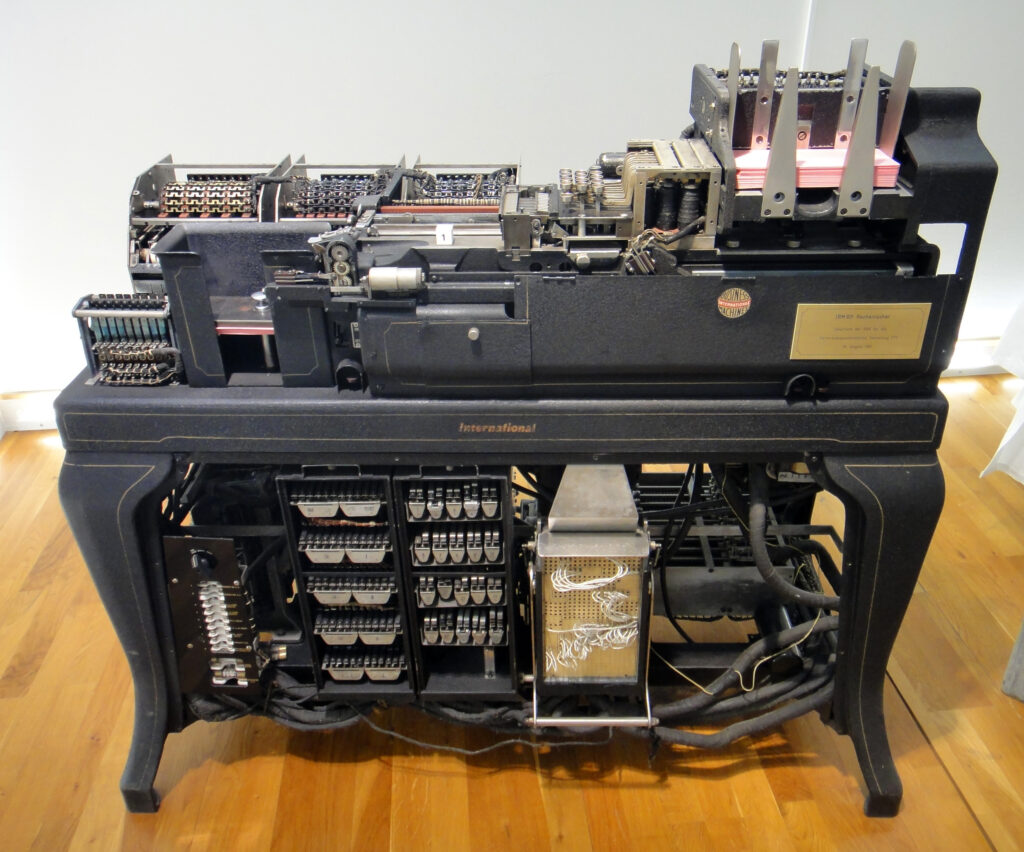
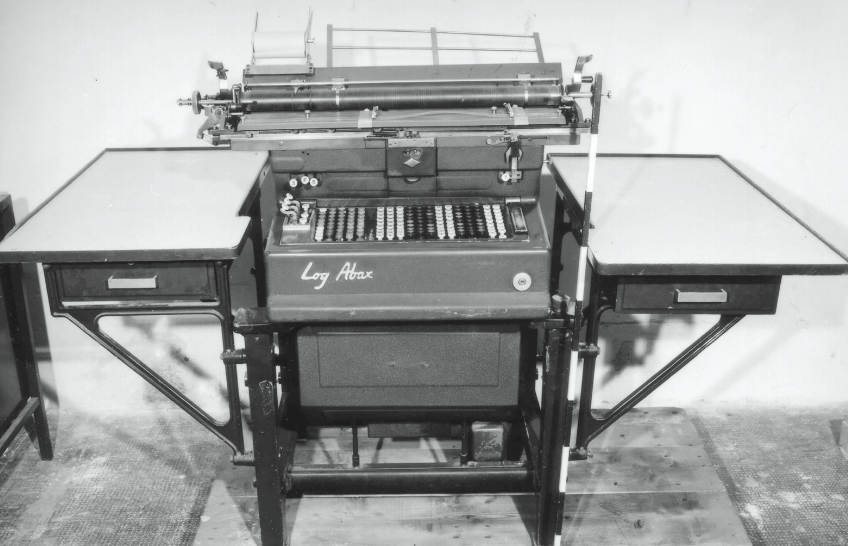
The CNRS would not interact with the French private firms interested in computing either. For the directors of the CNRS, working alongside a private company would go against the intérêt général – after all companies were expecting a competitive advantage from such a collaboration, and so the CNRS would end up serving a private interest. As for Logabax, the firm that had been handpicked by Couffignal to build his machine, it was not in a position to chime in. Logabax had built some of the most impressive fully mechanical calculating machines in the 40s, with in particular a mechanical long-term memory. Alas, it was otherwise the worst possible choice for the project: it was small, always on the brink of bankruptcy and had never ever worked with electronics.
The pride of France would take its sweet time, much to the despair of some of the French scientists that had been sidelined for political or personal reasons, chief among them Léon Brillouin, professor of Physics at Harvard and well acquainted with the latest American research. Back in 1947 he had used a French conference on computing to expose the latest technological advancements on the topic, and to remind the CNRS that the Americans were willing to train more young engineers in computing, a proposition that was never followed up. Years passed, the 40s turned into the 50s, the CNRS still had nothing to show. Finally, in January 1951, the Institut Blaise Pascal held an international conference on computing, where Couffignal showed a “pilot-machine”, that is a pint-sized version of the final computer. While small, it worked as expected, provided you did not ask it to calculate any number with more than 8 digits. Still, the Americans and British, present at the conference, must have been singularly unimpressed.
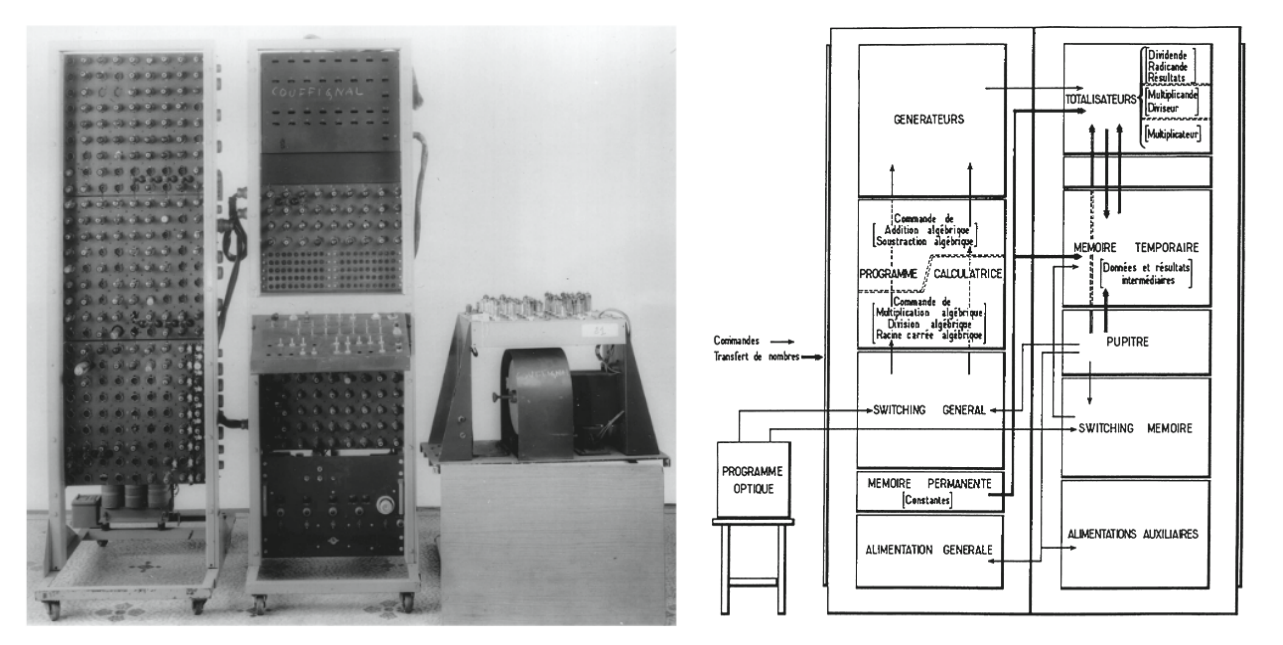
The final version was never delivered. Scaling up proved technically more complicated than just increasing the number of components, and in any case Logabax went bankrupt in 1952, leaving the CNRS without anyone to build its machine. Millions of Francs had been lost, and worse still – the failure of the project was seen for many more years as an industrial failure (the one of Logabax) rather than as a technological/design failure (the one of Couffignal and the CNRS). The CNRS spent some time trying to find a new partner to finish the machine, but in 1955 it finally threw in the towel and bought a British Elliot 402, which did not work that well either.
Could the French have had a working computer with another strategy in 1952? There seems to be little doubt about this. France had managed an impressive rebound in nuclear (the Zoé reactor was operational in 1948, largely thanks to Joliot-Curie), in jet engine (the Atar engine in 1948) and even in missiles where it was in some aspects ahead of the Americans. Léon Brillouin, who knew the topic well, had explained in 1949 that France had everything it needed to produce a computer quickly: highly-trained engineers and an electronics industry; and yet the vanguard of French computing had made everyone squander more than 5 years
Without solutions coming from the French research apparatus, labs started to turn toward private solutions, and two French companies will, for a time, be successful – at least until the French government started getting involved.
Main sources:
- L’informatique en France de la Seconde Guerre Mondiale au Plan Calcul, Pierre-Eric Mounier-Kuhn, 2022. This 700-pages thesis was my main source, and it gets into a level of detail (university formation, technologies government policies) I obviously can’t match in my short article..
- La non-construction du premier ordinateur au CNRS, Girolamo Ramunni, 1989 – a second source on Couffignal that only differs on details
- When computers were humans, David Alan Grier, 2005 for everything before analog computing.
- Sur l’analyse mécanique. Application aux machines à calculer et aux calculs de la mécanique céleste, Louis Couffignal, 1938