Lieutenant Narwhal, why isn’t our artillery supporting our infantry attack !?
I did the calculations, and it is better to attack unsupported, mon Général ! Our attack is on the 3:1 combat result table, and adding our guns would put us on the rather worse 4:1 result table !
What about committing the Cavalerie de la Garde ?
Inconceivable, mon Général ! We would still fall short of the golden 6:1 ratio but rather be on the dreaded 5:1 result table, and obviously we absolutely don’t want that !
I planned to finish the 1980 releases from Avalon Hill, but, because it’s Eurovision season, what better time to talk about a game in which half of Europe gathers for a contest of sort in some small European country no one usually talks about.
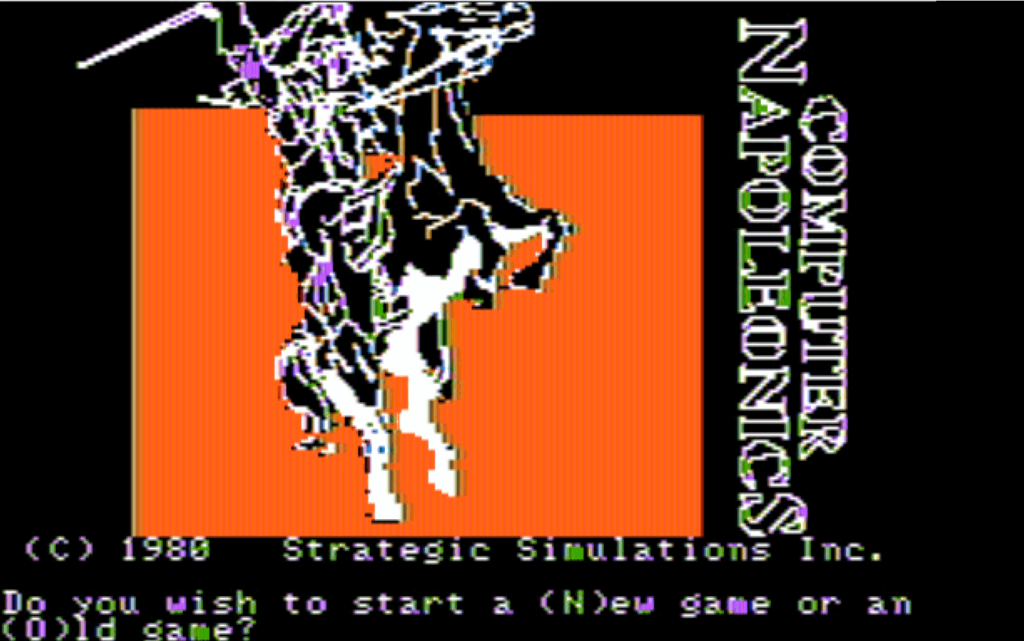
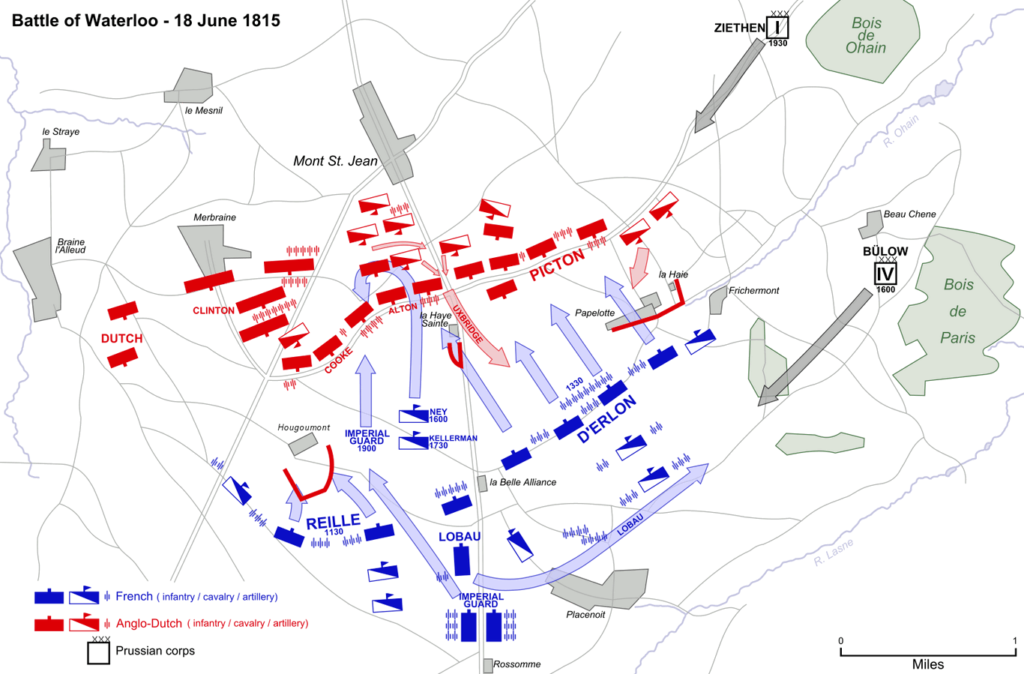
Released in September 1980, Computer Napoleonics is the third game released by SSI, and the second game designed and coded by John Lyon of Computer Bismarck fame. It features only one battle : Waterloo, a relatively minor squabble in 1815 where a German-Dutch army, supported by some British soldiers and later reinforced by a lot of Prussians, defeated an aging French general who only three months prior was retired by seaside. The battle may even not have been the topic of an early wargame if by coincidence it did not share its name with a Swedish schlager released only a few years before.
I am given command of the French, the only playable faction when playing solo. The only difficulty setting is whether I want the Prussian reinforcements to start arriving turn 2 instead of turn 3, which I accept.
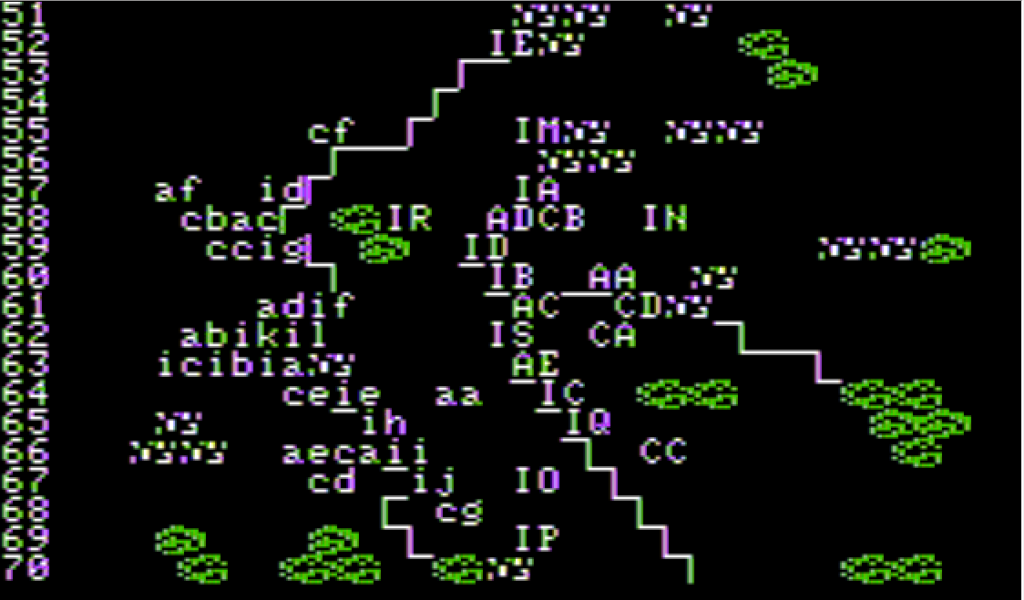
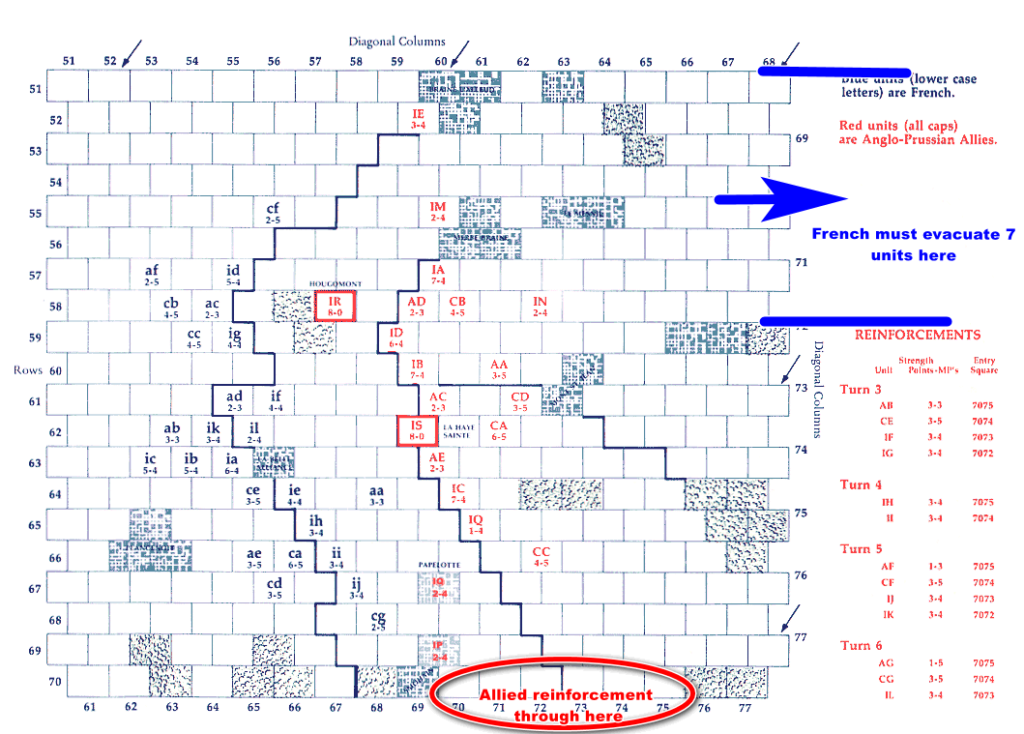
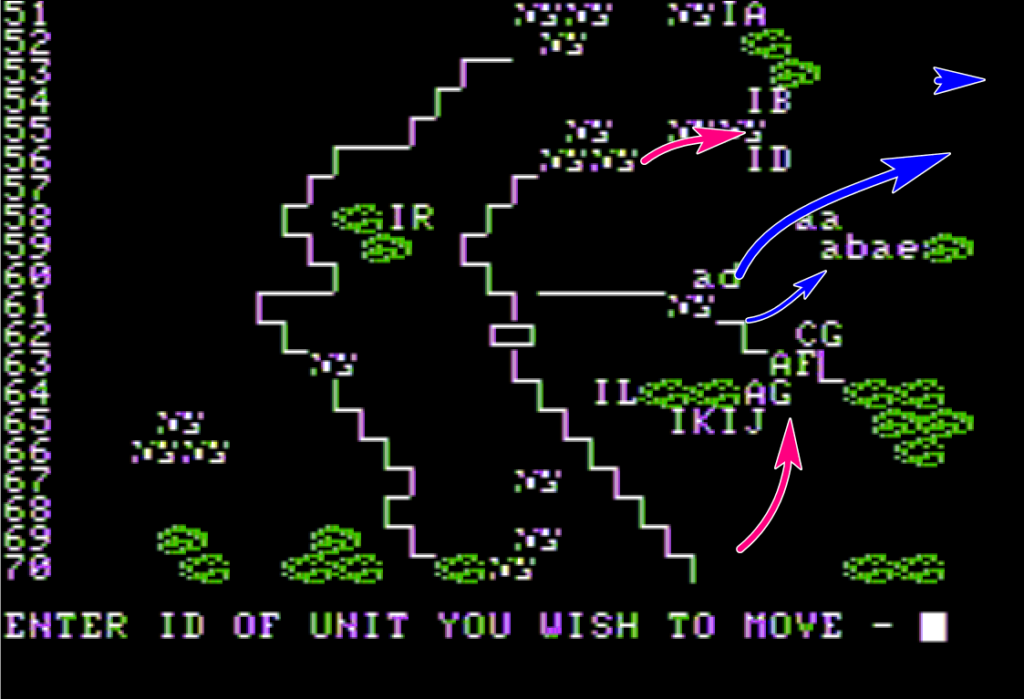
All units are represented by a two-letter code. The French forces are all those in lowercase, the allied forces are written in uppercase.
- The first letter is the type : (i)nfantry, (c)avalry, (a)rtillery.
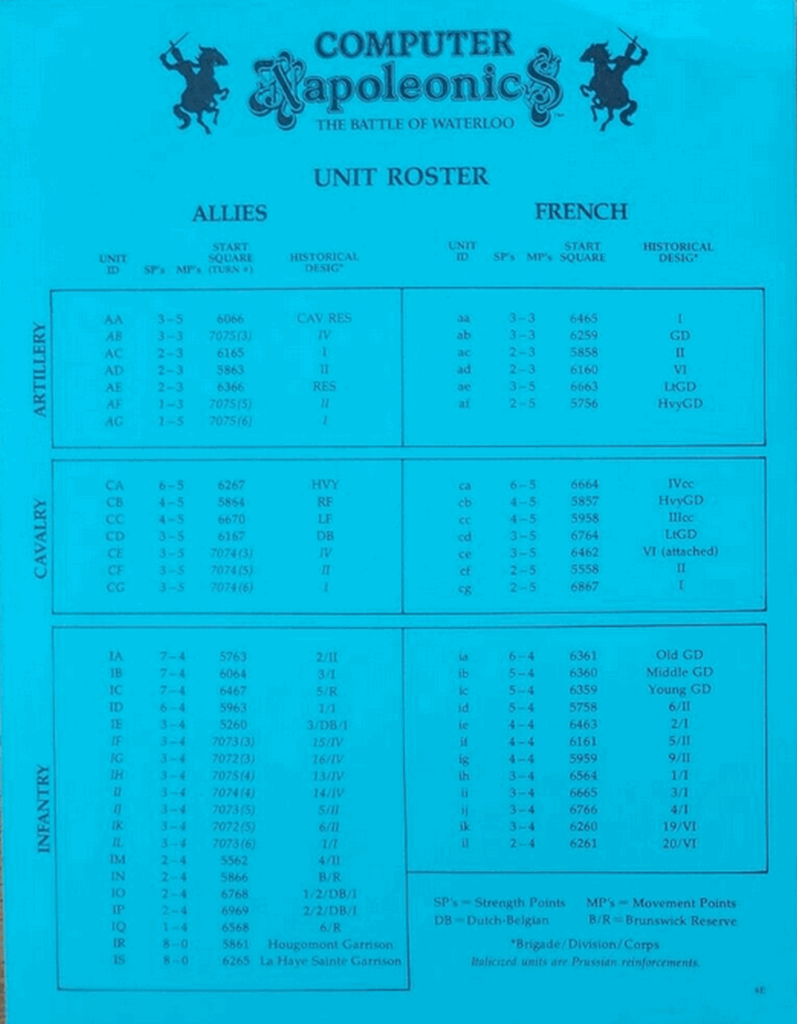
- The second letter is an identifier so you can check the unit strength on the reference card : the “earlier” the letter in the alphabet, the better the unit, so IA is better than ID which is better than IG etc.
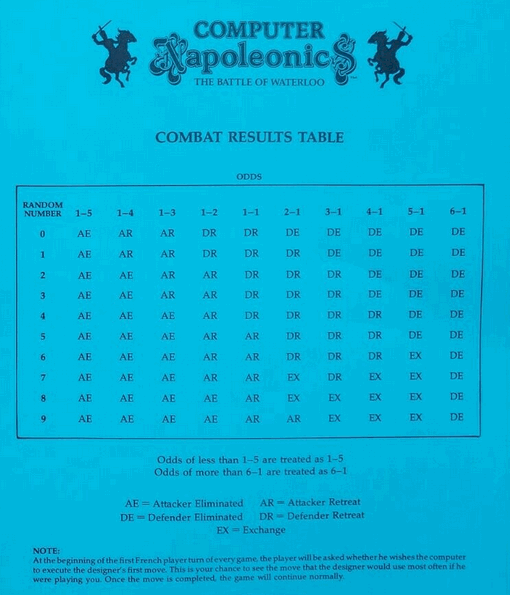
As for combat resolution, for now let’s just say that it follows a combat result table depending on the total strength of the attackers versus the strength of the defender, that above 3:1 ratio the defender is either destroyed (sometimes through mutual destruction) or pushed back, and at 6:1 ratio the defender is destroyed 100% of the time without mutual destruction.
The objective for the French is ambitious : destroy 60 strength points (50 in single player) of allied forces AND evacuate at least 7 units through the top-right border of the map, all this in no more than 10 turns.
The allied coalition starts with slightly inferior forces (65 total strength points for non-garrison units, vs 86 for the French), but :
- they are “in defense”,
- they lock the center of the map, with two garrisons of strength 8 in the farm complexes of Hougomont and La Haye Sainte. Those garrisons cannot move but as they are fortified in their building they have double strength,
- they have the best units in the game (3 units with 7 in strength, plus two with 2 in strength – when the French have at best two units with 6 in strength).,
- they will receive Prussian reinforcements starting from turn 2 in my case, for 35 total strength points over 4 turns,
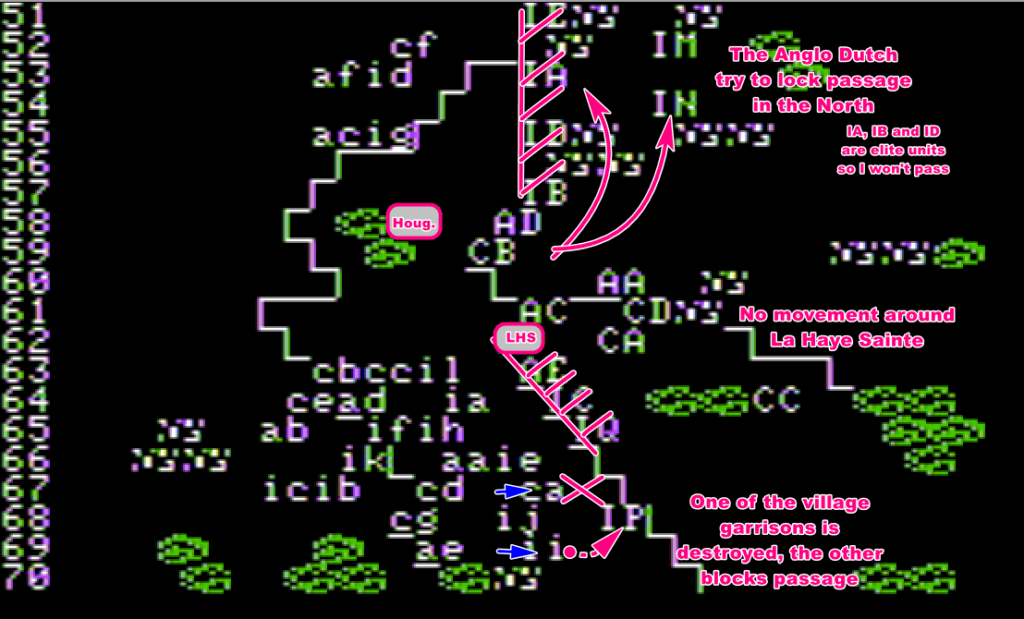
The fortified middle and the arrival of reinforcements pretty much determines my strategy below :
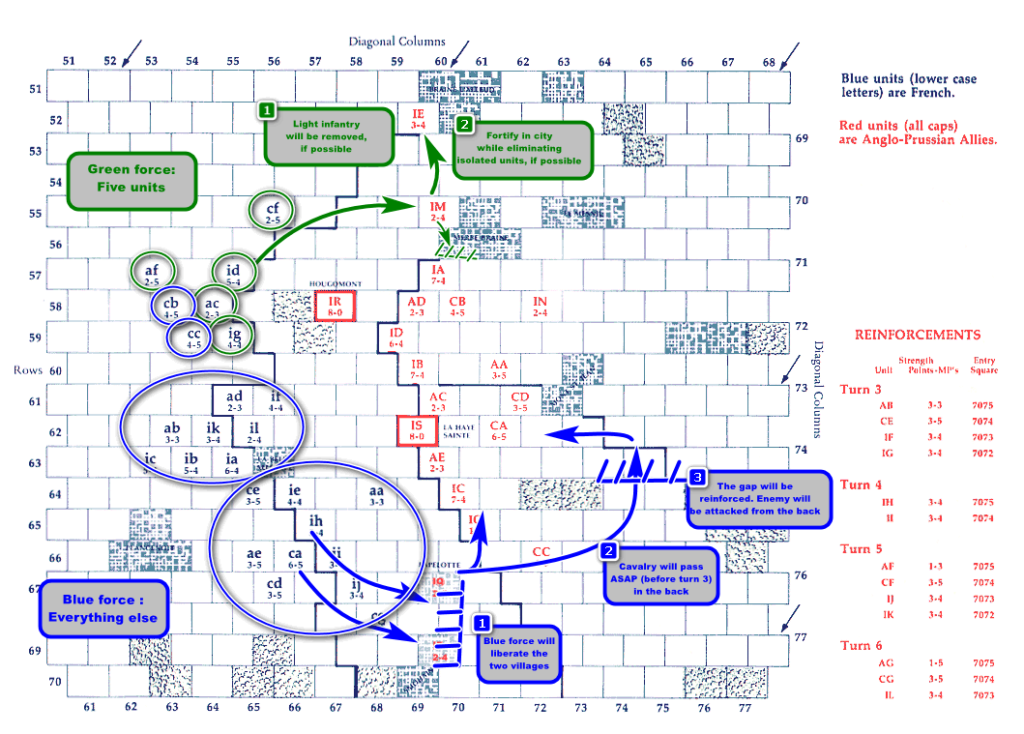
I will keep a token force North, mostly to harass isolated units and more critically force the allies to commit some defenses there. Meanwhile, everything else will be concentrated in the South. There, my three-steps plan is to
- Break through the thin infantry line of the Dutch-Belgian brigades and drive a wedge between the Anglo-Hanoverian-Dutch and their allies before the latter even arrive on the battlefield,
- Bottle-up the arriving Prussians between the villages (which will give me double strength in defense) and the two forests (which are impassable in this game),
- Use my cavalry to strike the Wellington’s forces from the rear while the infantry will attack from the South of the map.
As an added bonus, my plan sounds positively Napoleonic. Everything needs to happen in the first 2 hours (=2 turns), else I will be in trouble.
And the battle starts !
Turn #1 – 12 am to 1 pm : Assault on the South, Belgian resistance
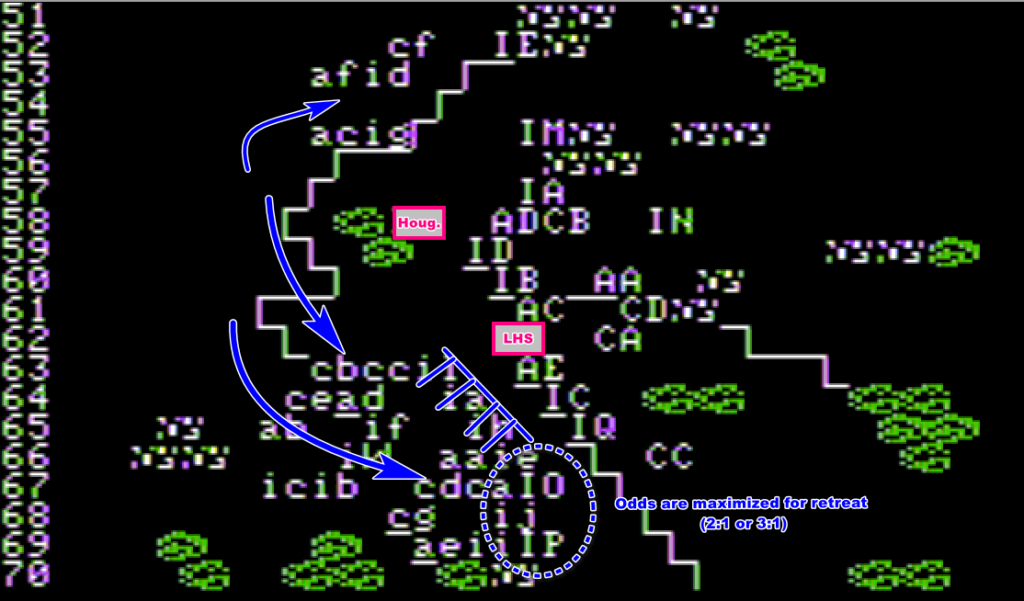
The French assault starts in the South. I set up a wall of infantry in front of the allied forces to avoid a counter-attack on my flanks, and attack the villages in the South.
After the movement phase, it is the combat resolution phase. Both enemy infantry units retreat, my forces follow-up. Forced into combat again, the Dutch Belgians infantry will have to fight at overwhelming odds, except if they receive reinforcements.
Unfortunately for them, Wellington wisely did not weaken his line to support the Belgians.
Less wisely, Wellington decides to allocate a very large share of his troops to build a wall of men in the North, but barely moves in the South. Some may see AI weakness, what I see is traditional British behavior : let the other countries fight for them by moving as far as possible from the French, then claim victory !
One of the Belgian brigades, forced into combat again, fights at 1:6 strength ratio and is destroyed, the other fights at 1:4 strength ratio, which according to the combat result table gave it 80% chance to be destroyed but still it manages to survive and retreats further.
Turn #2 – 1 pm to 2 pm : Assault on La Haye Sainte surroundings, here come the Prussians
The Dutch-Belgian resistance is bit problematic for the French who expected to destroy both brigades. Given my troops cannot immediately exploit the open ground South East of the map, I decide to start attacking the enemy main battle line, especially since Wellington moved a large chunk of his reserve North – leaving only one elite 7-strength infantry in the South : IC [aka Sir Thomas Picton’s 5th division of the Reserve Corps, for those of you who are Napoleonic connoisseurs]
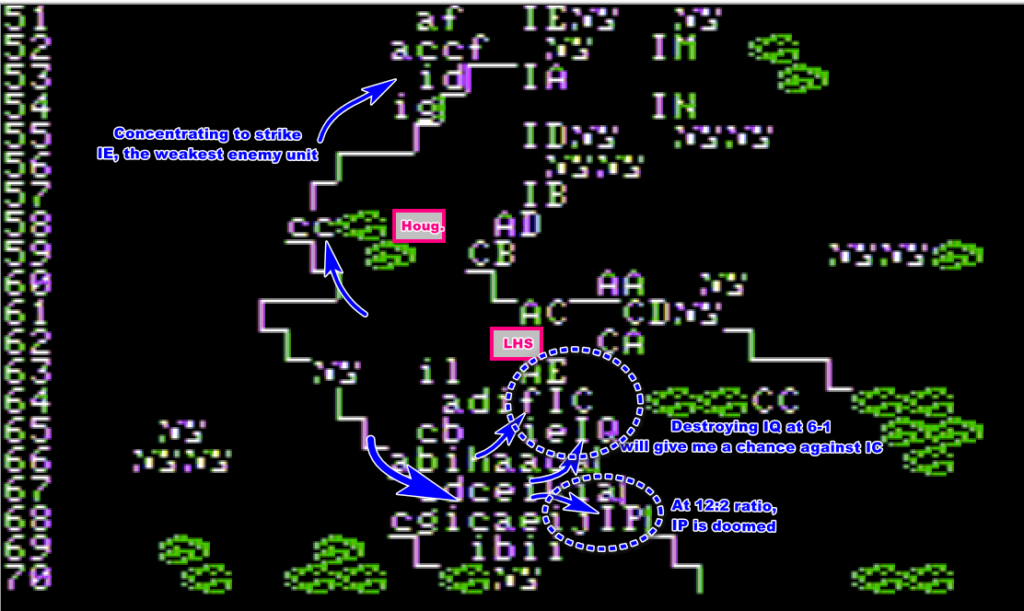
Unfortunately, while IQ Sir Lowry Cole 6th division of the Reserve Corps collapses under the attack of ca the elite cavalry of the IV French Corps led, IC Thomas Picton’s men managed to push back ie the French second division of infantry.
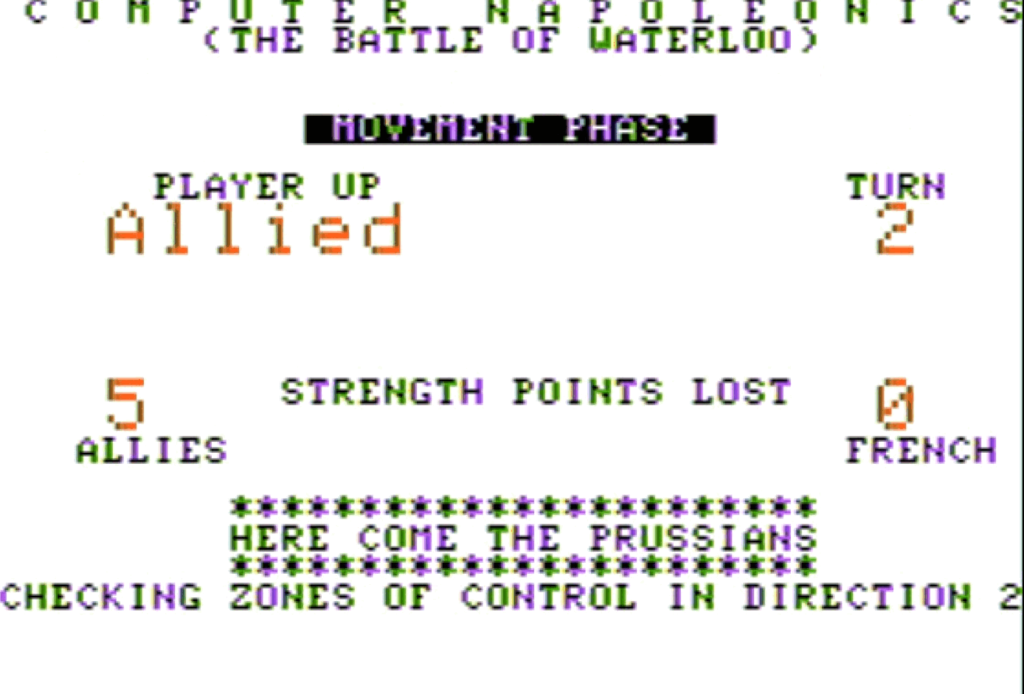
Well, it is the second hour of battle already, and as expected … HERE COME THE PRUSSIANS !
Blücher (the Prussian general) launches some disorganized attacks against my force, but does not manage much more than to lose half his infantry. As far as I understand, the AI decided it would put its troops at some prepared locations, and totally ignored that the whole French army was on the way.
Turn #3 – 2 pm to 3 pm : The wedge is set, bloody combat around La Haye Sainte
“Wait, my plan can still work”
Given the Prussians did not set up a defensive line, I decide to carry on with a delayed version of the original plan and push strongly in the South-East while creating a line of defense to contain future reinforcements.
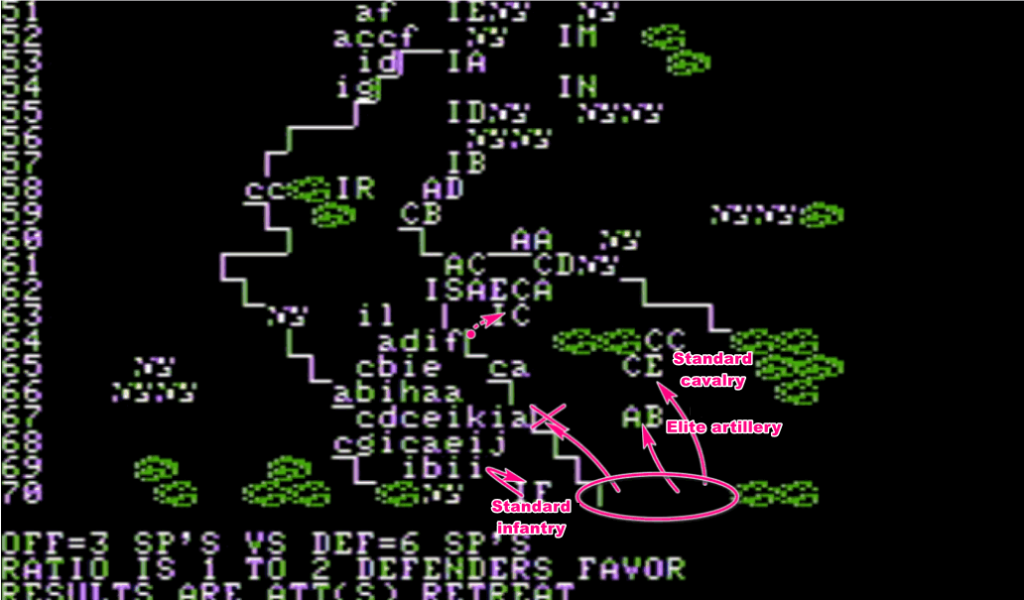
I am particularly interested in destroying the German artillery [AB]. The Prussian cavalry (CE) is in position to support it defensively, so I need to risk my fourth division of infantry (ij) to pin the cavalry. Once it is done, the artillery can be attacked from all sides at 6:1 ratio.
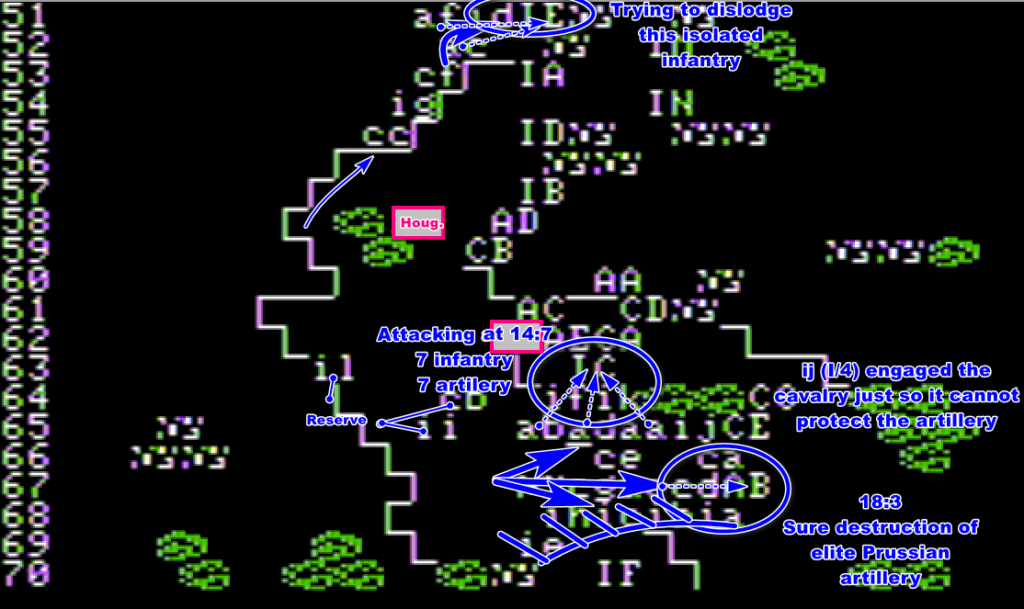
On the rest of the front, I renew my assault on Thomas Picton’s 5th division with concentrated artillery fire and artillery assault. In the North, I try to destroy the Third Netherlands Division (IE), relying on a simple infantry assault and heavy artillery support.
Thomas Picton’s men are finally destroyed, but so is my infantry due to the dreaded “exchange” result on the combat table. As for the other melees, they are always in my favor : the artillery is destroyed, the other forces are pushed back.
The Anglo-Dutch remain static in the middle, whereas the Prussians, who received new reinforcements (the rest of their 4th division : two brigades of infantry), do more inefficient attacks in the middle.
So, update, forget what I said earlier, everything is roughly according to plan.

Four hours into the battle, the wedge between the Prussians and the Anglo-Dutch is there, but I am still to try to pass in the Anglo-Dutch rear, and the passage is protected by both English (CC) and Prussian (CE) cavalry.
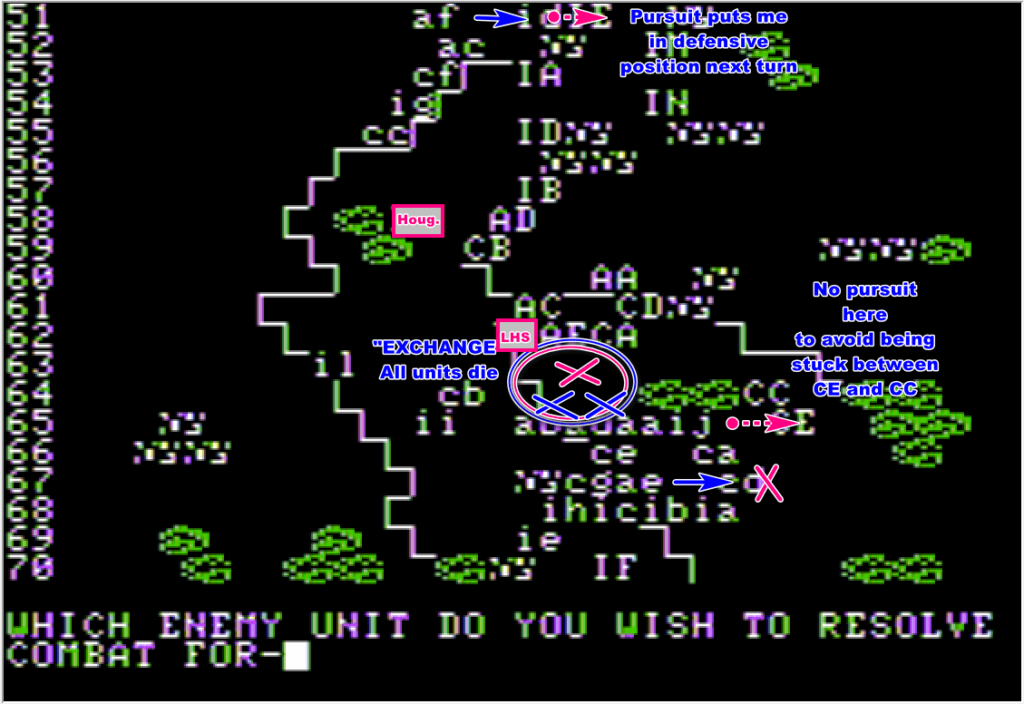
Turn #4 – 3 pm to 4 pm : Slow push by the French, the Prussians are delayed
Well, that’s the next steps for the French then :
My cavalry, supported by artillery, tries to breach the narrow gap between the two forests defended by the English cavalry. I am also challenging the surrounding of La Haye Sainte, while still holding my wall against the Prussians.
The result is more exchange in the center (this time destroying enemy artillery) and more resistance in the South-West. In particular, the English Cavalry manages to retreat in order, still blocking my way !
At least, I pushed back some of the elite infantry in the North and destroyed another Dutch division, through at the cost of my own cavalry.
Wellington does not receive any Prussian reinforcement this time ; he reorganizes his line in the North but totally ignores the threat in the South, though his Cavalry is still holding the line. The German Cavalry (CE) goes who knows here.
Turn #5 – 4 pm to 5 pm : The French pour from the rear of the battlefield
At least I have some maneuvering room for my cavalry, this time I manage to totally surround the English cavalry (CC), so it is bound to be destroyed. This allows me to dismantle my anti-Prussian wall and to bring the troops back to the center : my “South-Center” attack has been blunted by successive exchange results and what was left is now facing the elite English Heavy [“Household”] Cavalry brigade.
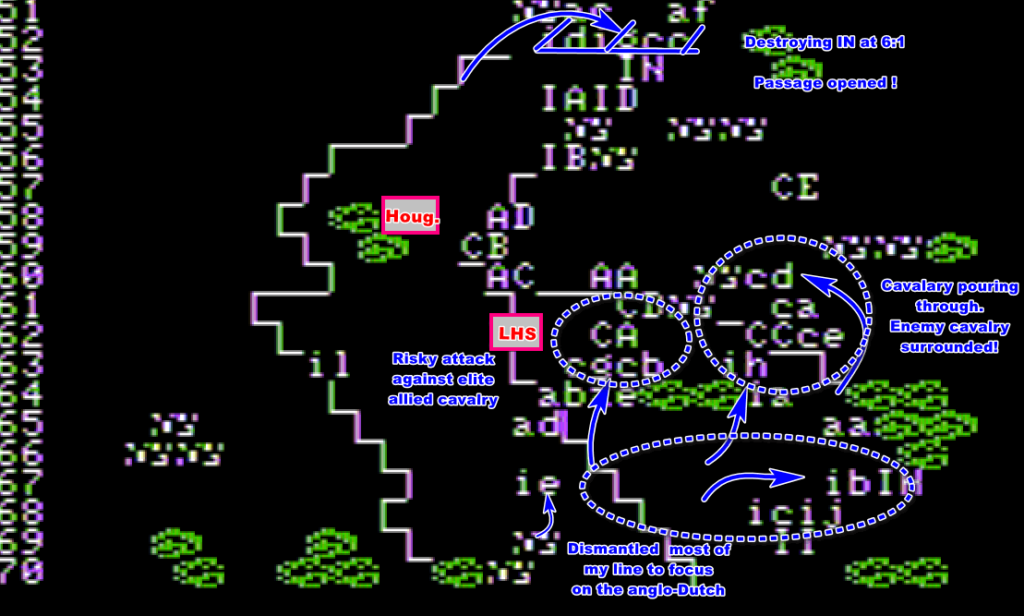
The English household cavalry holds the line, pushing back my assault. The artillery blocks any retreat to the South for my cavalry, one cannot retreat and is destroyed, while the other retreats East. At least, the English cavalry that was protecting Wellington’s rear is annihilated.
Still no reinforcements for Wellington, it turns out it is due to the Prussian infantry (II) retreating in line 70, and the Prussian does not receive any reinforcement if any unit is on line 70.
It is not an exploit if you did not do it on purpose !
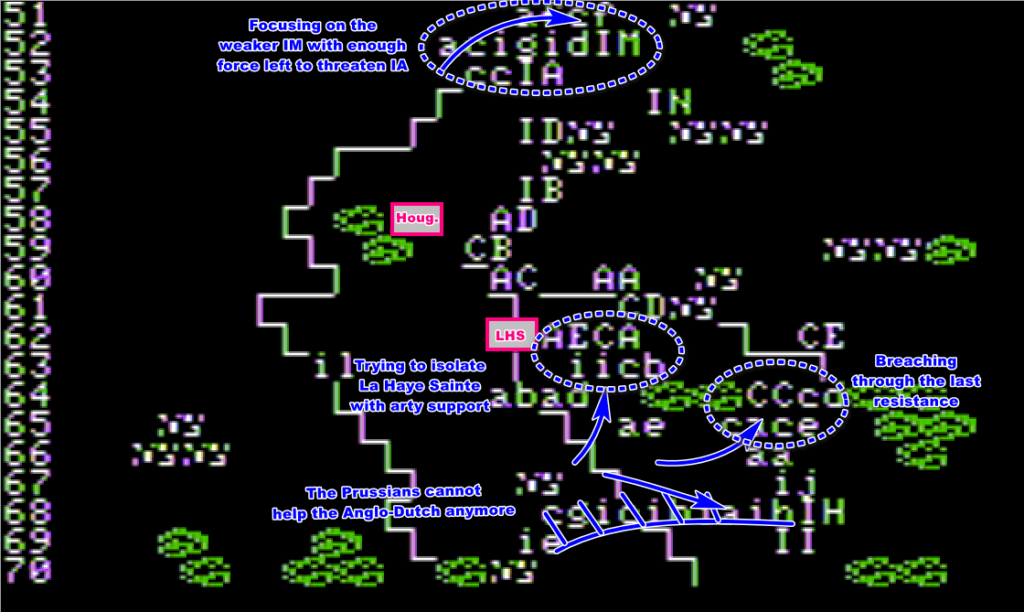
Turn #6 – 5 pm to 6 pm : Crushing the Anglo-Dutch center, Wellington’s failed counter-attack
It is the end. Wellington’s center had held so far, but now I can fall on him with overwhelming cavalry and infantry from the rear, including the Old Guard that I am certainly not going to keep in reserve like that aging general did. I also attack with some force from the South, including a powerful artillery barrage !
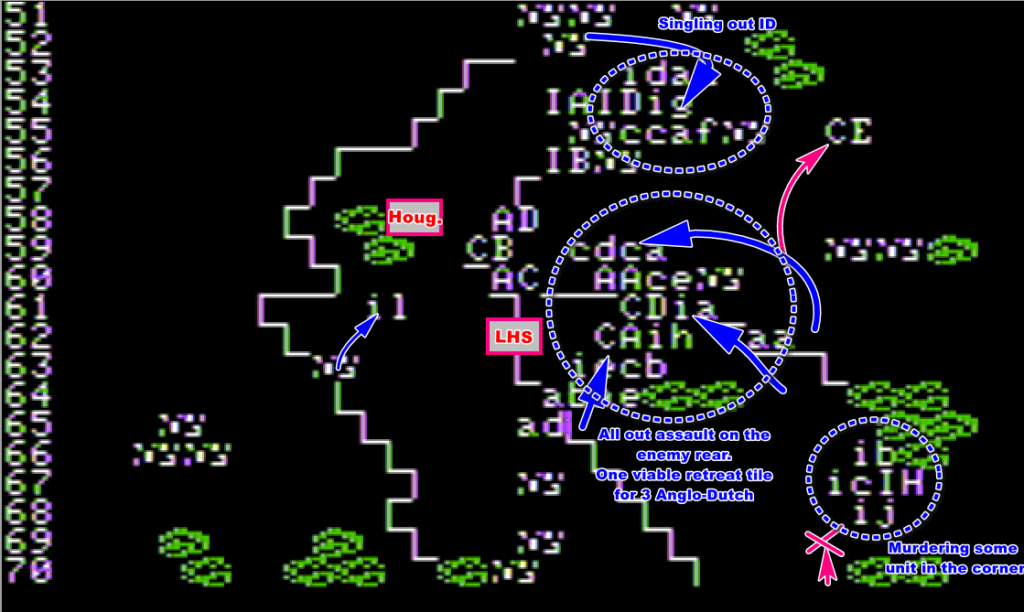
Long story short : everyone I don’t like in the center dies.
Elsewhere, the melees are less successful, but this is becoming less and less relevant.
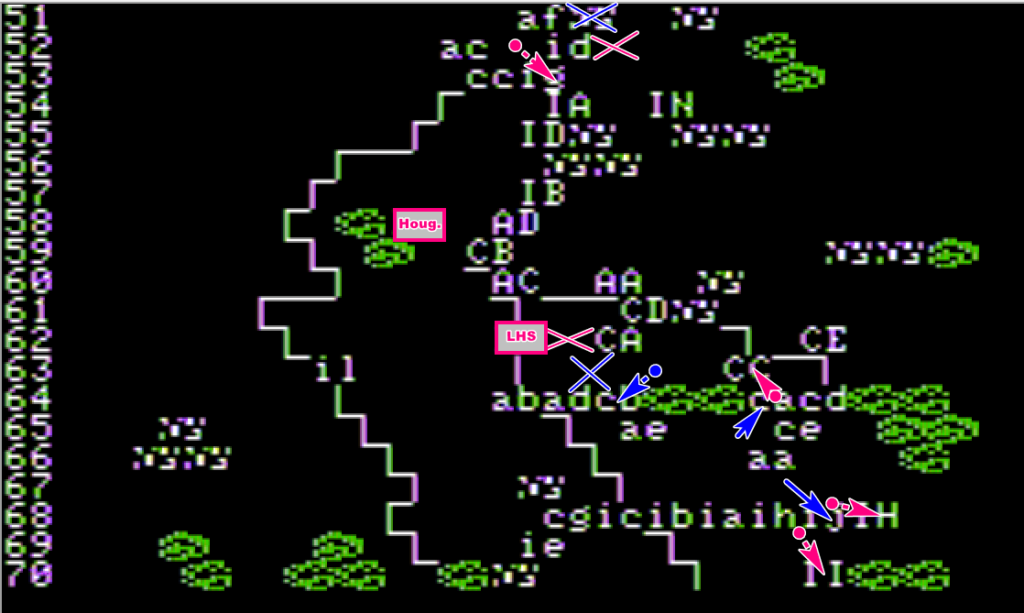
The rest of the Prussian reinforcements are finally there, and Wellington is pulled out of passivity. The remaining allied forces attack the French wherever they can : their elite infantry in the North, what’s left of their force in the center, and the Prussians in the South-East. The attacks are mostly ineffective though.
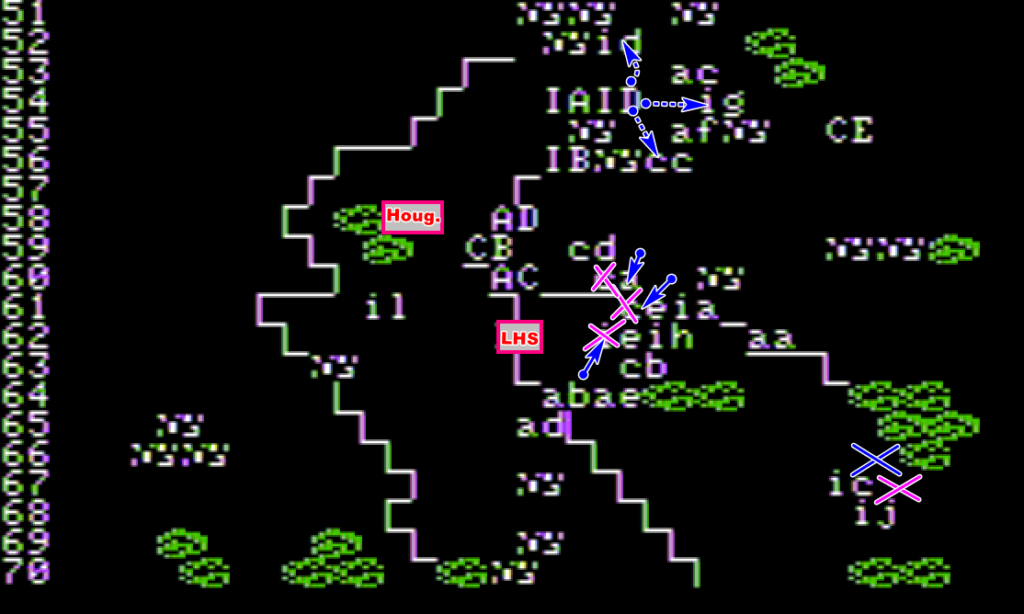
Turn #7 – 6 pm to 7 pm : Destruction of La Haye Sainte
At this point, the Allied Forces have lost more than half of their total forces, and are as such demoralized (the combat resolution table is moved one rank in favor of the French) :
It is time to prepare for the evacuation of 7 units, which means removing the Prussian IV Corps Cavalry (CE) protecting the evacuation route. The French horse artillery (af) is hopelessly engaged with the English infantry and cannot be saved – it is left behind.
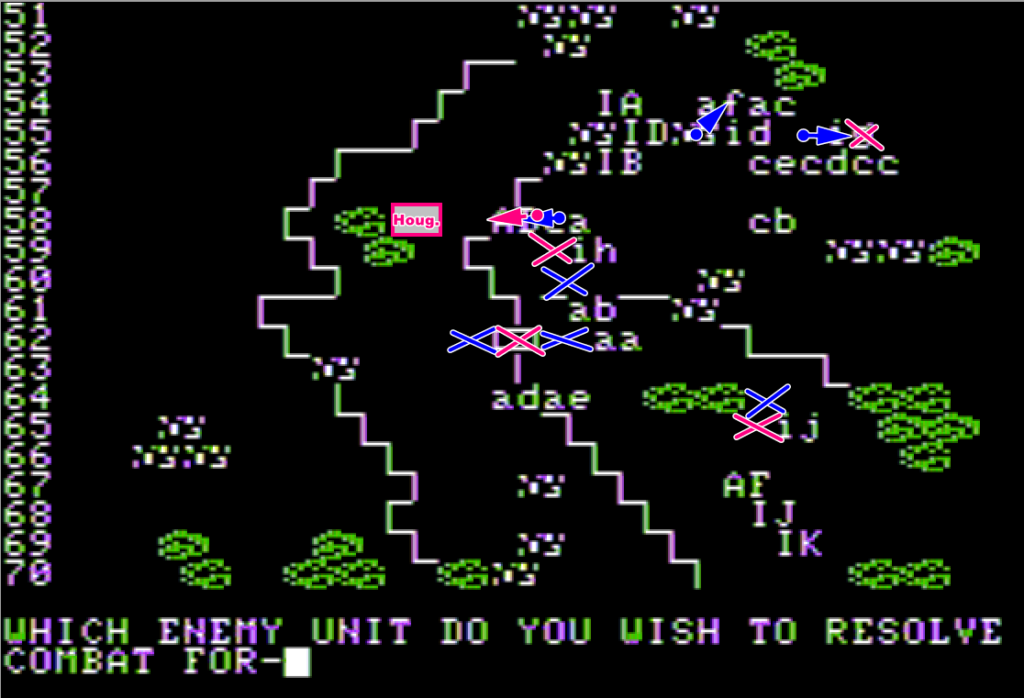
Meanwhile, the French forces in the middle of the former English lines take upon themselves to finish off any mobile force :
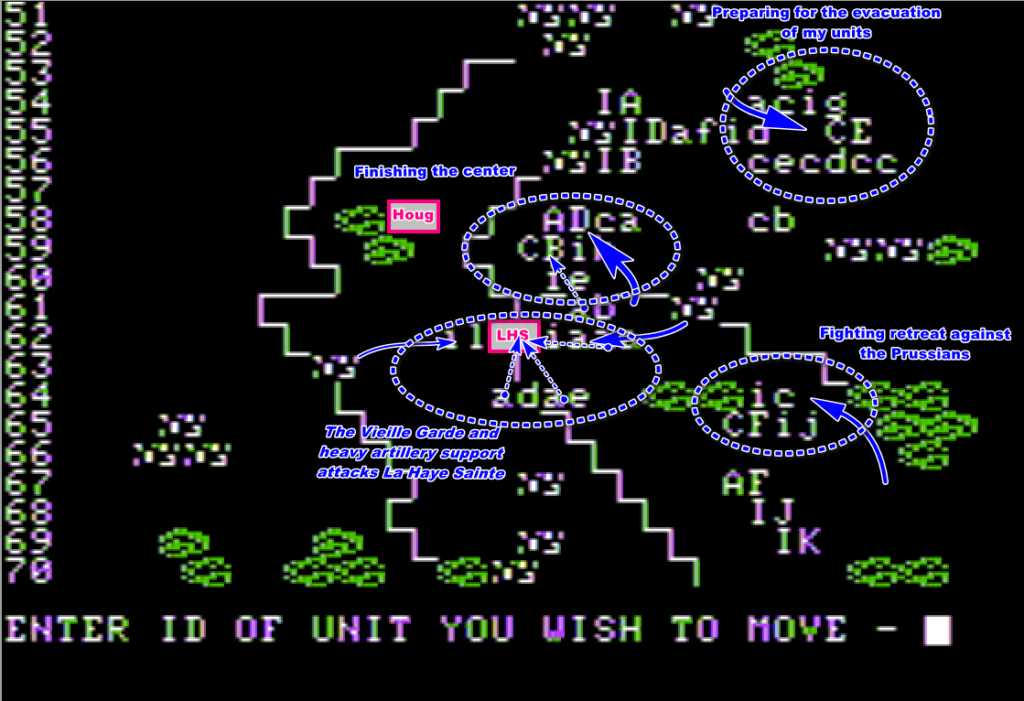
The melees are extremely bloody, with a lot of “exchange” results. The Vieille Garde is destroyed, but so is the garrison of La Haye Sainte :
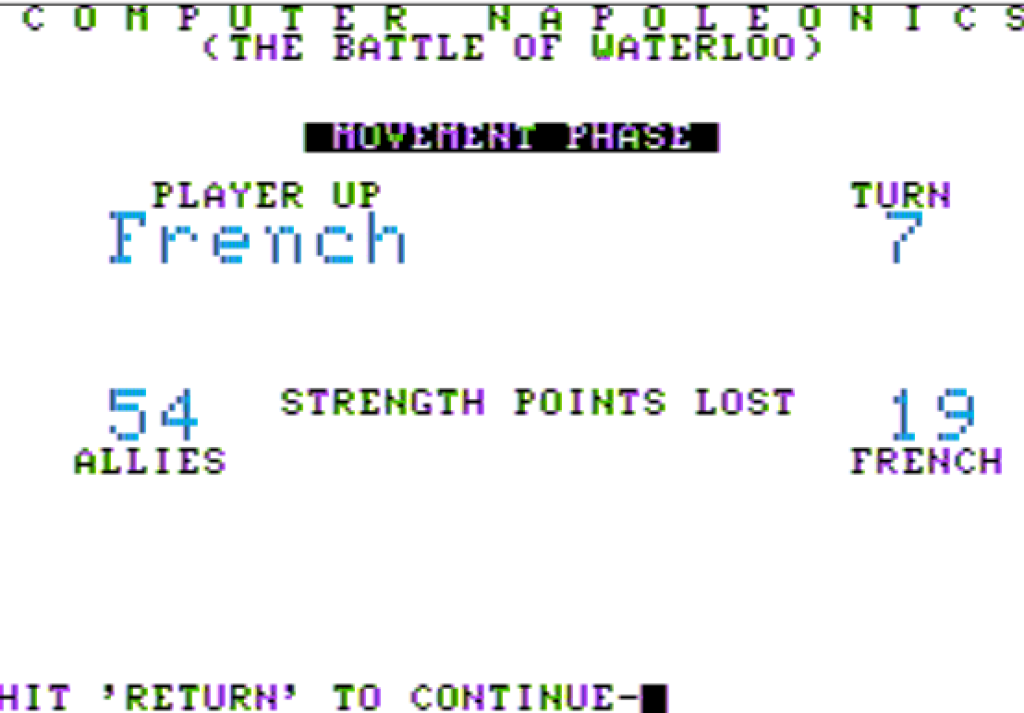
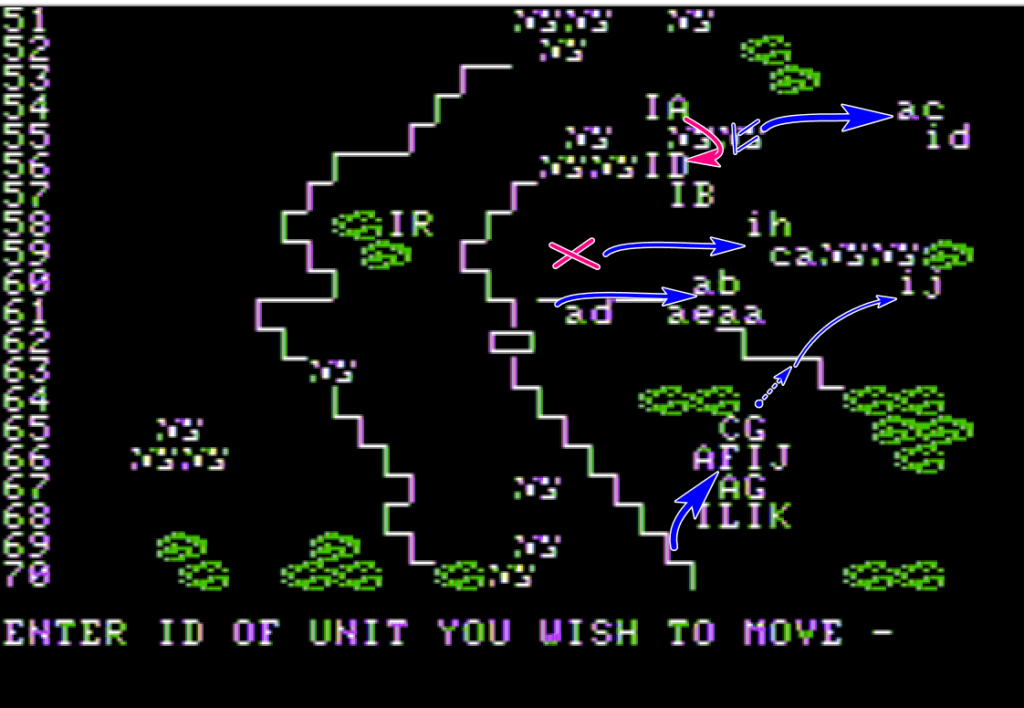
Turn #8 – 7 pm to 9 pm : The French leave the battlefield
In the previous hour, the total losses have escalated to 75% of the Allied forces and 40% of the French forces :
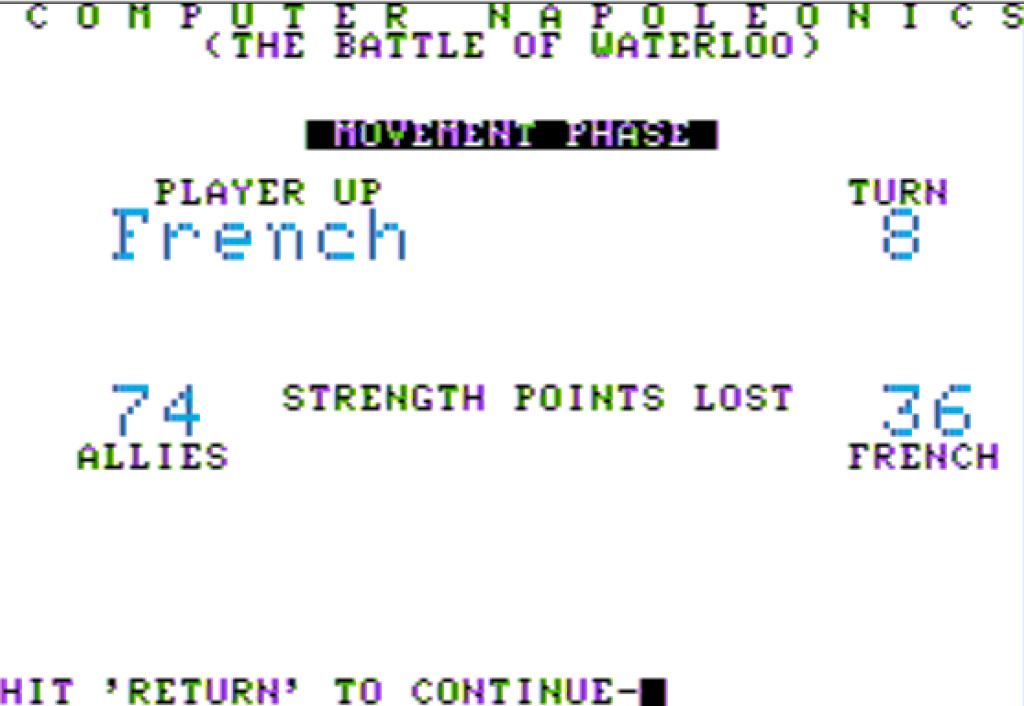
The French only have to leave the battlefield, which would take two hours. Entrenched in a village, the 6th division of infantry resisted the last British attempt to block the evacuation of the French force, before they evacuated themselves.
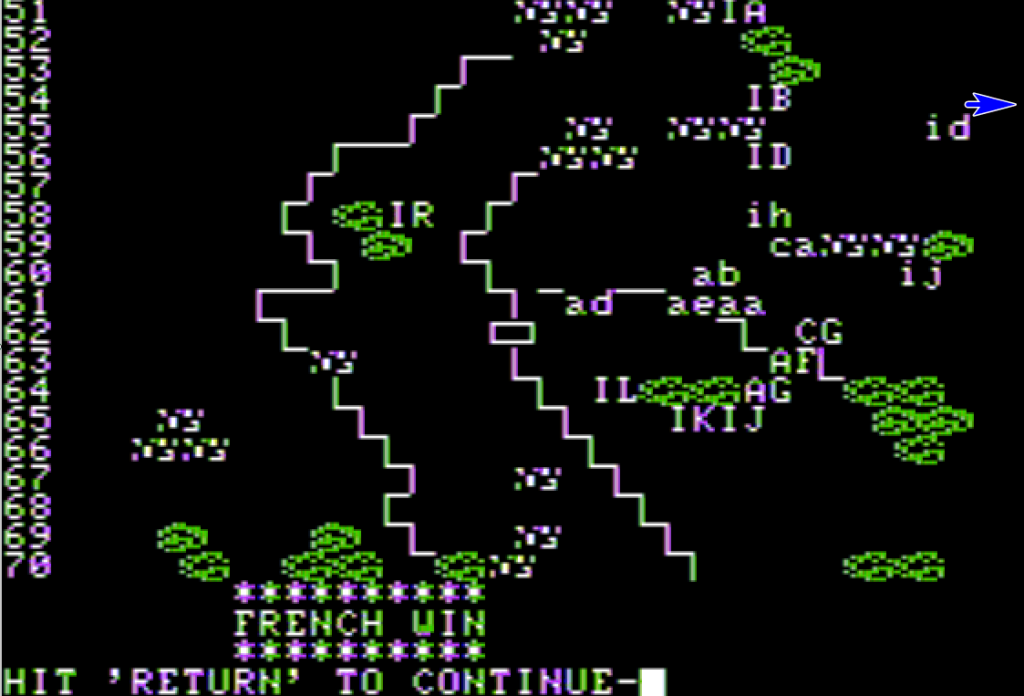
The battle of Waterloo was an unmitigated success for the French. Costly, certainly, but a night in Brussels would compensate that.
Conclusion / Analysis of the battle :
Overall, everything went according to plan, which is quite rare for a game I have no experience on – I had only played 3 “test turns” to understand the rules of the game before playing this AAR. Further to this, I don’t believe I was especially lucky, more the opposite, with the Belgian-Dutch infantry and later the English cavalry surviving against overwhelming odds, and then a lot of “exchanges” when the most likely outcome was the enemy destruction (in general due to impossible retreat).
I refused to fight the Prussians “cheaply” by positioning troops on line 69 (in which case Prussian reinforcements would have spawned on the map engaged in combat, and with no retreat route would have been destroyed very easily), but I “exploited” without knowing by pushing Prussians back to line 70 ; nonetheless I don’t believe that without the two-turns delay for the second half of the Prussian reinforcement the battle would have turned any different – by that point I was already crushing the allied center.
As to whether the strategy and the outcome were realistic and could have happened in real life …. Hell no. Obviously, as much as we french like to call Wellington overrated, he would never have been so passive in real life. In addition, the French would never have put their army right between the Prussians and the English at the risk of being boxed in.
In this After Action Report, I discussed as little as I could the “rules” of the game, this I will do in my Review & Rating. As you will see, they have quite a few oddities.
2 Comments
Very hard game to showcase ; in 1981 we will have more of that kind so please give me any feedback you have on the format 🙂
The battle may even not have been the topic of an early wargame if by coincidence it did not share its name with a Swedish schlager
😀
For the AAR itself, it was readable (mostly via the use of the symbols on the game map), which could have been an issue with a game where units are represented by two-letters codes