Previous episodes of the Guadalcanal Campaign : Intro & Coral Sea, August,
Back to the Guadalcanal Campaign ! August had been a good month for the US Navy, with one Japanese carrier sunk and another disabled. Of course, the last week of August had been less kind to the US Marines, left starving and under fire of Japanese battleships.

But this regrettable situation was about to end. The transport ships in Espiritu Santo were refuelled and filled to the brink of supplies and marines. The fleet carrier Hornet was on site, ready to escort the supply. By the time the supplies would arrive, the Wasp would be ready in Brisbane. With two fleet carriers and sufficient supplies to run combat air patrol from Henderson Field, the control of the Solomon Islands would change. Supplies were essential: less than 3 supplies on Guadalcanal, no air mission. Oh, and also the Marines get hungry without food, apparently.
1st – 4th of September 1942 – The second battle of Savo Island
Three fleets leave Espiritu Santo on the 1st of September :
- The merchant ships themselves, with minimal escort, but the transport destroyers can contribute to the defense somehow,
- The Hornet, escorted by only a few destroyers in case I encounter submarines – it is not supposed to ever get in range of Rabaul and I don’t expect Japanese aircraft carriers either,

- Finally, the reason why I am so light on escort for my transport and my carrier : my surface combat fleet needs all the punch I can muster,
I learned my lesson in August on the impact of a specific rule in the manual : the Japanese always shoot first, except against American fleets with a combat mission (and the mission cannot be changed after the task force is created). Having a fleet in combat mission to escort my ships during the night is therefore necessary. I believe this fleet will be sufficient against Japanese destroyers and light cruisers. As for battleships, I will detect them in advance with my carrier.
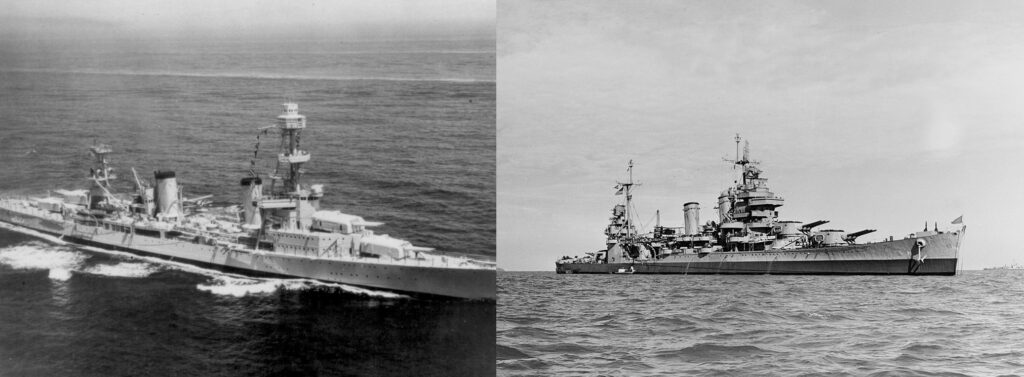
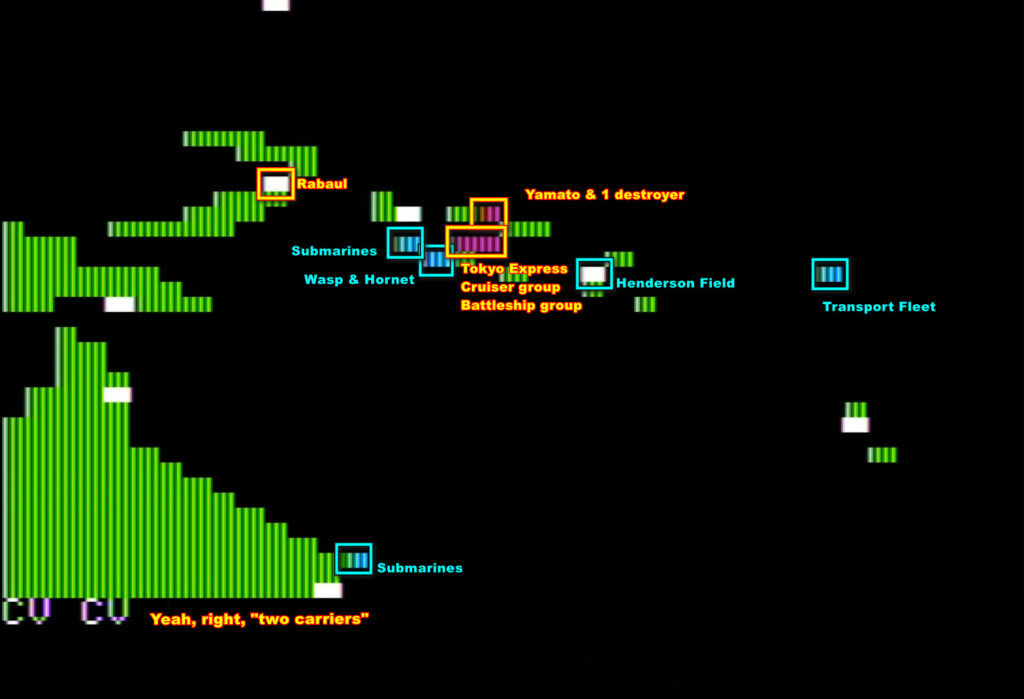
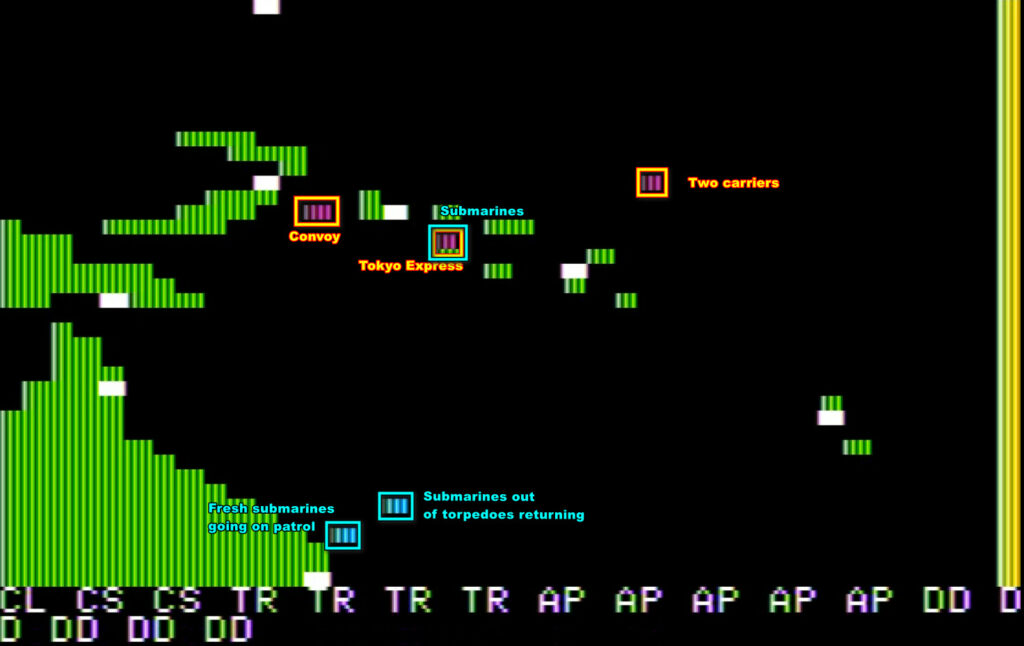
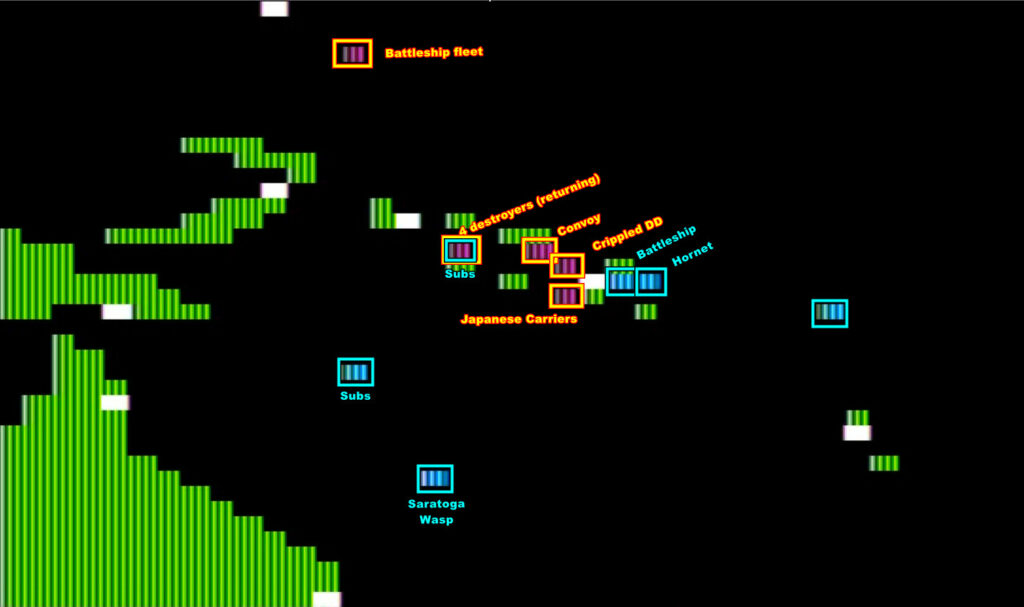
On the 3rd of September, as my fleet is close to Henderson field, I get a bit of a surprise :
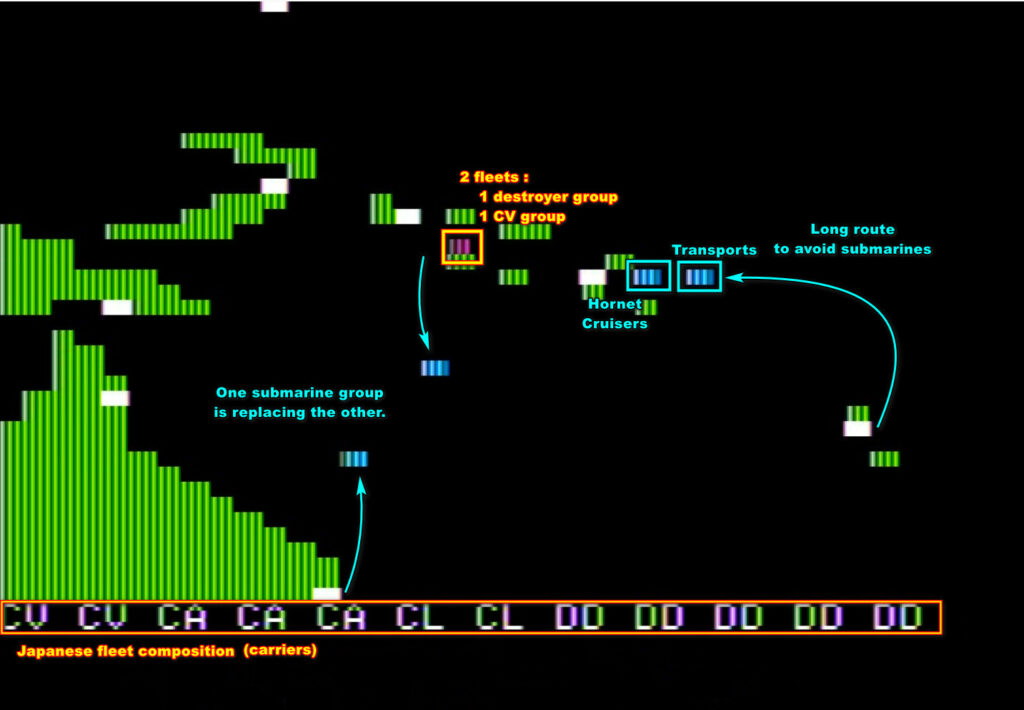
My planes from the Hornet detect a group with two Japanese carriers. It is a bit puzzling, because at this point in the campaign the Japanese have received only 3 carriers, and I know that one has been sunk and the other is too damaged to be there. This means that the Shōkaku is back already after express refit and repair in Truk… but then that means it did not have the time to embark new planes. As for the other carrier, it must be another ship my men misidentified, possibly a seaplane tender, and those are inoffensive.
There is another group of destroyers, probably part of the Tokyo Express intending to land some troops on Guadalcanal.
This changes my plan a bit : I want to approach my carrier to seize this unique opportunity to destroy the Shōkaku. But 4 destroyers will not be enough to protect against an attack from Rabaul, so I need fighters from Henderson Field… which means I need supplies there.
The only way to do this is to detach my fastest transports (the destroyers) to land supplies during the night, and escort them with the cruiser force. Meanwhile, I will transfer fighters and bombers from Espiritu Santo to Henderson Field. On the 4th, I will then push the Hornet a bit – while keeping close enough to Guadalcanal to be protected by the Cactus Air Force – and I will attack the Shōkaku, if it is still there.
And so I start landing during the night of the 3rd already, escorted by the cruiser fleet. There is one flaw in my plan though…
… my pilots totally misidentified the enemy ships – that’s not two carriers, that’s one battleship followed by four heavy cruisers, and they were heading straight for Guadalcanal where my cruisers are expecting to meet some destroyers ! My cruisers shoot first, but that does not save them !
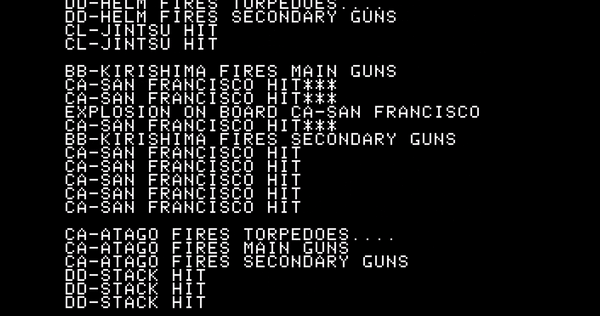
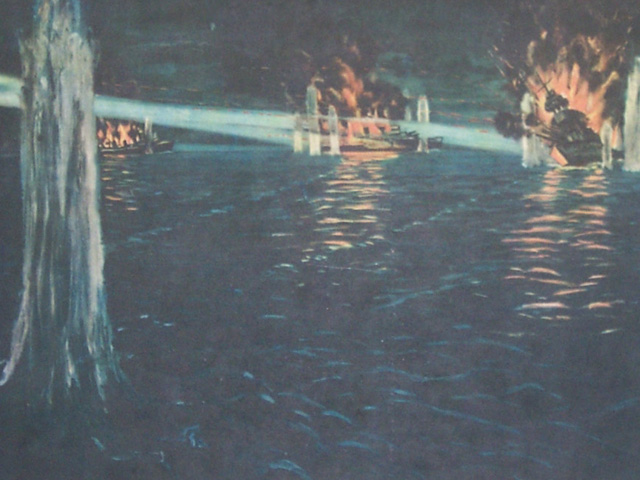
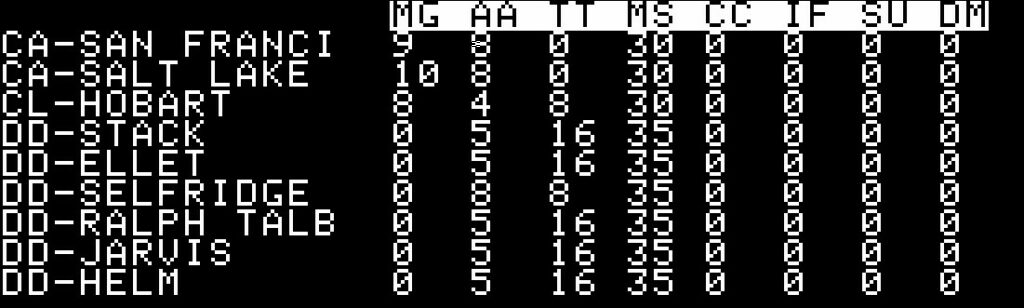
I shoot first and sink the Atago, but the counter-attack is devastating. The heavy cruiser Salt Lake City is blown out of the water by the enemy cruisers, the San Francisco is also devastated by the Japanese battleship Kirishima, and sinks immediately. I also lose two destroyers, the Stack and the Ellet.
Those are some devastating losses, and it’s not over : the Japanese battleship then bombards the airport, destroying between 25 and 30 of my newly arrived planes ! At least they don’t attack my transport ships.
The Japanese retreat before the dawn of the day, and I cannot even pursue : my air cover from Henderson Field is not as strong as expected, and I don’t want to risk a carrier to maybe sink a battleship.
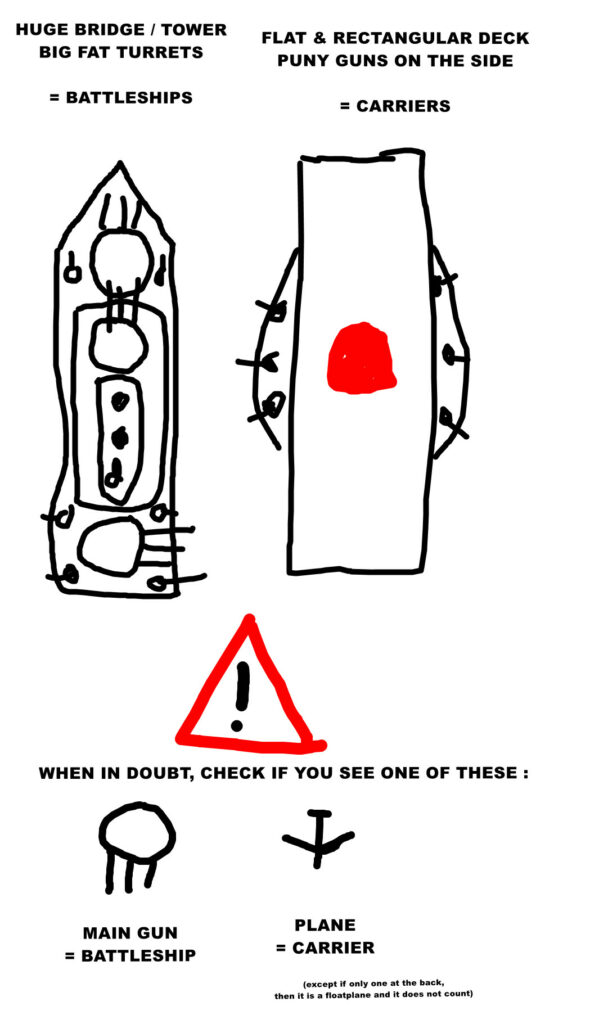
Meanwhile, learning from the experience, I distribute this handy recognition guide to my pilots :
5th – 7th of September 1942 – The Yamato
With the Japanese battleship clearly returning to her base (combat costs a lot of fuel), and no other ships incoming, I can proceed to land the rest of my troops and supply, with air cover from Henderson Field. Meanwhile, the Hornet is ordered to join up with the Wasp, which left Brisbane on the 3rd.
Japanese Bettys attack my landing force from Rabaul on the 5th, but the Cactus Air Force shoots down a good chunk of them, and the rest does not do any damage to the landing fleet. A small engagement with a Tokyo Express during the night only results in minor damage for both sides. On Guadalcanal, I start some offensive to destroy the Japanese forces that landed in late August :

A few days later, Guadalcanal will be Japanese-free again, with minimal American losses.
Meanwhile, the Hornet and the Wasp regrouped and this time I am ready for offensive action : the Bettys from Rabaul have been culled during their attack against my landing ships, and I have some significant escort this time.
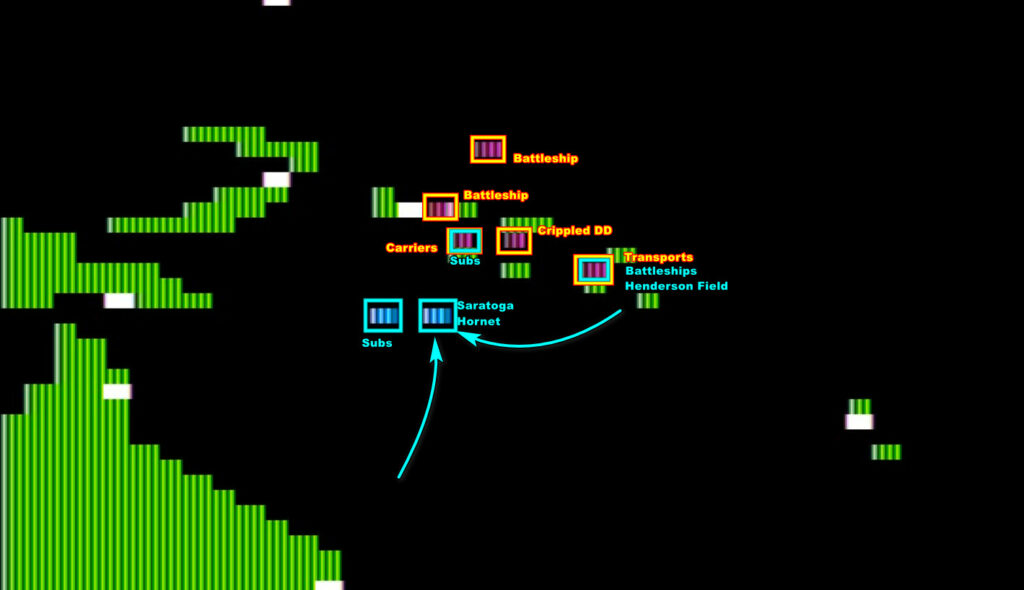
And on the 6th, I approach the usual Japanese route, and boy is there traffic : 2 battleship squadrons !

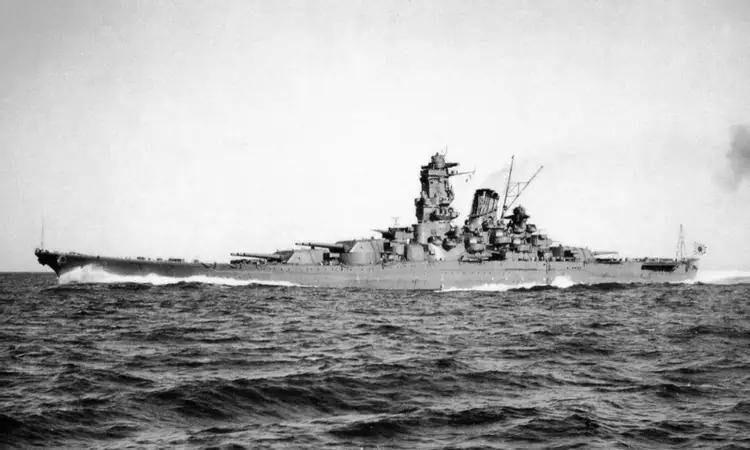
My airmen from both carriers attack the closest group and what do you know… they find the pride of the Imperial Japanese Navy : the Yamato ! The 33 Dauntless bombers from the Wasp miss her (though they hit one of her destroyer escorts twice), but the 15 Avenger torpedo-bombers don’t :
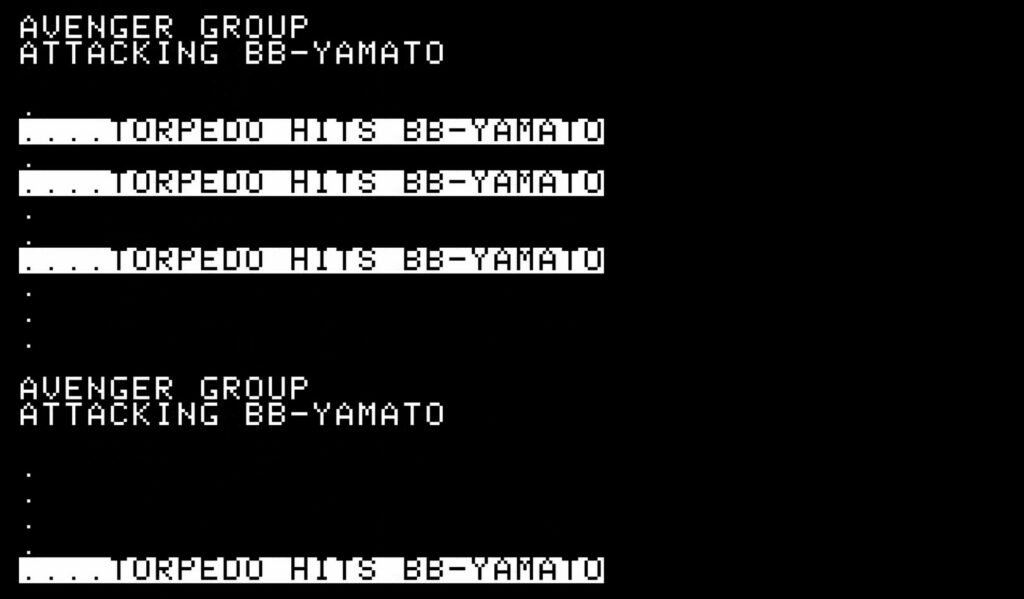
The 53 bombers from the Hornet arrive immediately thereafter, and they are now attacking a crippled battleship – hard to miss. Hit five times by bombs, and once more by a torpedo, the Yamato is nonetheless still floating ! The rest of the escort receives additional damage, with in particular the Heavy Cruiser Suzuya receiving a torpedo as well.
Meanwhile, the Wasp and the Hornet are attacked by Bettys, but most of them were shot down by the escort, with no damage for the US Fleet.
The night falls, and it is not possible to finish off the Yamato immediately. During the night, Henderson Field receives a mighty bombardment from the other battleship group but my planes were evacuated during the day.
As soon as the sun rises the morning of the 7th, the US plane is on the lookout for the largest battleship in history. And she is quickly found, limping North only accompanied by a destroyer as badly damaged as she is.
The planes from the Hornet decide their top priority is finishing off the destroyer (the Shirakumo). Not the smartest decision, but at least they don’t miss her. With only one target left, the pilots from the Wasp finally hit the battleship four more times, and eventually :
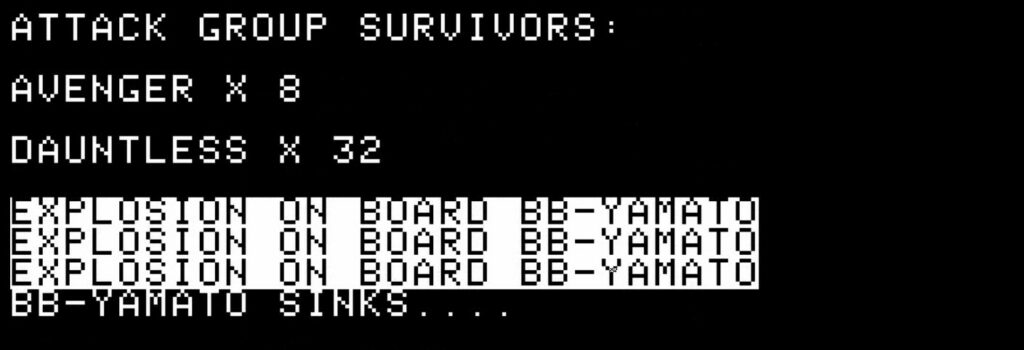
One Japanese battleship gone, 5 left !
Attacked unsuccessfully yet again by a handful of surviving Bettys, the Wasp and the Hornet are now short on fuel (called “Endurance” in-game, you lose 10 endurance for each air attack, except if the task force already has 10 or less ; launching airstrikes requires and reduces endurance). They head for Brisbane, which they reach on the 10th.
8th to 16th of September 1942 – Interlude
Not much happens while my carriers refit in Brisbane. The supplies on Henderson Field are regularly destroyed by Japanese bombardments, but regular San Francisco Express rotations keep the garrison from starving. I deliver supply during daytime (the Bettys are pretty much destroyed, and well, they seem to almost always miss anyway), while the Japanese deliver their Tokyo Express supplies by nighttime, so no “accident” occurs. I have nothing to intercept the Japanese supply runs, but one of my submarines, the Sculpin, manages to sink two destroyers on two successive days : the Hatsuyuki and the Umikaze. The other 6 submarines in the area send torpedoes to various targets, including cruisers, but all miss.
17th to 24th of September 1942 – The Japanese Convoy
On the 18th of September, just as the Wasp and the Hornet are ready to leave the safety of Brisbane with a massive escort, some alarming news arrives on the desk of the Admiralty :
American reconnaissance detected what is most definitely a Japanese carrier fleet and a large Japanese convoy on its way to Henderson Field. So far, the Marines on Guadalcanal have been able to kill the Japanese about as fast as they are being dropped by the Tokyo Express, but with heavy transports, the number of Japanese soldiers may reach a threshold where it is not possible anymore.
I need to destroy the convoy, but of course I also need to destroy the carriers so I cook up a plan :
- A surface fleet, led by the battleship Washington, will take position on Guadalcanal. With the Yamato gone, my battleships are more powerful than the Japanese battleships,
- The surface fleet will be protected by my aircraft carriers, which will attack the Japanese carrier if they meet them,
- With Guadalcanal protected from sea and from air, I will transfer a large air force to Henderson Field to further escort my ships – once it is resupplied anyway,
Flawless plan !
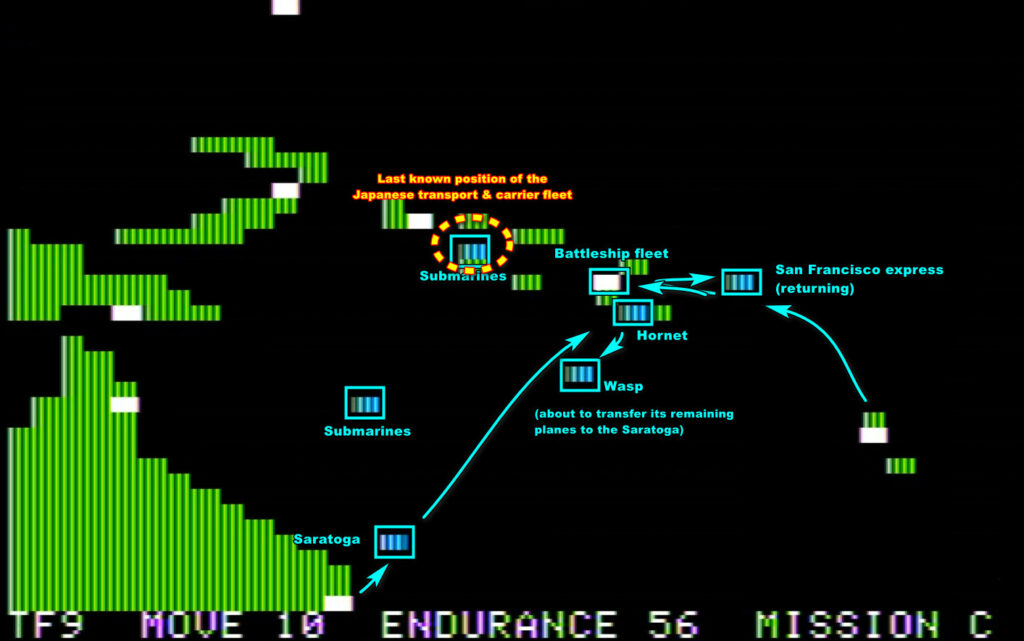
There is a small problem : the Hornet and the Wasp have around 2/3 of their maximum plane capacity, so the two Japanese carriers may have more planes together. Easy to solve : the Saratoga is about to be refitted and available, so I will just regroup as many planes as possible from the Wasp on the larger Hornet and the rest on the Saratogar as soon as she is available. After that, the Wasp will train more naval pilots in Brisbane while I will have two “full” carriers to work with.
The 19th, Guadalcanal is resupplied, the Washington, several cruisers (the Australia, the Astoria and the Hobart)and four destroyers are in front of Henderson Field, with the Hornet and her own escort in close proximity. Planes are transferred from Espiritu Santo to Henderson Field. The Japanese transport fleet is sluggish : some of its ships have a top speed of only 10 knots (2 tiles by turn – or only 1 in diagonal). The enemy carrier fleet is next to it.
The night of the 19th, my battleship fleet is surprised to encounter a bunch of destroyers trying to run the blockade. The Japanese destroyer Ushio is sunk, the rest scatters after receiving significant damage, but not without managing to hit the light cruiser Hobart during the day. Her crew will fight the damage for two days, but the ship would be sunk by a Japanese submarine on the 24th of September as she was trying to make its way back home .
Back to Guadalcanal, on the eve of the 20th, the Japanese are everywhere !
Well, the good news is that I have the Japanese carriers exactly where I wanted. The bad news is that the Saratoga has not arrived yet, so the Hornet is on its own. Not great. Still, I attack!
I only transferred a handful of bombers to Henderson Field, and unfortunately for them the Japanese carriers (which turn out to be the Shōkaku and the very small Zuihō, the latter can only carry 30 planes) have some 35 planes fighting escorts – a gauntlet very few of my 18 bombers survive, and they cause no damage.
The 44 bombers from the Hornet are luckier. Almost 20 of them are shot down, but the rest manage to land two bombs on the Zuihō and two more on the Shōkaku.
As for the Japanese attack, it is inadequate. Only 18 bombers but escorted by no fewer than 32 fighters ! It looks like the Shōkaku did not train new pilots, and is basically fighting with what was left of its initial planes and the ones transferred from the damaged Zuikaku ! Most of those bombers are shot down, but one of the 6 survivors is lucky, and lands a bomb on the Hornet, for marginal damage. As for the Bettys from Rabaul, they are once again comically inefficient, and fail at causing any damage, except to themselves as they are also shot down by the defenders of Guadalcanal.
My battleship and assorted cruisers will take care of the transport, and I decide to pursue the Shōkaku. I regroup the Saratoga and the Hornet south of its probable escape route on the 21st… but I am out of range and cannot attack !
There is no way to pursue further, on the 22nd they will be too close from Rabaul for comfort, and I really don’t want to end a turn on the same tile as a Battleship group. Once again, the Shōkaku escapes mostly undamaged.
Meanwhile, in Guadalcanal, the Japanese transports are landing next to my battleship which is just standing there, not doing anything. You see, with all those combats, my combat fleet endurance/fuel dropped to 7, and below 10 they won’t engage enemy fleets. Of course, the Japanese transports are not going to engage my battleship and cruisers either, so they just land troops, and there is just an awkward silence while Japanese companies are landing in full view of the American sailors.
Well, maybe the Washington cannot attack the transports, but the Saratoga still can. Without any air defence in the area, the Saratoga starts a killing frenzy while the Hornet heads home :
- The 22nd of September, she sinks the transport destroyer APD-34 and the transport Boston Maru,
- The 23rd, she engages a battleship fleet, damaging the battleship Mushu and sinking the Light Cruiser Nagara,
- The 24th, she engages the transport fleet again : the transport destroyer APD-2 and the transport Meyro Maru are sunk. The same day, the Kinryu Maru is torpedoed by a submarine, but survives.
After that, short on fuel, it is time for her to return to Brisbane to refit.
Various other Japanese ships – transports or escorts received damage, sometimes critical. The seaplane tender Akitsushima sank from her damage on the 26th, the transport Kinryu Maru would be torpedoed and struck from the naval register by a submarine on the 27th by a submarine as she tried to limp back to Rabaul. The Japanese managed to land some 6 000 troops, but the cost was prohibitive for them, and I can manage 6 000 Japanese soldiers.
25th of September 1942 – 7th of October 1942 – Interlude
Not much happens in the last week of September and the first of October. I run more San Francisco Express by day, the Japanese run Tokyo Express by night. The tempo is only perturbed by a Japanese submarine sinking the transport destroyer Little on what should have been a safe route.
Now totally oblivious to the Betty threat from Rabaul, I even run a supply mission with my larger ships… and lo and behold the Bettys manage to hit one of my ships. Once ! Don’t worry for her, she will make it home without problems.
Meanwhile, the Japanese run their bombardment missions from air and from ships, so Henderson Field is never in-supply for very long, but I too can play this minigame and B-17 bombers from Espiritu Santo bomb the Japanese supplies in Guadalcanal from time to time. My marines also immediately attack on land every time they receive new supplies from my fast destroyers, so eventually, I manage to reduce the Japanese garrison to fewer than 2000 soldiers on Guadalcanal – I have 21 000 !
Finally, on the 7th of October, the Wasp, the Hornet and the Saratoga are ready to sail. Together, I don’t think they fear anything the Japanese can throw at them.
Overall, I feel like I earned some significant successes in September, maintaining my losses at the level they were in August, while causing the Japanese greater losses this month.
Still, I don’t think I changed the strategic situation :
- I destroyed the Yamato, but with 5 battleships remaining the Japanese can still bombard Henderson Field every 3 or 4 days,
- I chased the Shōkaku, but she is otherwise doing fine. She will be back,
- I destroyed 3 transport ships (out of 4 available to the Japanese in September) but 6 more will be available to them in October, and most of their supply runs are done by destroyers anyway,
The most decisive change to my situation is that I now have so many Marines in Guadalcanal that I don’t see the Japanese throwing me out any time soon.
I still like the game, but it has flaws. It took me more than one hour to run the 12 final days, even though pretty much nothing happened. Bettys are ridiculously inaccurate and their only purpose is to make the game longer while their attacks are solved, to destroy my supplies in Henderson Field and to magically drain fuel from my fleets. Furthermore, I am frustrated by the Japanese always remaining tantalizingly out of range of Henderson Field – the airfield is hard to defend, but as a player, I don’t care that much because I can’t use it as a platform for strikes either. Finally, I also fear the game may be effectively won long before the last turn, though of course writing that last sentence I probably just jinxed myself. We will see in October, and I can forgive a lot to a game featuring seaplane tenders.
Next episode : October
Time played so far for the main campaign : 7 hours 30 minutes
8 Comments
Wow, this game is just awesome.
I like the historical photos of ships.
Yeah I’m with you on the seaplane tenders. And the CLAA. Technically correct is the best kind of correct.
As a fellow RTW veteran, I feel compelled to point the poor service done for the American pilots in regards to MS-Paint based ship ID. What’s even that, a depressed 1910-era Dreadnaught?
I tried to MS-Paint a Yamato, but failed and I don’t even want to show the result. Want to give it a try ?
FYI, I’m really enjoying these posts, even as I can’t imagine how tedious this game must be to actually play.
Honestly, there were worse games. The game is interesting enough when you have a carrier fleet to move around, it is only a chore to play during what I call “interludes”.
Oh, hi, look at you you sexy little sea-warfare simulator, how you doin’?
I’m kinda hurt by the Atlanta being qualified as a CLAA rather than the destroyer flottila leader that they were designed as and still used in that way by this point in the war, but that’s just an insignificant pet-peeve of mine.
The link to the October article is broken for me. Just sends me to the top of the page.
Thanks! Fixed !