In 1982 and 1983, Gary Grigsby had developed 100% of the monster wargames on the market, but Avalon Hill finally entered the scene with Gulf Strike, a game that features an unlikely alliance between Iran and the Great Satan against Iraq and the Lesser Satan. The battleground spans from the Turkmenistan to the Red Sea – a territory only slightly smaller than the one featured in War in Russia – but unlike the latter, Gulf Strike gives you for the first time full control of all land, air, sea and underwater assets.

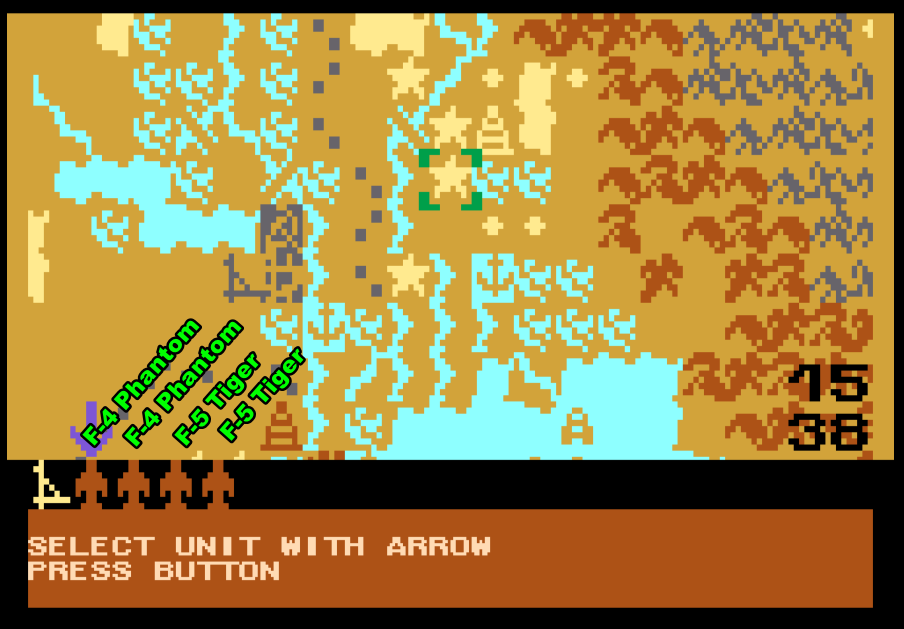
The general context of the war is unspecified in the manual, but whatever it is it’s big given the scale of the armies & navies involved. Unfortunately, Gulf Strike only uses one icon by faction, so a Kuwaiti air group and a British submarine are both represented by a star ![]() , and similarly entire Soviet army groups and isolated destroyers both use the hammer & sickle
, and similarly entire Soviet army groups and isolated destroyers both use the hammer & sickle ![]() so it’s hard to have a sense of scale. Let me explain the opening situation:
so it’s hard to have a sense of scale. Let me explain the opening situation:
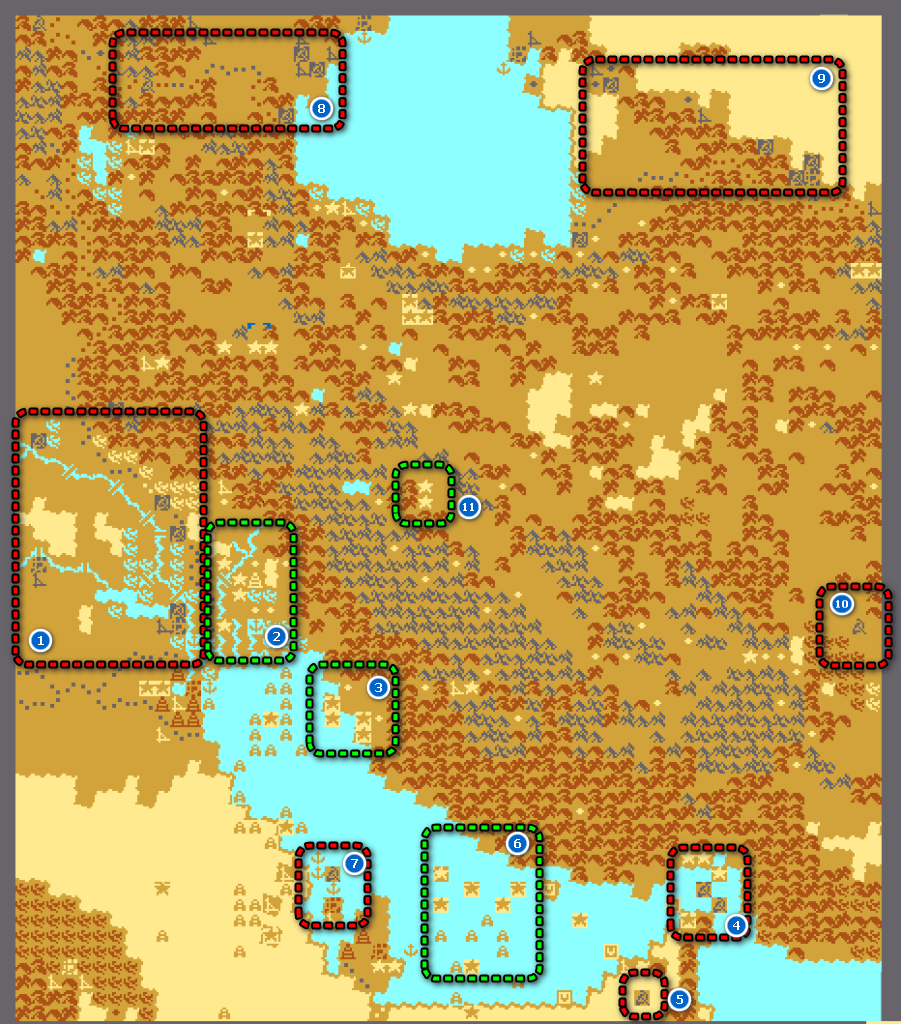
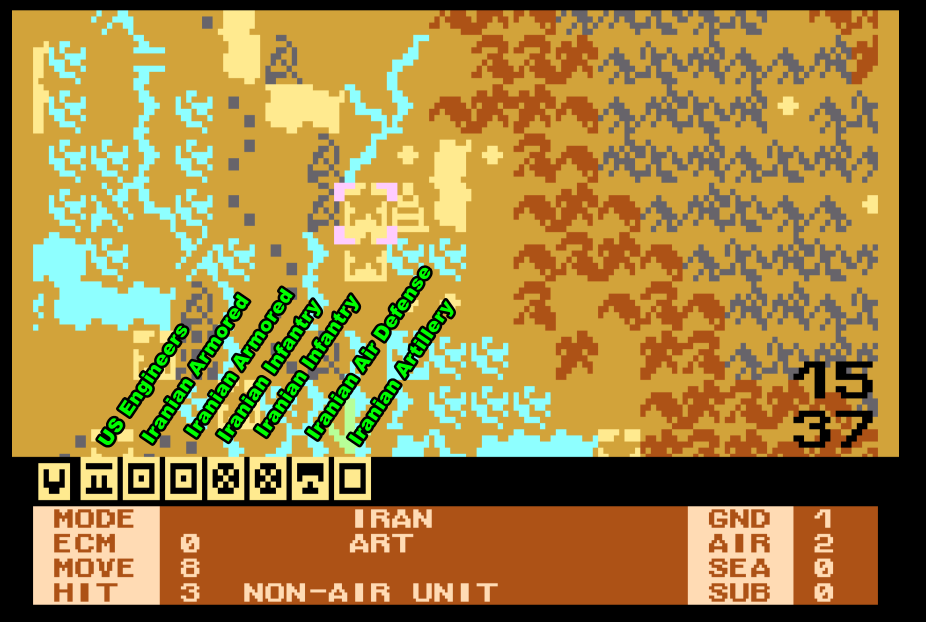
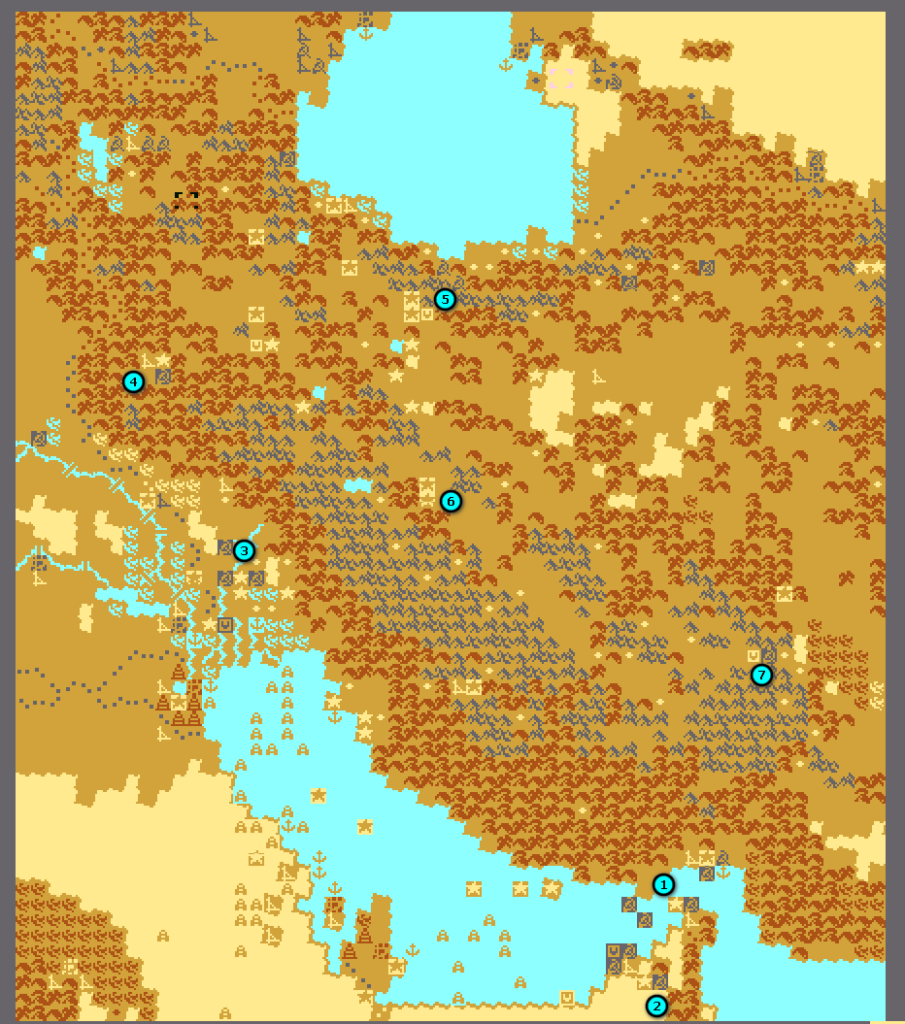
- In the West, Saddam Hussein’s massive Iraqi army is the border (1), ready to cross. The Iranians on the other side are much fewer, but well-fortified (2). The Ayatollah Khomeini, being a stalwart ally of the West, can count on the support of a Western expeditionary corps currently further inland (3), in addition to a massive US air force. If I was a CNN camera team, that’s where I would be.
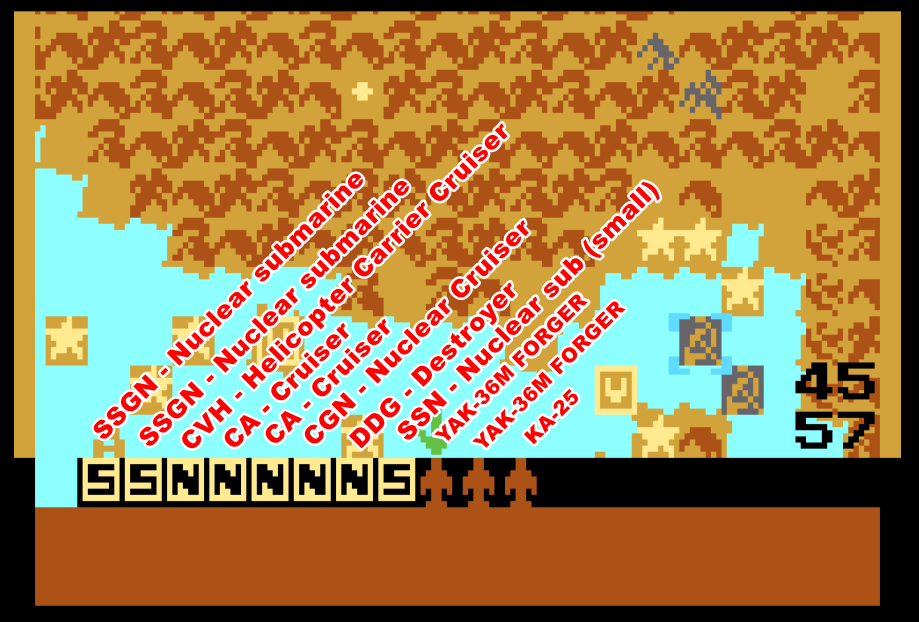
- In the Red Sea, the Soviets deployed a large number of ships, submarines, including helicopter-carrying cruisers along with their Yak-38 (4). They also deployed some Marines in the Emirates (5). The Allied answer, in addition to the meager local Saudi, Omani and Emirati forces, is an American carrier group (6), with submarine escort and some token French ships. The Iranian fleet is still at its base (3). The allied fleets will also have to deal with a group of Iraqi fast attack ships roaming along the Saudi coastline (7).
- Much further in the North, the Soviets are about to cross from Caucasus (8) and Turkmenistan (9) right into Iran, to which we must add a small force in the East (10). The Soviet armies are massive and supported by a powerful Soviet airforce, but its progress will be slowed down by terrain features. To counter this threat, most of the Iranian army is spread into garrisons, though there are a few large forces here and there. The Americans deployed another large ground support force in Esfahan (11).
Facing multiple threats, I must prioritize. The Soviets win if they manage to occupy 9 objectives (![]() ) within 25 turns. I expect the Soviet land force to move slowly, so the first threats I want to tackle are the Soviet Navy and the Iraqis – all of them. Among those two, I will first focus on the Iraqis, for two reasons:
) within 25 turns. I expect the Soviet land force to move slowly, so the first threats I want to tackle are the Soviet Navy and the Iraqis – all of them. Among those two, I will first focus on the Iraqis, for two reasons:
- I need to free the Iran land troops as soon as possible, whereas I don’t really need to free my ships to go anywhere,
- The Iraqi air force can support the Soviet Navy, so destroying the former will help with the latter.
We’ll see how my plan collide with reality.
Turn 1
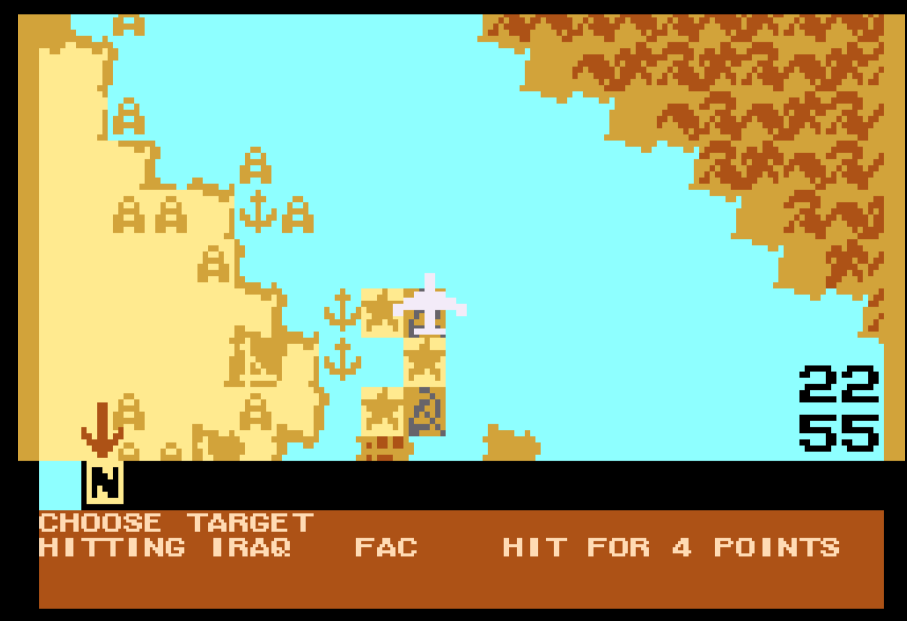
I start the war with one of the most traditional openings of modern warfare: the deployment of airborne and airmobile troops (including a handful of British and French paratroopers) next to Iraqi airfields. I won’t know the result until the end of the turn, when combats are resolved.
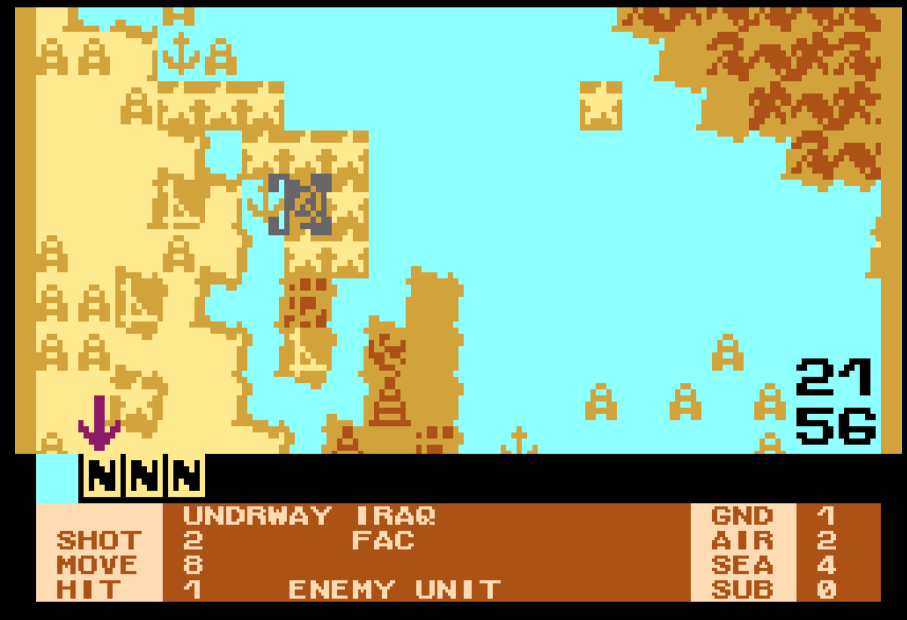
Combats being resolved at the end of the turn gives a huge privilege to the Iraqi-Soviets, because they move after me and there is no zone of control to “force” them to fight. This is particularly an issue in the sea war, because ships are fast. I want to get rid of the Iraqi fast attack ships quickly, so to make sure they don’t escape I surround them as much as possible:
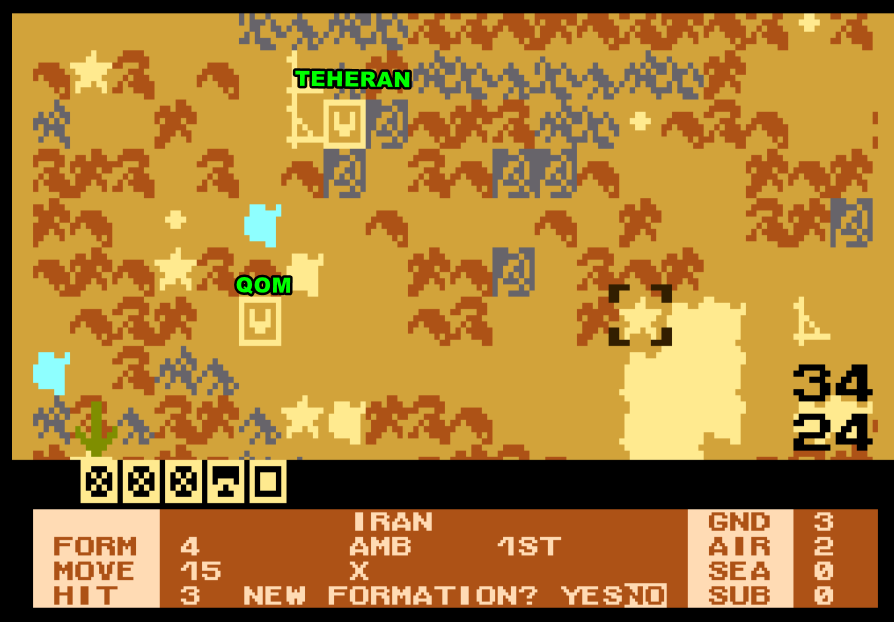
After less interesting movements on the rest of the map, the land & sea phase ends and it is time to attack with my planes (whose attacks are resolved immediately). My main focus is the garrisons of Iraqi airports so my airborne troops can prevail but frequent interception by Iraqi or even Soviet fighters makes this costly in planes – if I was a CNN camera team, I would have some pretty compelling material at this point: videos of American bombers shot down in flame, and the White House would demand that I move further away to the frontline, for instance to Teheran.
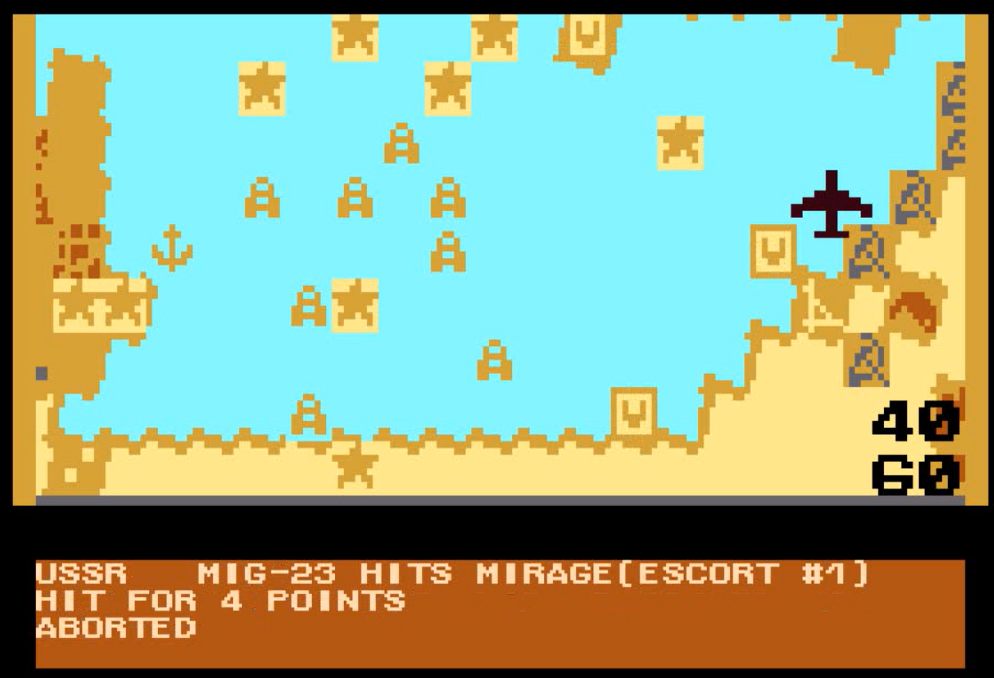
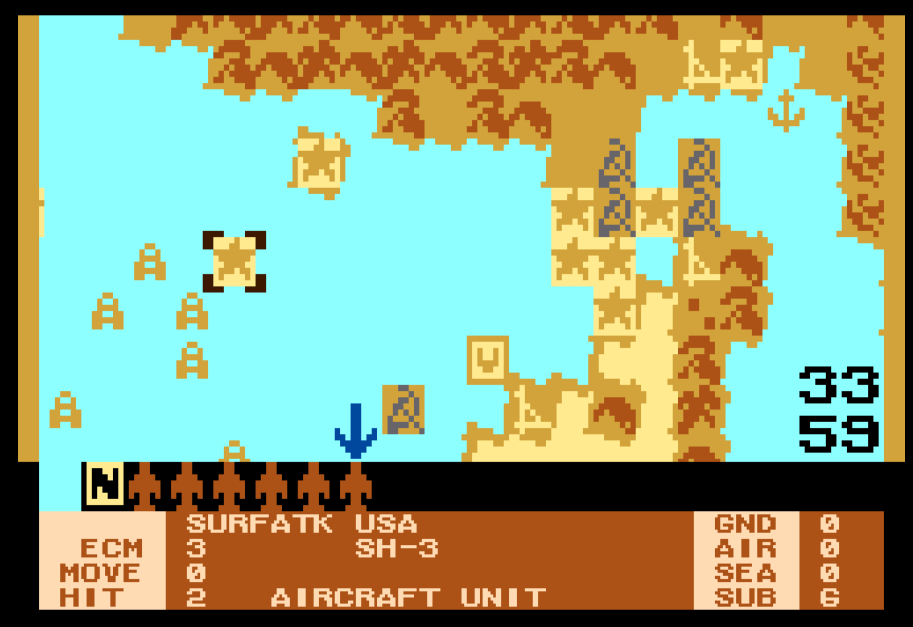
The results are worse against the Soviet fleet. A Qatari Mirage squadron flying an air superiority mission near the Soviet fleet in the hope of engaging the inferior Yak-36M is instead intercepted by a MIG-23 squadron coming from I-don’t-know-where and doesn’t make it back. Those Mirages were 100% of the Qatari air force, so the Qatari contribution for the rest of the campaign will be limited to their two weak infantry units.
Similarly, I try to attack Soviet subs with Iranian and American P-3 Orion which are dedicated sub-hunters, but the surface ships cruising along the subs shoot my planes down, for no Soviet losses. As for the Omani planes (Hawker Hunter and Jaguar), let’s just say that the Omani Air Force was in dire need of modernization anyway.
After my air turn, it is time for the Soviet and Iraqi planes to move. The Iraqis focus on my airfields and try to destroy my planes on the ground – the nerve! – though it costs them more than it costs me.
As for the Soviets, they soften the various Iranian strongpoints, and given so many of my interceptors were allocated to air superiority or escort during my turn, I am not stopping them. At least, they are sometimes wasting attacks on units that they already depleted (ground units cannot be totally destroyed from the air) so while it’s painful to watch it could have been worse.
Finally, the game resolves a few ground and sea combats. Here again, I am disappointed: only one Iraqi attack boat is destroyed, and both airport garrisons hold the line against my paratroopers, though with significant losses. All and all, a pretty bad opening to the war.
Turn 2
Well, I am not too happy with the opening, but on the ground it’s not like I can pivot in one turn. I am still on the receiving end, and the Iraqis are crossing the Karun river to attack Ahvaz, where the first American reinforcements arrived.
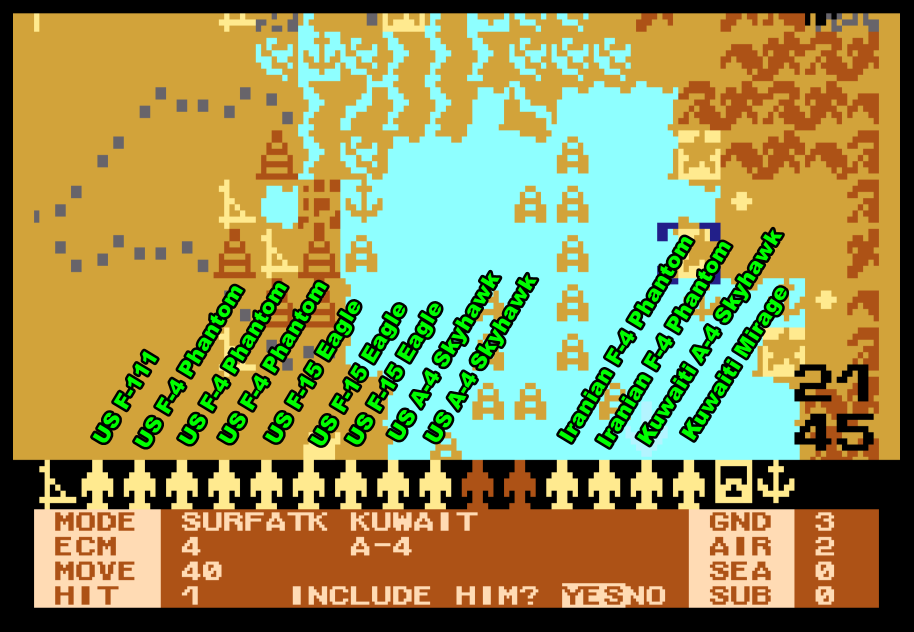
Made wiser and more careful by my losses the previous turn, I barely sortie any aircraft. In Gulf Strike, planes have three possible air modes:
- Surface Attack, which is exactly what you can imagine,
- Air Attack, which is either “escort” if the plane is sent with at least one in surface attack, or air superiority trying to entice enemy planes to attack otherwise,
- Interception, which keeps the plane in reserve to attack enemy planes doing surface or air attack during the turn of the other player – provided the intercepting plane did not do any attack during its turn.
During the first turn, maybe two-third of my interceptors were running air attack missions. This time, three quarters of my interceptors are doing their job description, with the rest escorting a couple strikes on the Iraqi airports. I also use unescorted anti-ship crafts to intercept the Iraqi fast attack boats – the enemy interceptors don’t interfere and the Iraqi lose the little navy they had entirely.
My passive strategy pays off wonderfully: the first turn had been all gloom and doom for my airmen (and by extension for myself), but the second one sees the Soviet air force melt in front of them: the majority of their sorties are intercepted, often successfully. Land-based planes can do up to 3 missions every turn (provided they did not run out of “range” before, eg a chopper can only go through 20 tiles in total every turn), which means I have 3 opportunities to intercept each enemy plane – I don’t believe a lot of them survived the gauntlet.

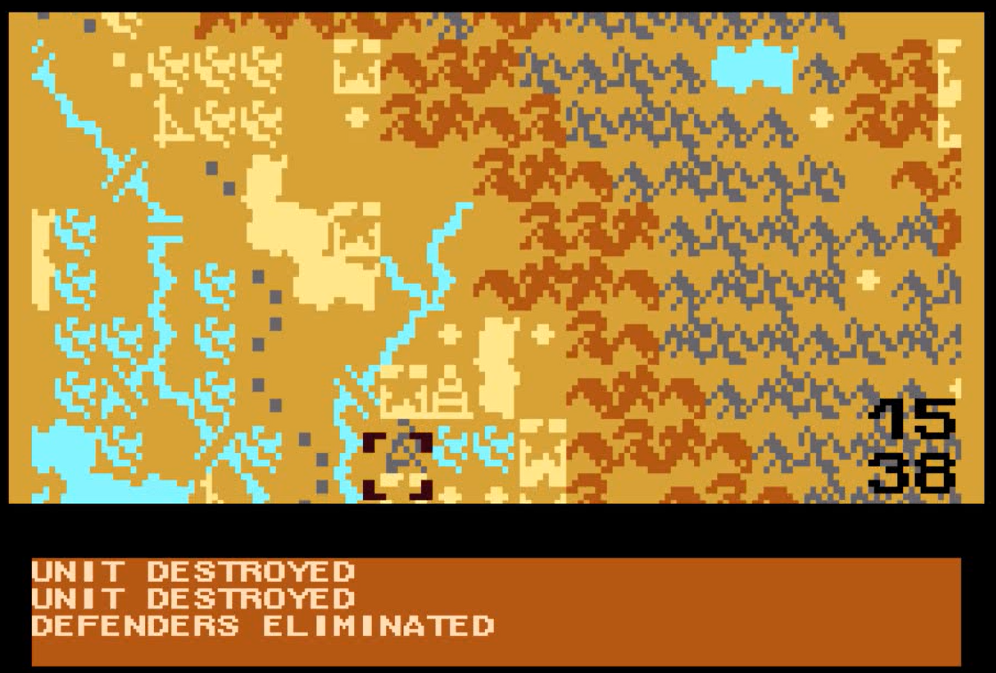
I am also successful on the ground. One of the two Iraqi airports falls to my airmobile infantry, and the Iraqis fail to dent the Iranian defense in the South despite overwhelming force.
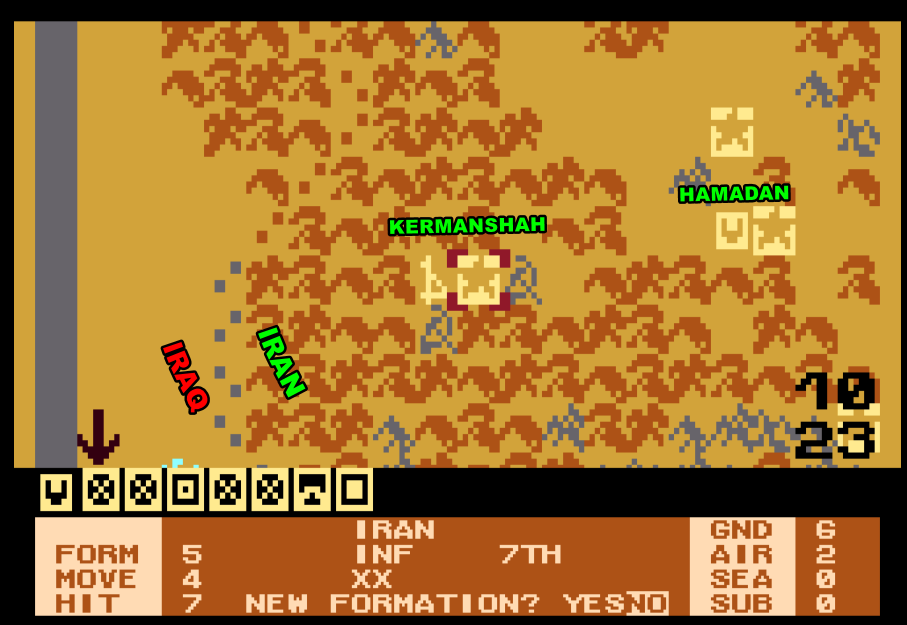
My only setbacks are in the mountains near <checks manual> Kermanshah, where a large Iraqi force inflicts some significant damage to an Iranian group that rushed to the rescue of the city and did not have the time to take a defensive posture. Meanwhile, the Soviets continue their slow progression from Caucasus and Turkmenistan, destroying a couple weak garrisons on the way.
Turn 3
The situation on the Iraqi border looks solid, particularly as the Saudi army, on the move since turn one, is closing in.
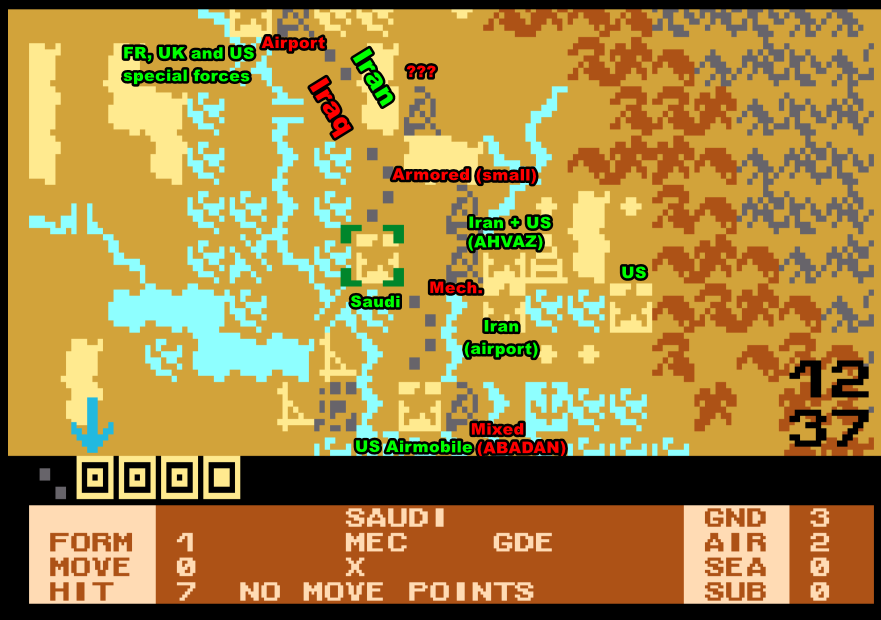
The Saudis (and Emiratis, Kuwaitis etc) are low quality. This one is the best peninsular Arab division (most have 2 in ground attack), while the typical Iranian or Iraqi mechanized divisions have 5 in ground attack.
My only worry at this point in the campaign is that the Iraqi-Soviets only need 9 objectives to win the campaign, and they already control 3, including Abadan near the Iraqi border that they seized by surprise. Satisfied that the Soviet-Iraqi air force has been largely put down, I allocate a portion of my planes to some limited objectives:
- Ensure that the Americans liberate Abadan by crushing the small number of Iraqis there. The first mission is intercepted, but the second and third ones make it – the enemy force is reduced to a shell of what it was,
- Destroy a Soviet naval group approaching Abu Dhabi. The group is intercepted, but makes it through – and then the Soviet assets are quite simply erased from the map!
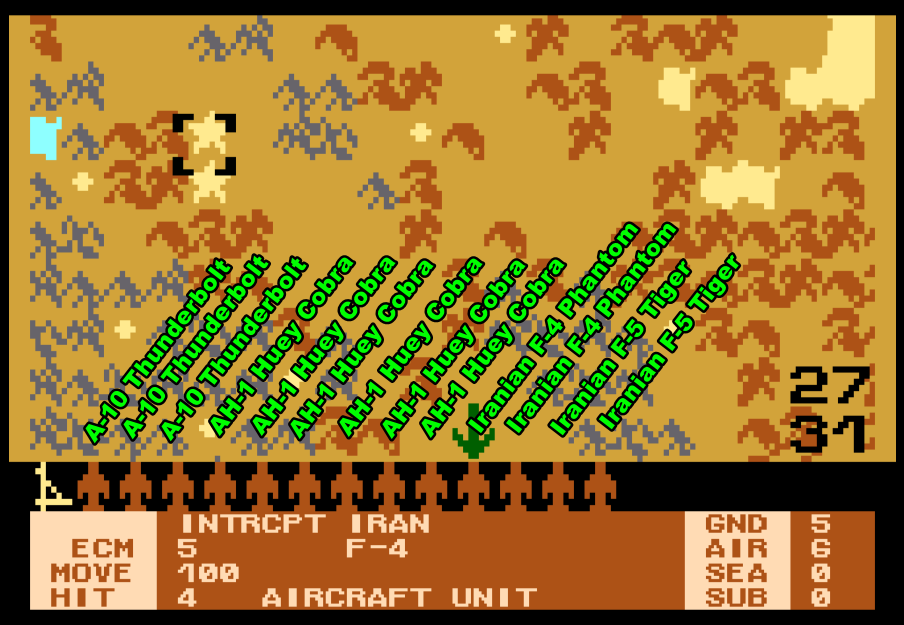
- In the North, two Soviet forces are getting uncomfortably close to Teheran. I commit my reserve of A-10 and Huey Cobra and soften them somewhat, though both my Cobras and my A-10s suffer (one of the squadrons is shot down). Somewhere in Congress, the Air Force prepares a scathing memo.
The combat resolution goes as expected: the Iraqis receive significant losses, my special forces finally overrun the second airport and Abadan is liberated. It even goes better than expected, as the Soviets don’t try anything against Teheran this turn. If I was a CNN team in Teheran right now, I would be pretty disappointed.
Turn 4 – 6
At this point, let me speed up the account a little. Strategically, the key change compared to the previous turns is that the Soviet-Iraqi air force is pretty much gone: in turns 4 and 5 the Soviet-Iraqi air phases will take a few seconds instead of 3 or 4 minutes in the turn, and will be effectively skipped by turn 6.
- Starting with the Soviet Navy in (1): the Soviets failed to progress much beyond Oman, crippled by a ruleset that really protects land units from naval units – basically they keep bombarding me, but as far as I can tell they have no way to “finish off” my troops occupying the objective points, except with that one marine unit – which is unfortunate for them because the Omani army finally destroys it turn 4 (2).
Given that I am now safe from Soviet interceptors, I aggressively use my anti-sub aircrafts to destroy the Soviet submarines – they can’t shoot back! On turn 5, I cordon off the straits of Ormuz with my own submarines, and then go close and personal with all my ships. It is a slaughter: by the end of turn 6 the Soviets are down to two submarines and one cruiser, for zero losses on my side – a combination of luck and design oversight, because the Soviet ships may move last, but the Allied ships shoot first. The naval threat is effectively removed.
- The Iran-Iraq border (3) is another place where everything goes according to plan. With the arrival of American and Saudi forces I have the advantage now, and I switch my units from “deliberate defense” to its opposite “deliberate attack”.

This front receives the bulk of my air support. At that point, I realized that each land unit has a chance to shoot “once” when attacked, so I concentrate as many planes as possible in one stack – even ordering some dedicated air superiority fighters like the F-15 to do surface attacks, because I know there isn’t a meaningful Soviet air force anyway.
This works wonderfully: the Iraqi army is reduced from 36 hit points to 23 turn 4, from 23 to 7 turn 5 and vanishes turn 6. The damage I receive in exchange is marginal.
- Meanwhile, the siege of of Kermanshah goes on (4). While strong, the Iraqi force is not sufficient to threaten the city, particularly after I reinforced it with the French, British and American paratroopers & special forces. By the end of turn 6, I have a decision to take: destroy the Iraqis to free my units or ignore it as Kermanshah is not at risk
- This brings me to the really bad news of the campaign: Teheran (5). The Soviet forces are stronger than expected, and I reacted too late and too timidly – I should have abandoned the undefensible objectives to regroup my troops into a force that could actually stop the Soviet steamroller. My large reserve of helicopters in Esfahan (6) cannot execute more than one air mission every turn, and after a brave defense the garrison is destroyed – Teheran is poised to be seized turn 7 and the Mullahs are boarding helicopters from the top of the US embassy, right in front of the cameras of CNN! I hate to see friends of the United States sad, and I promise them we will return to Teheran.
With the garrison of Teheran gone, the Soviets will be able to merge their force coming from Turkmenistan with the one coming from the Caucasus. This is worrying, but still I should have the time to make a stand at Qom, toward which all my local forces are converging.
- Finally, the Soviets destroyed the garrisons in <checks manual> Kerman (7), which opens a highway to, well, not much for a long long time. This is a low-prio enemy army, though I still shadow it with a mid-sized force.
I end this first part here. The Soviet control 4 cities already, and two more (including Teheran) will fall the following turn.

There is no reinforcement in the game, so I just need to destroy Soviet units faster than I lose mine; however the Soviets will win if they take 3 more cities, so I can’t be too careful either. We’ll see how the campaign ends – the game has a lot of issues but I am happy to return to a “traditional” wargame.
2 Comments
War makes strange bedfellows, I suppose. Infinite range for interception is an ODD rule.
Also as you say the UI makes it hard to see the units, or to differentiate between them.
Lovely article though!
I was a big AH fanboy in my teens, but they always seemed to drop the ball in the computer game arena from the beginning. It shouldn’t be a big surprise; most of the staff didn’t care for computer games and weren’t afraid to say so in the pages of the AH General magazine. (Same went for RPGs and f/sf themes in general; they fumbled RuneQuest, for example.)