RDF 1985 is the second opus of Roger Keating’s When Superpower Collides series, which started in 1982 with Germany 1985. RDF stands for the historical Rapid Deployment Force, “a highly mobile force that could be rapidly moved to locations outside the normal overseas deployments in Europe and Korea” and specifically aimed at the Middle East. Amusingly, it was dissolved in January 1983, shortly before RDF 1985 was released in March. This AAR will be very low on rule-explanation, these can be found in the Germany 1985 AAR.
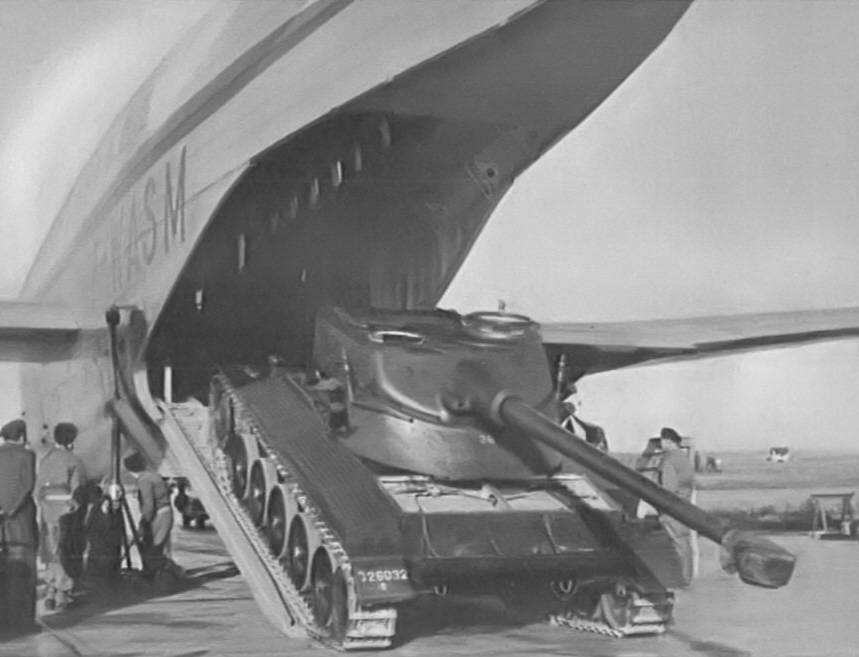
Germany 1985 had no background whatsoever about why the Soviets and NATO were clashing for the control of Germany. RDF 1985 is more generous with context : as gigantic armoured formations were ducking it out in Europe, Soviet paratroopers taking off from Central Asia seized the Saudi Dhahran airfield and put it to use. “Soon huge Antonov AN-22 transport planes were landing at Dhahran, unloading T-72 tanks, BMP infantry combat vehicles, artillery, and BM-21 Katyusha rocket launchers”. The Americans immediately react by sending the RDF.
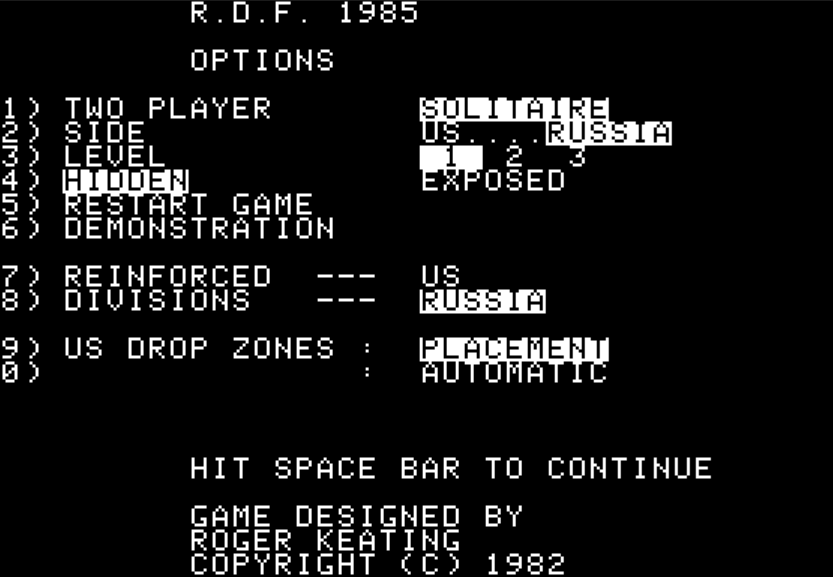
The game follows the same ruleset as Germany 1985, with no manual but only a “rule book supplement” explaining the few differences and rare additions. The only real difference compared to Germany 1985 is how air power works… but the RDF 1985 design was retrofitted in Germany 1985 v2.0 which is the version I had played, so from my point of view, no change there either.
I will be playing the Americans on this one, as they have new fun toys : the US Paratroopers (that are way better than the Soviet VDV from Germany 1985) and the transport ships. This will also give me an opportunity to play the “air cavalry”, which given how they operate (powerful and long range attacks) are akshually attack helicopters. My objective will be to control as many as possible of the airports (4 points each), cities (2 points each) and oil fields (1 point) at the end of the campaign, which may be turn 21, 22 or 23. I will also receive one extra point per Soviet unit destroyed.
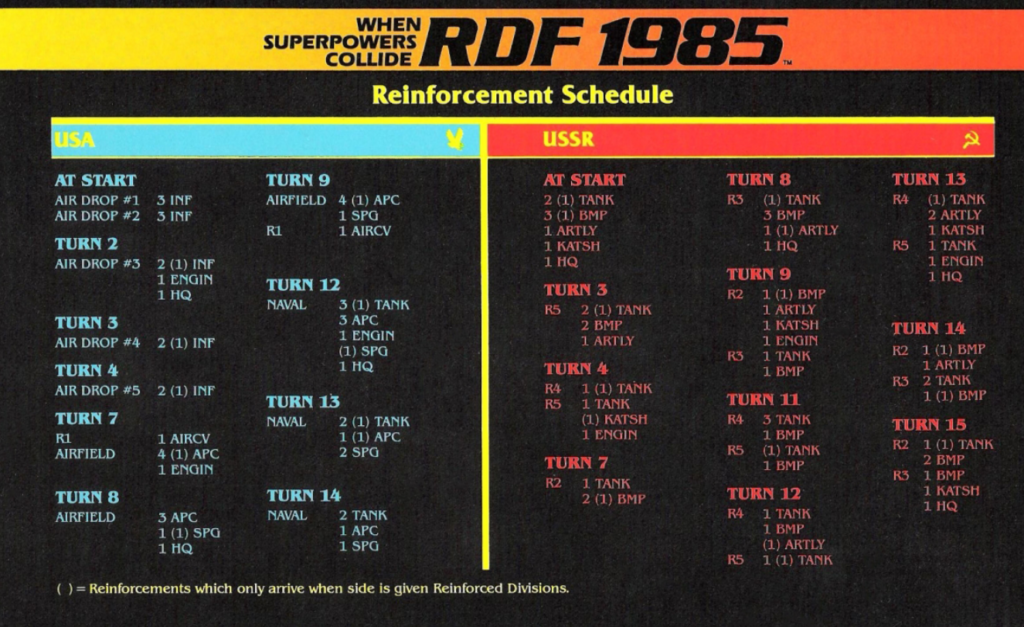
For this purpose, I will have to initially rely on several waves of paratroopers, then (starting turn 7) on airlifted troops, and finally (starting turn 12) on a massive sea-transported force. This means of course I need to control airports, and make sure there is no welcome party on the beach. As for the Russians, they will outnumber me from turn 1. All their reinforcements will come from the West.
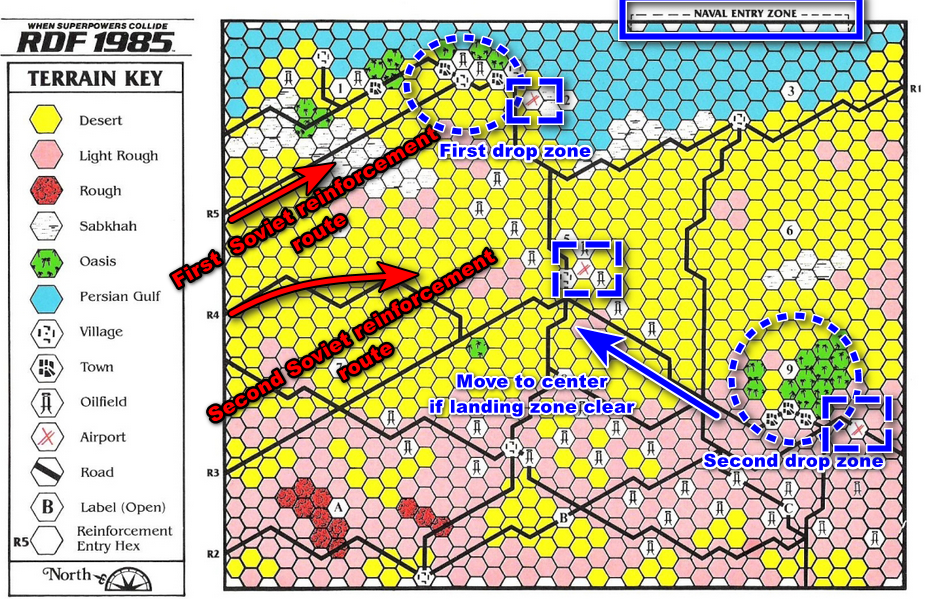
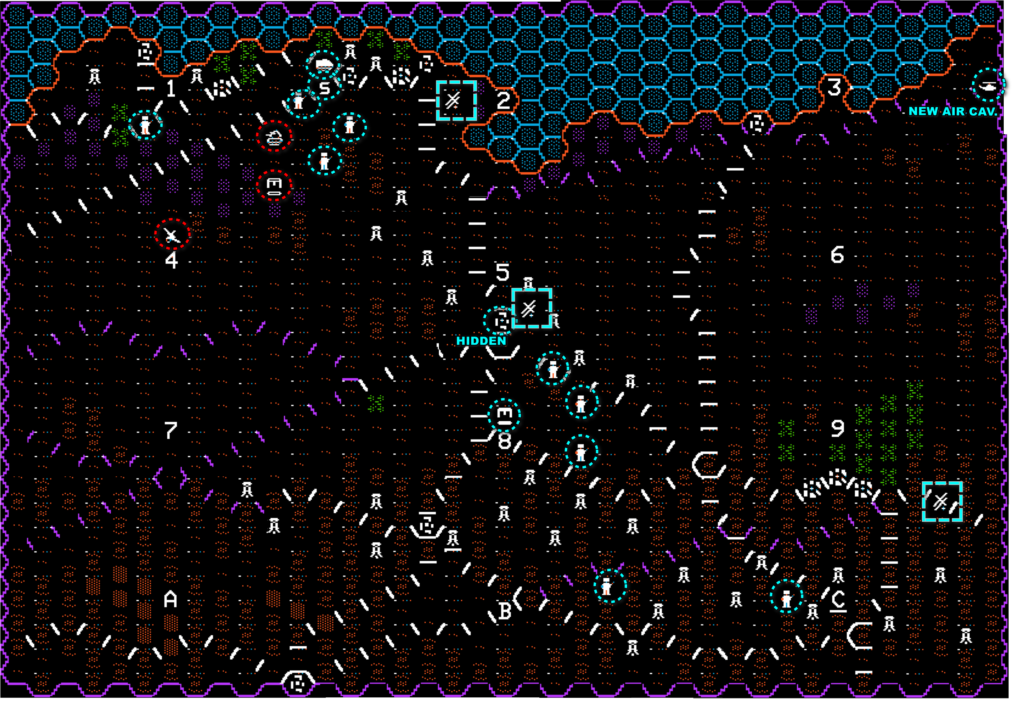
With two initial airdrops and five in total that must be planned from the beginning, I decide to focus on two areas :
- I allocate three airdrops to the oasis at the top of the map. Oasis are easy to hide into, and my force will be able to both block the Soviet reinforcements and secure an airport,
- I allocate two airdrops to the South-East, the large oasis will also be easy to defend and I will be able to secure a second airport. As there will not be Soviet reinforcements in that area, I will hopefully be able to move to the centre and secure the third airport and then the “naval entry zone” at the top of the map.
Day 1 (turn 1 – 4)
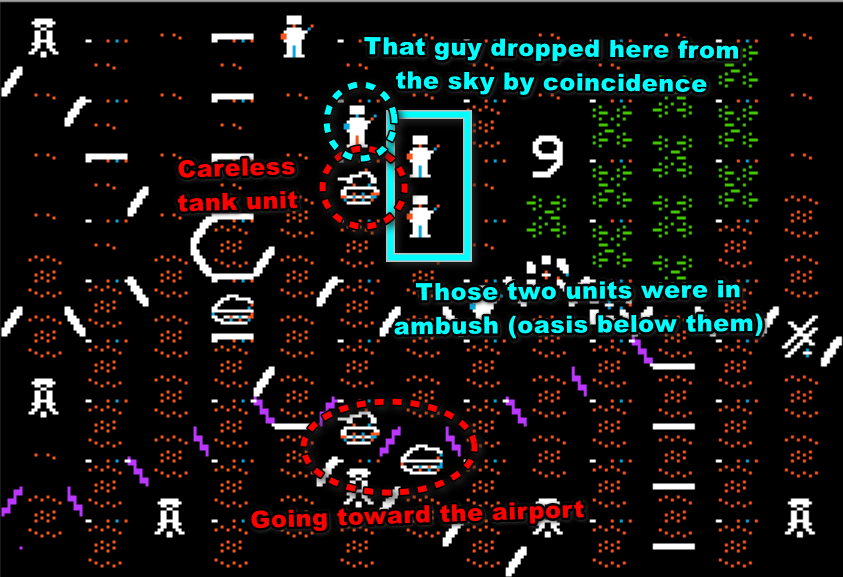
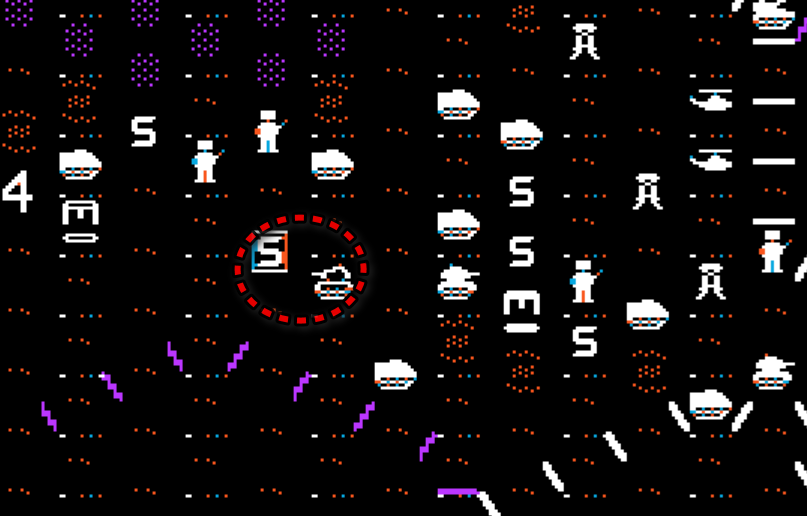
- The first paratrooper group drops next to some Soviet artillery. Not your lucky day, Ivan.
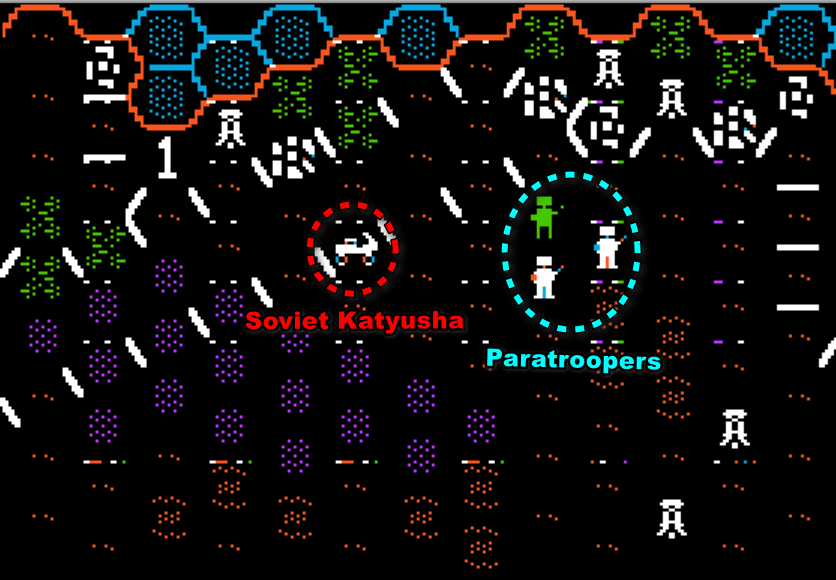
American planes immediately attack the enemy unit, which is then easily finished off by the paratroopers. But the attack reveals more Soviets : 2 motorized infantry units and one artillery.
These are easily destroyed the following turn by a combination of massive air strikes and daring assault :
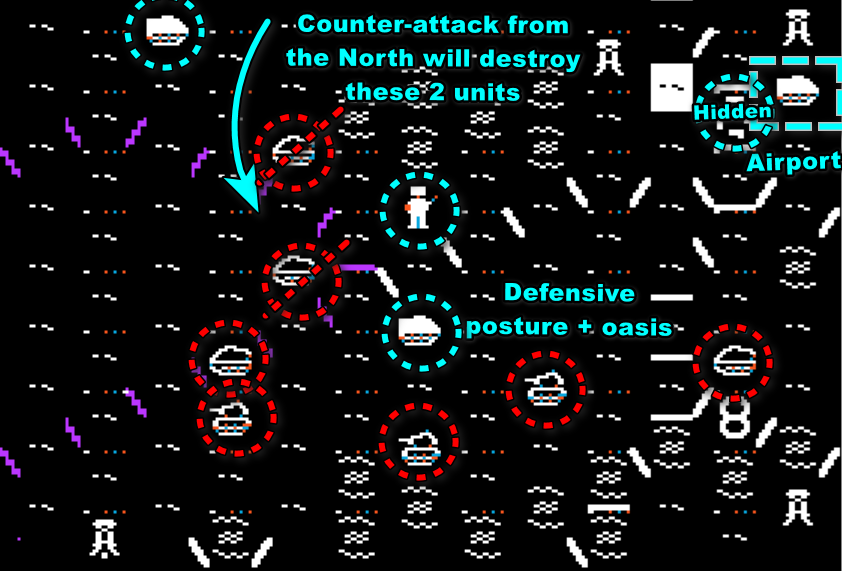
A third communist motorized infantry that came to see what was happening suddenly discovers more paratroopers falling from the sky all around it, and soon it stops reporting to its HQ – forever. That’s a good start. Half the enemy starting force has been wiped out. With no target remaining in the area, I change my plan a tiny bit and detach a small group to occupy the central airport. The rest hides in ambush in the oasis and in the city.
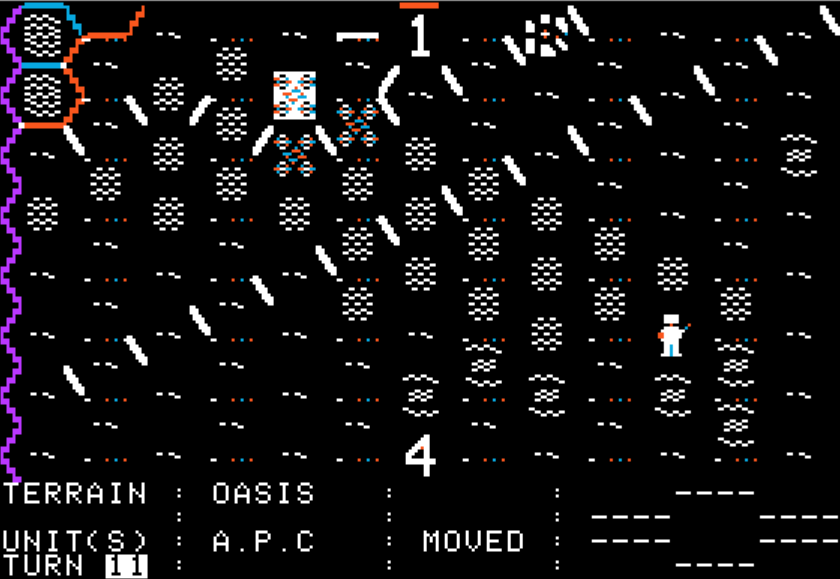
- The second paratrooper group has an eventless landing, and immediately occupies the Southern airport. They then hide, waiting for the Red Army to come to check what happened.
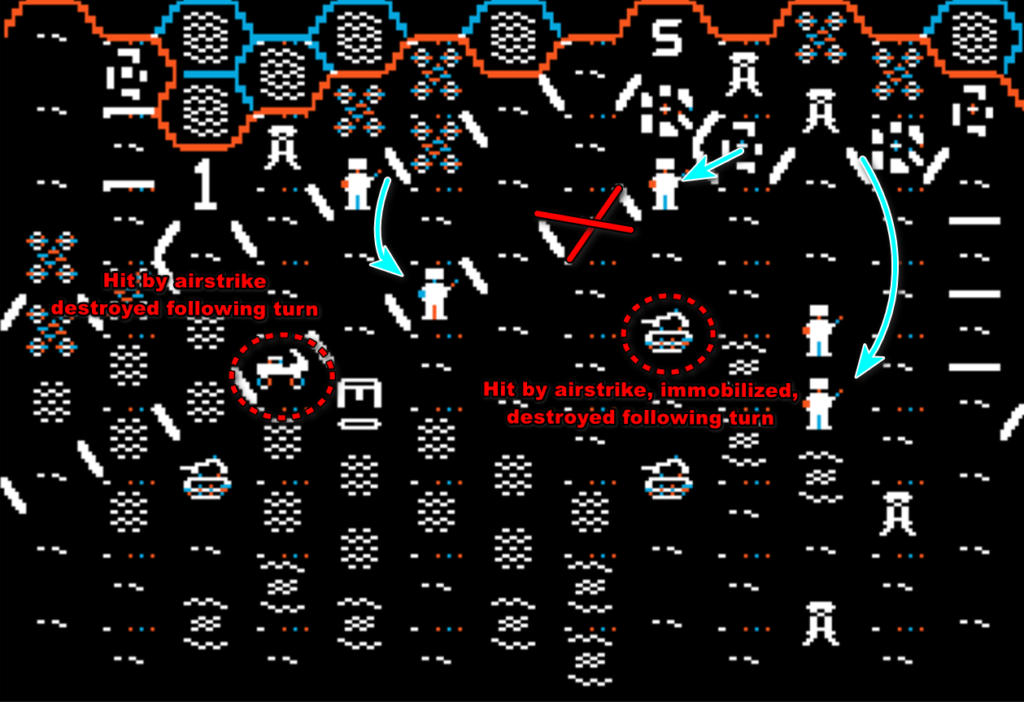
The ambush is a success. One of the enemy tank units advances headlong in a group of hidden paratroopers.
The enemy tank units is destroyed. The rest is hit by more air attacks from the sky, but they have ample room to scatter and retreat toward the North. One more unit destroyed, one almost destroyed and 3 badly battered. Everyone sings “Blood on the Risers“.
The first enemy reinforcements arrive before nightfall, and the ambush from the first paratrooper group is a failure – one of my hidden infantry is BUSTED ! Happily enough, the enemy does not have enough firepower to destroy it outright, and it manages to fall back toward the city. The rest of the US paratroopers remain hidden.

First night (turn 5 – 6)
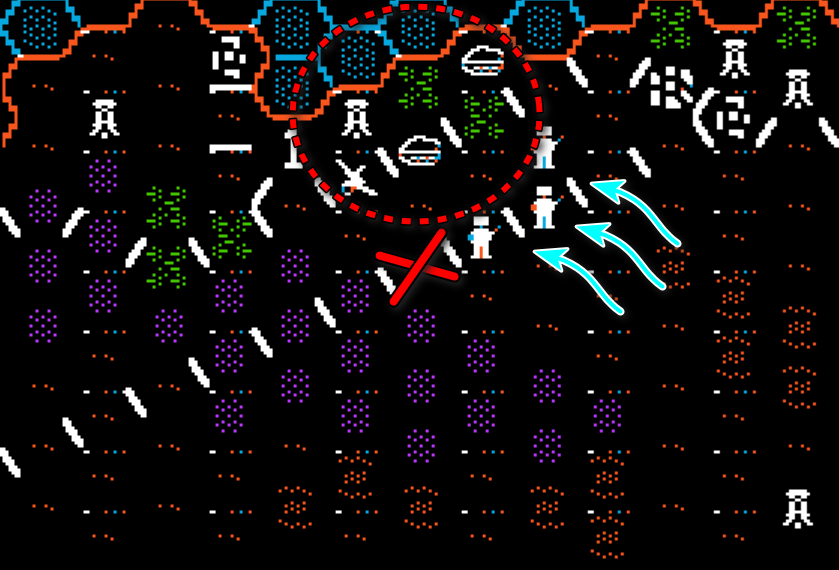
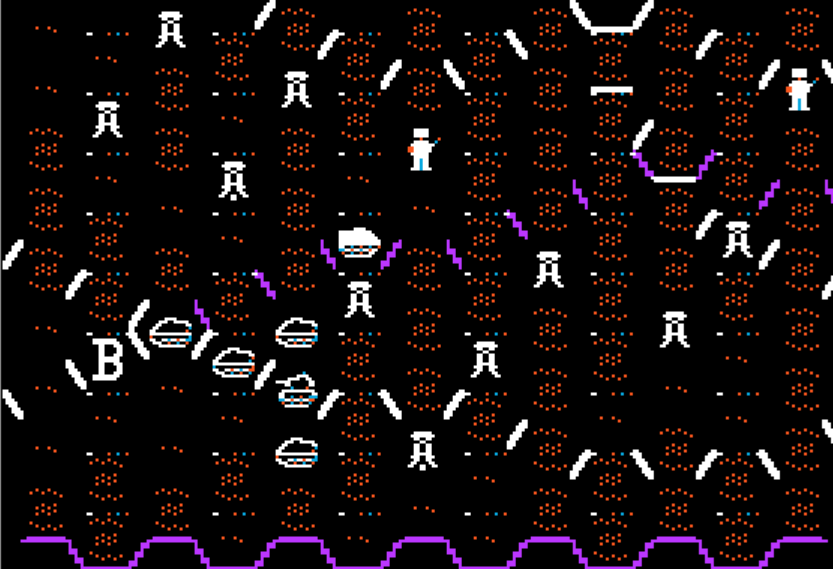
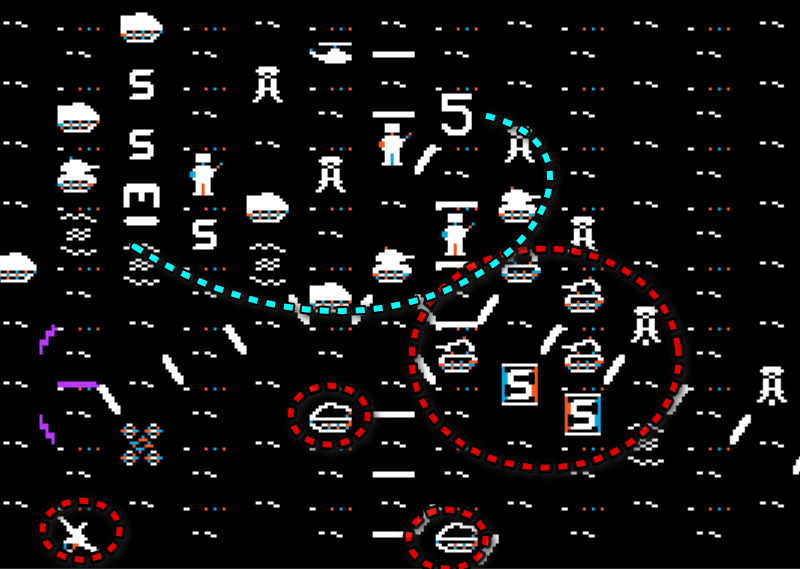
I retry my ambush thing, and this time the night perfectly hides the paratroopers (max detection range = 2). As the Soviets approach the coastal city, very angry paras spring from the side, isolating a part of the column and calling air strikes on the rocket artillery at the back :
By morning, 3 more units have been destroyed in the area. Another had been destroyed by chance in the South – for a total of 11 since the beginning of the battle. I feel like an American Rommel now.
Day 2 (Turn 8 – 10)
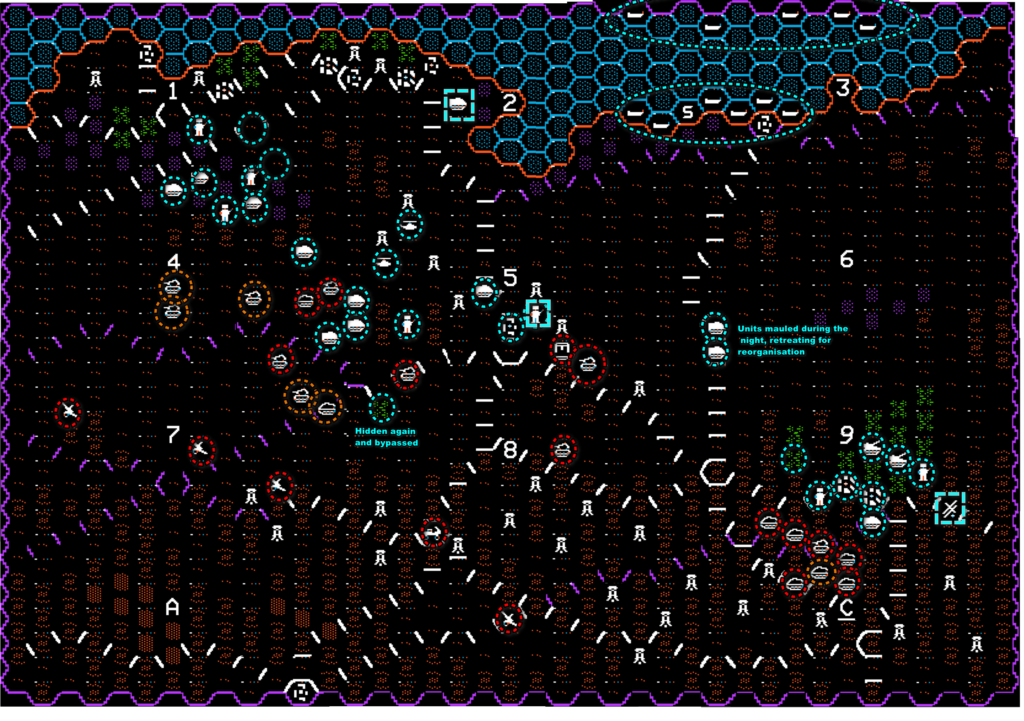
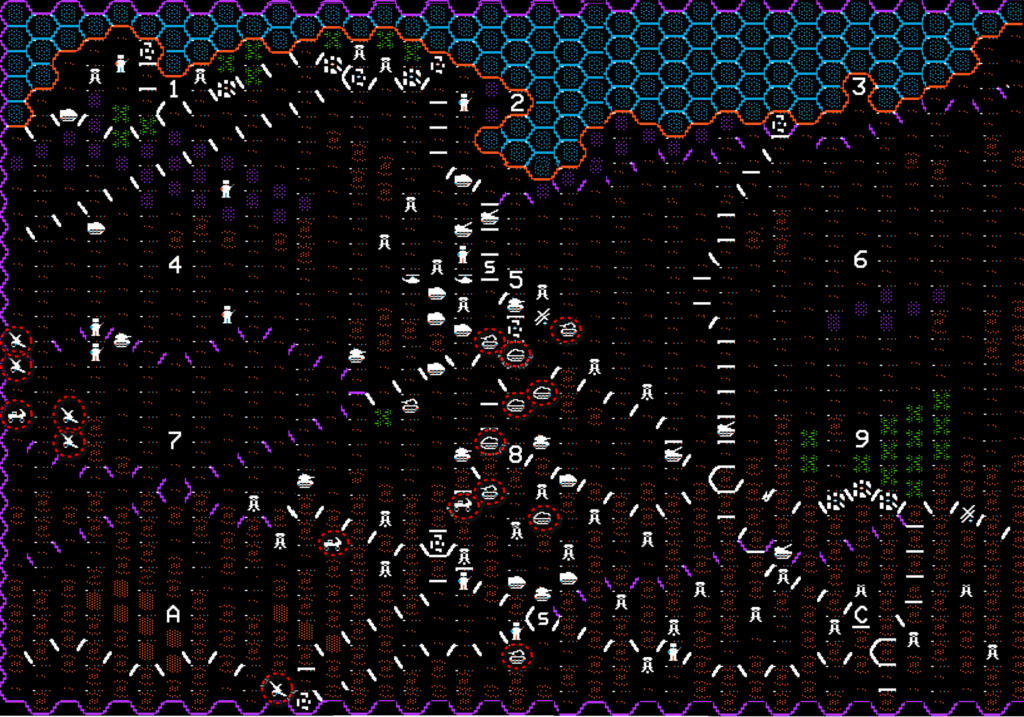
At the start of day 2, I feel I have the situation well in hands :
- I control the 3 airports and all strategic areas, pushing the Soviets to the Northern deserts where I won’t prevail against tanks with only paras,
- I destroyed 11 of their 21 units during the first day, including all their HQ and almost all their artillery, and all my 14 units are all still there,
There are still a few points of attention :
- The Soviets just acquired air superiority, so the my reinforcements will arrive later in the day,
- The Soviets will receive 18 more units during the day – I will receive 17 myself, though pretty light ones – APC and some artillery,
- All the infantry at the bottom of the map has been fighting in difficult conditions, and is mostly depleted at this point. Worse, during the day, all the Soviet reinforcements – the 24 of them – will come from the bottom-left corner of the map.
Due to this, my spread-out infantry in the South gradually fall back to the oasis, not without destroying a Soviet tank that was hanging out at the wrong place at the wrong time.
But I am most happy with the development in the coastal oasis. With no enemy reinforcement coming before the night, I push aggressively both from the oasis and the central city. I deplete some of my units (nothing “Reorganisation” won’t fix in the future), but I manage to completely surround a large enemy force :

The following turn, every single Soviet unit in this area of the map is wiped out : 2 or 3 tanks units, 1 motorized infantry unit, 1 engineer brigade, 1 artillery battery. During the night, the Soviets will receive reinforcements in the area, but they will have nothing to reinforce and will start massively outnumbered locally.
Second night (turns 11-12)
Neither the Soviets nor the Americans use the night for R&R. In the center near the airport at the crossroad, the Soviet surround and bombard a forward position I established. Unfortunately for them, I break the encirclement during my turn and cause them significant losses :
The rest of my troops at the top of the map prepare an ambush along the enemy reinforcement road :
The trap works perfectly, and 2 Soviet units are destroyed the moment they appear.
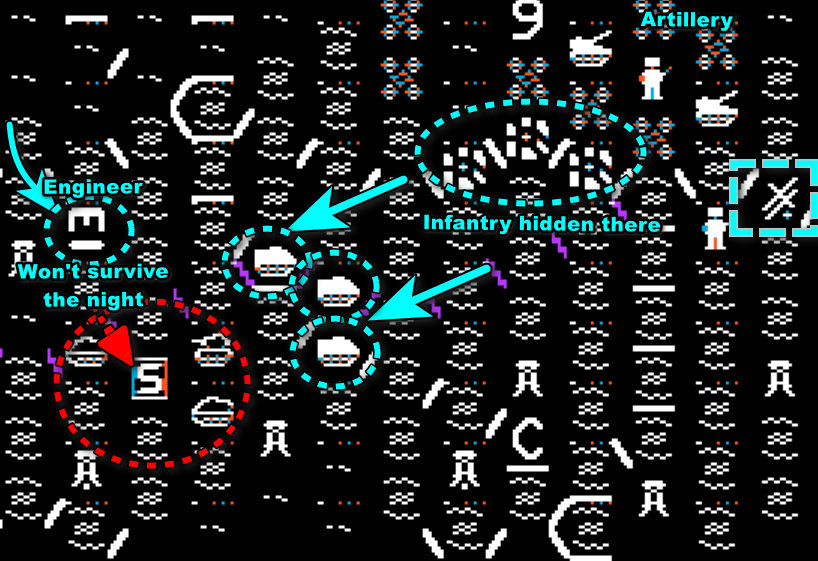
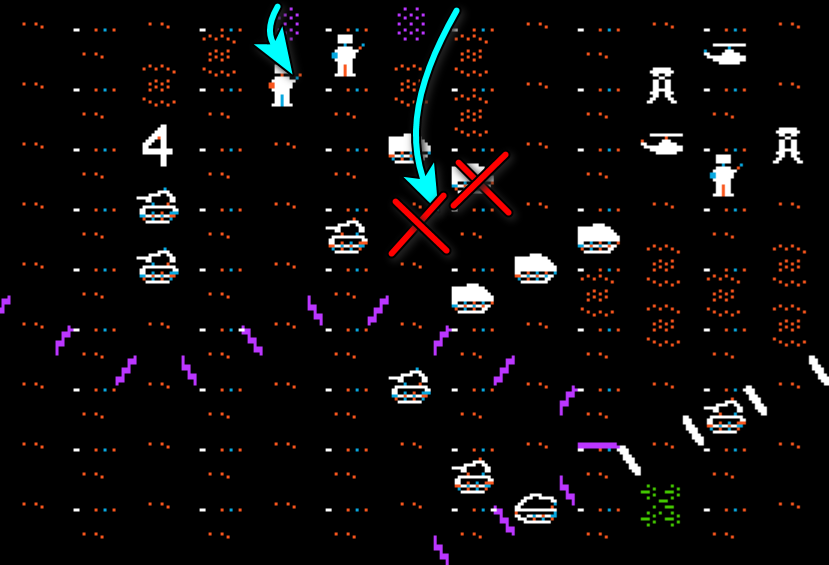
I encounter my first setback in the South. I felt confident I could launch a counter-attack and destroy the tip of the enemy force, but I was not powerful enough. The counter-attack during the Soviet turn destroys the engineers (my first loss of units) and mauls 2 of my 3 APC :
By the end of the night, my final reinforcements are spotted on the horizon : heavy forces, including tanks, and a lot of them : 17 units over 3 waves. Of course, the Russians will receive 26 units.
Day 3 (turns 13 to 16)
On the eve of the third day, there are 2 points of attention on the map :
- On the top left of the map, I feel I have quite an advantage, as I kept destroying enemy reinforcements. I am planning to push more,
- On the bottom right of the map, I will have to resist to a probable assault by superior Soviet force.
The future of the campaign seems to rely on what will happen near the southern airport. Once my reinforcements arrive, I am confident I can destroy the Soviet vanguard. The problem is that the Soviets have retaken air superiority, which means that not only they will have close air support, but also that all my movement in “transport” mode are twice as slow – so it will take 2 turns or more before my reinforcements make their way to the front.
But the battle does not turn at all as expected. In the North I feel smart by destroying 2 advanced enemy units.
But I am then immediately punished by fresh Soviet units attacking all over the battle line. I lose two units immediately, other manage to retreat. I was Rommel, now I am Graziani : I have advanced too deep and too greedily. More than half my units are badly depleted and my slow infantry is unable to retreat. My only option : dig up and divest the reinforcements to the area.
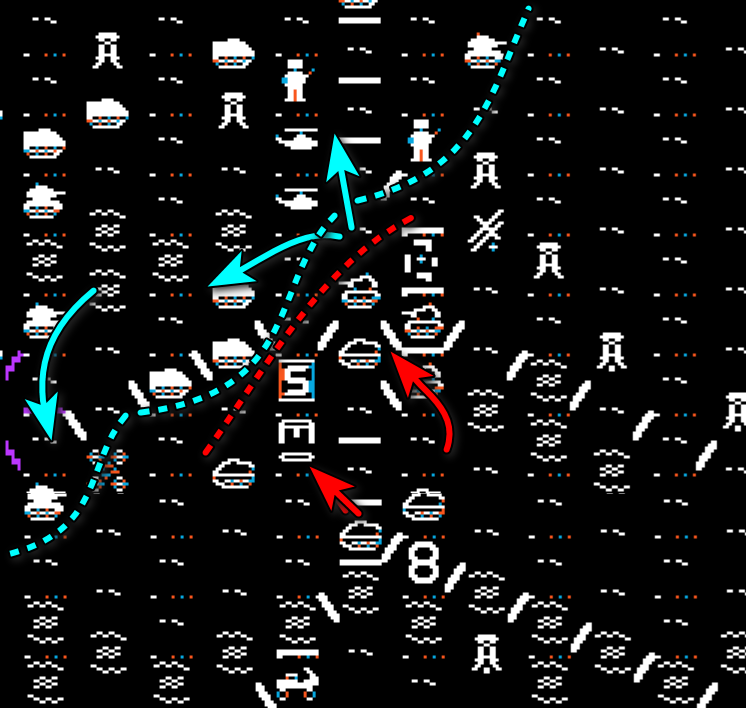
And I can do this, because in the South, the Soviets decided to split their force :
Once the unit is in the middle is routed with the help of artillery, the 2 motorized infantry on the right Are easily isolated and destroyed. The South is saved, I only allocate minimum reinforcements after all – not to help defend, but to start a counter-attack there.
In the North, as my reinforcements pour in, there are massive combats over the whole frontline, with significant losses on both sides. By the end of the day, a very favorable situation emerges :
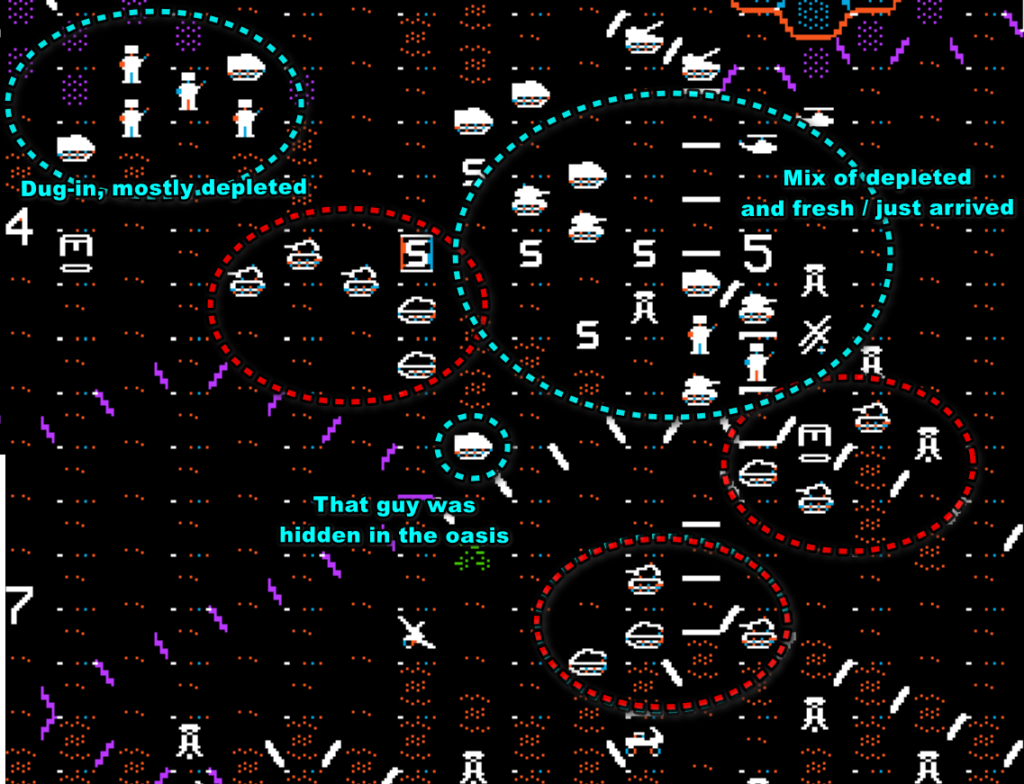
What makes this situation so favorable is the importance in the ruleset of “sighting friendly/enemy” units. When attacking, each friendly unit that can see the target adds +1 column shift (aka +1 damage), each enemy unit which can see gives -1 column shift. In the case above the top Soviet group of 7 units
- is standing in the desert, so quite visible,
- is surrounded on 3 sides by 15+ units that are not in a capacity to fight, but can all watch the element unfold and add their +1 damage to combat,
- gets “prepared” by support fire by artillery, air support and combat helicopters (+8 column shifts),
- can have its retreat blocked by that isolated APC of mine,
Long story short, turn 16 is the darkest turn of the Soviet army in the history of this battle. That’s what left at the end of the day :
3 units, and those 3 units are too damaged to flee.
Third night (turn 17 and 18)
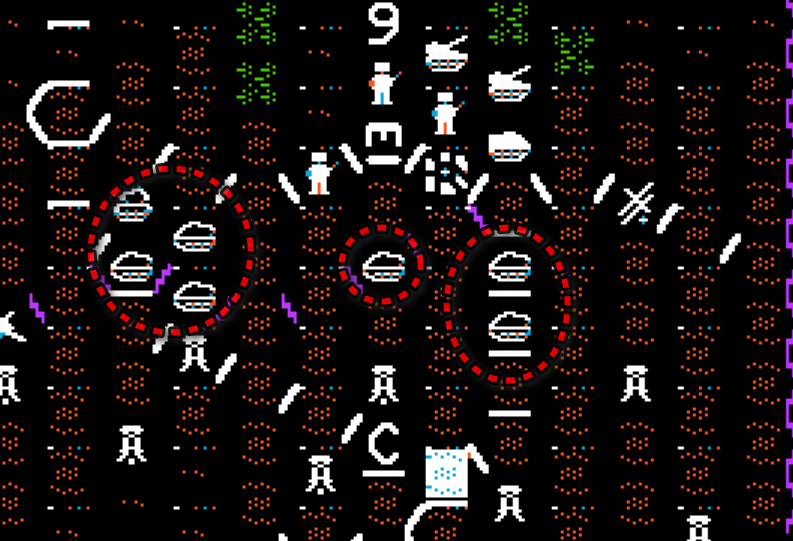
The Russians’ situation is desperate. They regroup what’s left of their force, including those troops that were employed near the southern oasis, and prepare for a last assault on the central airport :
A lot of my units are too far away to help by pointing targets, but I have a GENIUS solution : give ground, and let the Russians have their airport. For now.
Meanwhile, I prepare to envelop this force, helped by the fact that my troops at the oasis can now progress along the bottom of the map. Some of my troops totally ignore the situation and go after the artillery – it is a massacre.
Day 4 (turn 19 – 21)
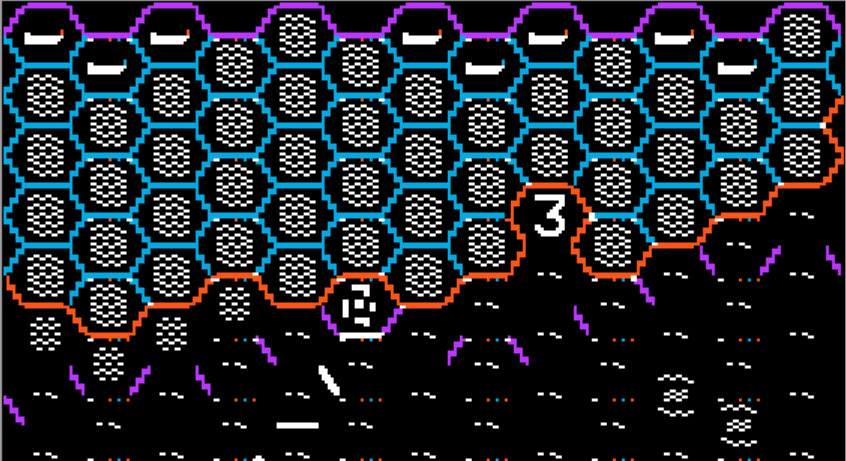
It is the end, the last Russian force is totally surrounded by the beginning of the fourth day. After a few hours of combat, it is totally annihilated.
The victory screen comes turn 21 :

Looking back, I think the very first turns were decisive. The Russians have two strengths in RDF 1985 : their artillery and their number. But I was lucky to land my paras in a position where they could immediately destroy half the starting Russian force, including their starting artillery. After that, I managed to destroy Soviets units quickly enough that they never really outnumbered me. Being able to use the airports and the landing beachs without opposition helped, of course.
After this AAR, I played as the Soviets and I found the game much harder : in this configuration the Soviets have less troops than NATO, even including the ones they are bound to lose in the initial air assault. The NATO forces are elite, supported by constant air attacks. Any Soviet unit on the frontline gets drained from the sky very quickly, forcing the player to keep rotating an already small force. I was defeated.
I had more fun with RDF 1985 than with Germany 1985, but only because I did not have the long learning process for the second game. I believe the two scenarios of Germany 1985 are stronger. The RDF 1985 map has very few features, more than three-quarters of the map is some variation of desert or “light rough” terrain, the rare exceptions being the rough terrain (located in a place where no action happens), the oasis (two patches) and the two cluster of towns (at the same location as the two oases, and with almost the same effects).
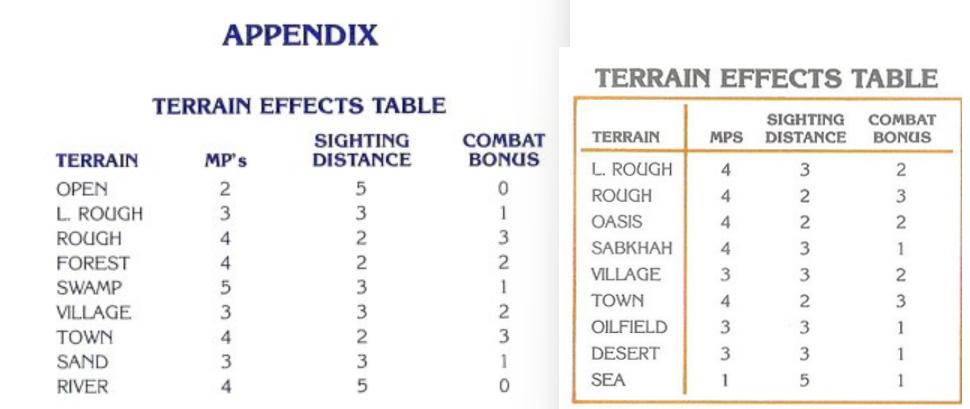
Worse, the terrain has very little impact. In Germany 1985, the sighting distance could go from 2 to 5 which naturally created areas hard to approach (due to the “someone is sighting you” bonus or penalty) and justified using smoke or waiting for the night. In RDF 1985, the range is between 2 and 3 – but really mostly 3 – the end result is that combat is a number game – very high in mobility, true, but also always the same wherever it happens on the map.
We will be leaving the desert and returning to feature-full terrain for the two remaining games in the series : Baltic 1985 and Norway 1985. The games were released in 1984 and 1985 respectively, but I will cover them before reaching their historical release date in order to conclude on the series. But before that, we will be fighting aliens in space. Again.