Previous episode : Introduction and battle of the Coral Sea
And we are back to Guadacanal Campaign, Gary Grigsby’s first monster game, that I will cover in several episodes given how long the main campaign is.
The Japanese had one victory in the battle of the Coral Sea, where they sank one American aircraft carrier and damaged another, both historically and in my earlier AAR. But their fortune turned at the Battle of Midway (4-7 June 1942), where they lost four fleet carriers, only destroying one American carrier (the Yorktown, which for my AAR continuity is convenient since I had lost it).
With the Japanese Navy unfanged, the allies could be on the offensive. As a first step, the allied planned to occupy the Santa Cruz Islands and a tiny island called Tulagi, part of the Florida island group. The idea was to protect the communication between Australia and USA, and to put pressure on the Japanese base of Rabaul.
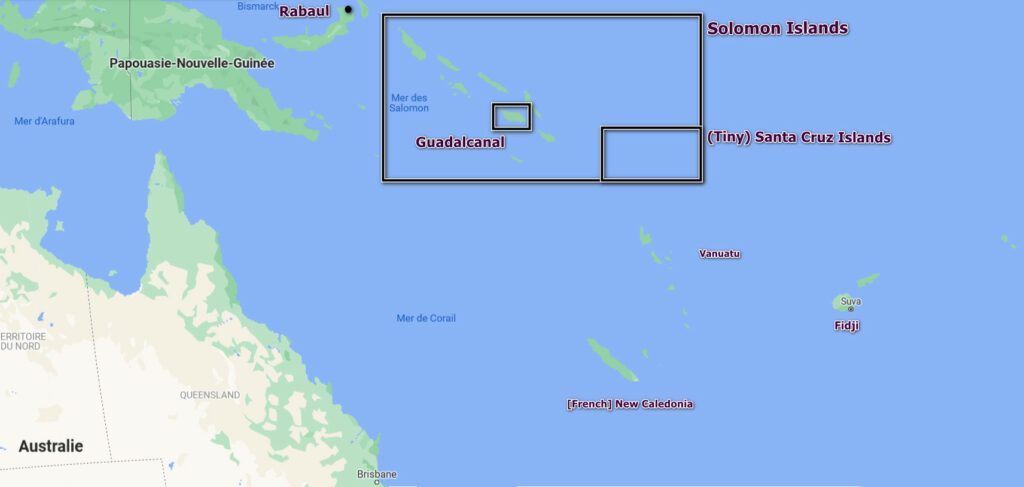
But investigating Tulagi, the Americans discovered that the Japanese were finishing building an airfield in the neighbouring Guadalcanal island. A free airfield in the center of the Solomon Islands was too tempting to pass, and the Americans assaulted it at the same time as Tulagi, the 7th of August 1942.
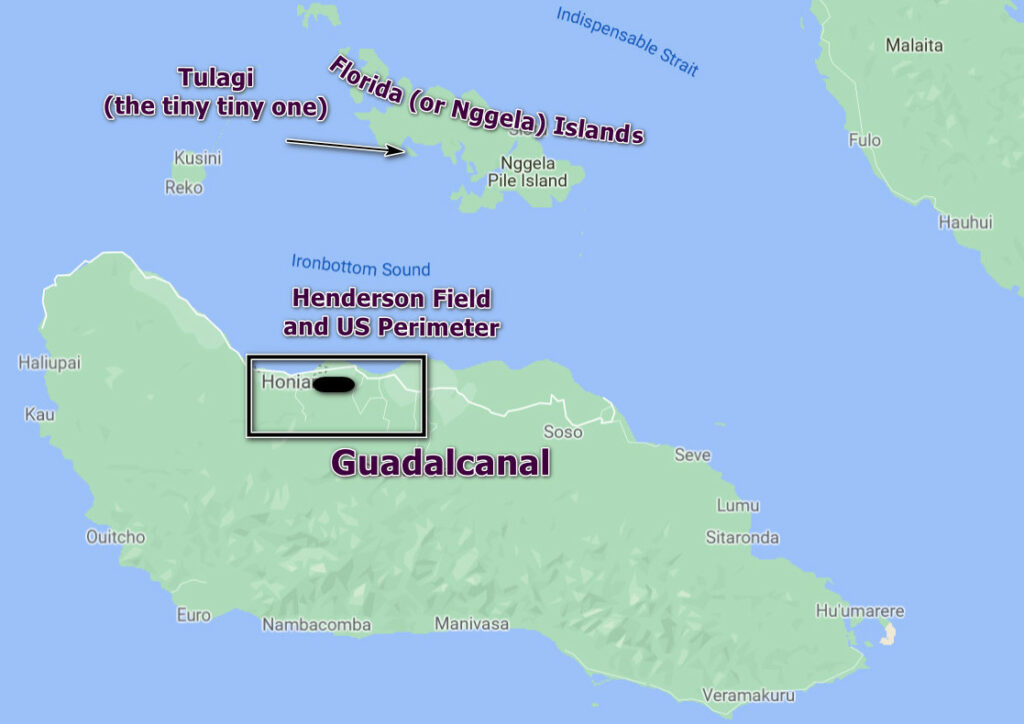
This is the trigger of the Guadalcanal Campaign, during which the Americans and the Japanese would manage for several months to land forces on an island roughly 100 kilometres long and 50 kilometres large, forces who would later fight for the control of Henderson Field. For months, neither navies managed to consistently assert control of the seas around the island.
Gary Grigsby’s Guadalcanal Campaign focuses only on the air and naval operations. The objective of the player, whether American or Japanese (only the American in solitaire), is to keep control of the island by having more troops than the other side, those troops requiring supplies that also need to be transported there.
The player takes control on the 7th of August, with the US transports in their final approach of Guadalcanal while a strong carrier force (the Saratoga, the Lexington and the Wasp) escorts them.

7th – 8th of August 1942 – The battle of Savo Island
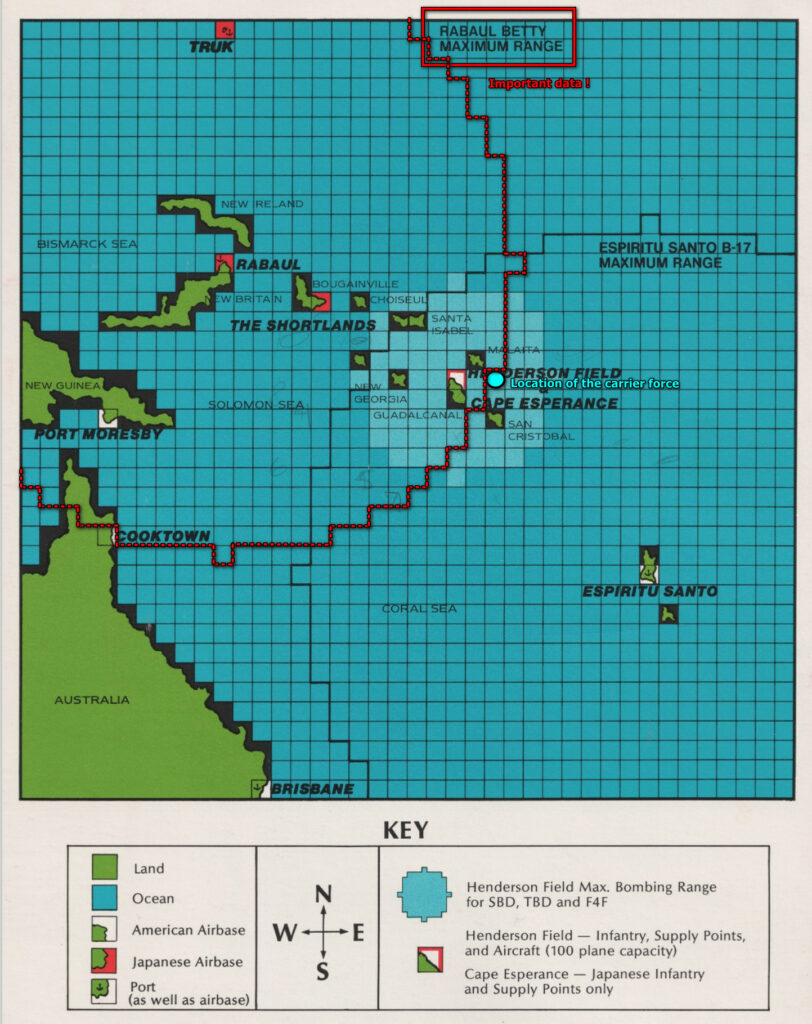
As historically, the US landing is totally unopposed on the 7th of August 1942, though I can expect an air attack in the coming days. To counter it, the carrier fleet takes position just outside of Rabaul’s range, but with its planes able to fly combat air patrol (CAP) missions over the landing beaches.
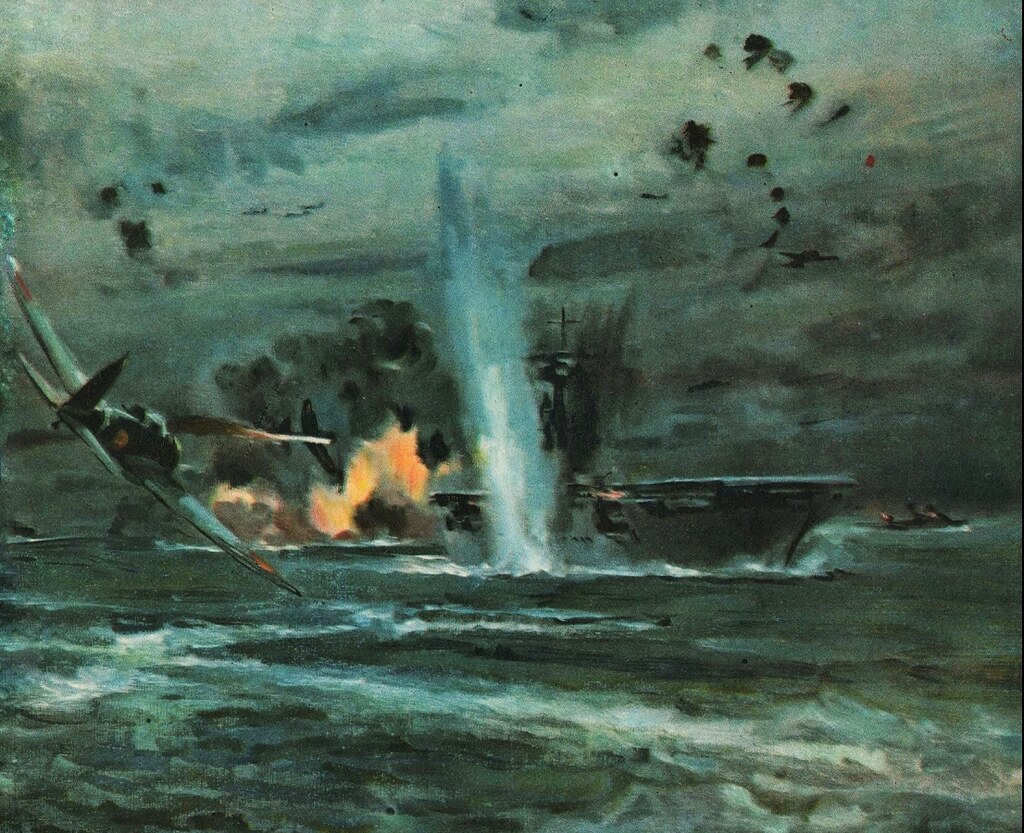
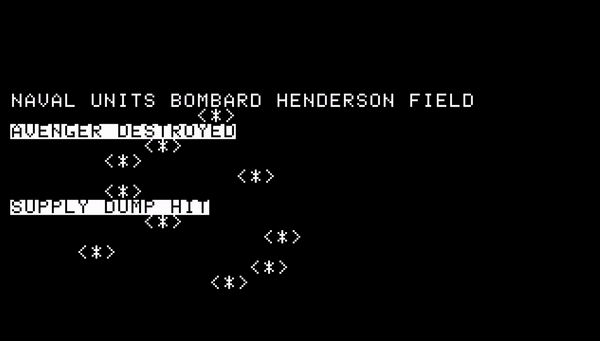
But the 8th, 42 land-based G4M “Betty” escorted by 48 Zeke fighters attack from Rabaul. My air cover is a bit distant so not 100% efficient, and the bombers make it through. The planes focus on the President Jackson, a transport ship, which receives no less than 5 torpedoes, with predictable results :
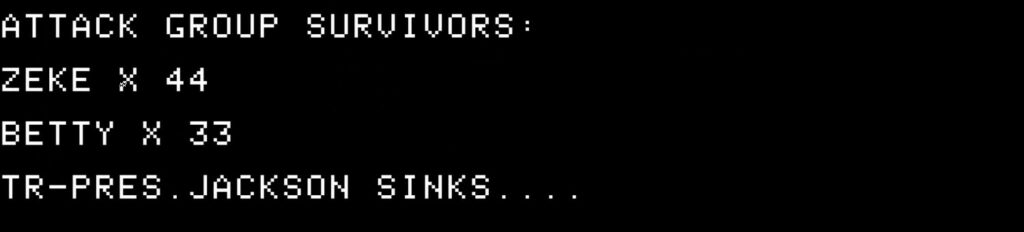
Losing a transport so early is painful – I will only have 20 transport ships for the entire campaign (and 12 transport destroyers), so it is a loss that will never be replaced.
This is simply a hors d’oeuvre. During the night, a Japanese surface fleet (5 heavy cruisers, 2 light cruisers and 4 destroyers) attacks the landing force and its escort by surprise ! My recon planes had totally missed its approach during the day ! This is an exact recreation of the Battle of Savo Island !

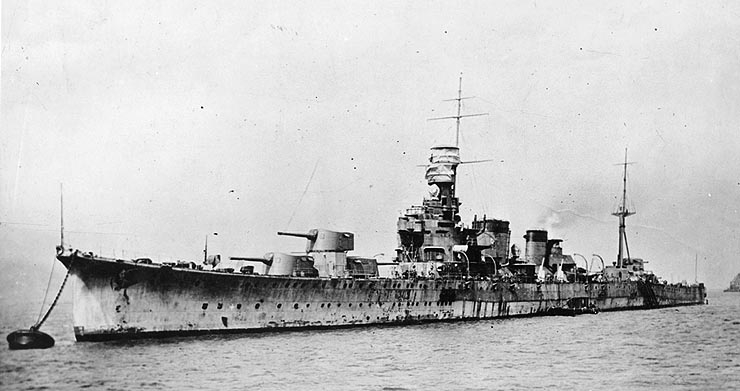
The USS Vincennes is sunk ! A lot of other ships are damaged (1 light cruiser and 1 destroyer crippled, 2 heavy cruisers and 3 destroyers more or less damaged). Still, it could have been worse. My fleet performed much better than historically (4 cruisers sunk) – the battle of Savo Island has been called “the worst defeat of the US Navy” for a reason.

Despite being numerically superior, the Americans were unable to fight back competently (in game terms, the US Navy has a massive handicap in surface combat the first week of the campaign) and I only managed to significantly damage the cruiser Kako in return.
9th – 10th of August 1942 – The pursuit
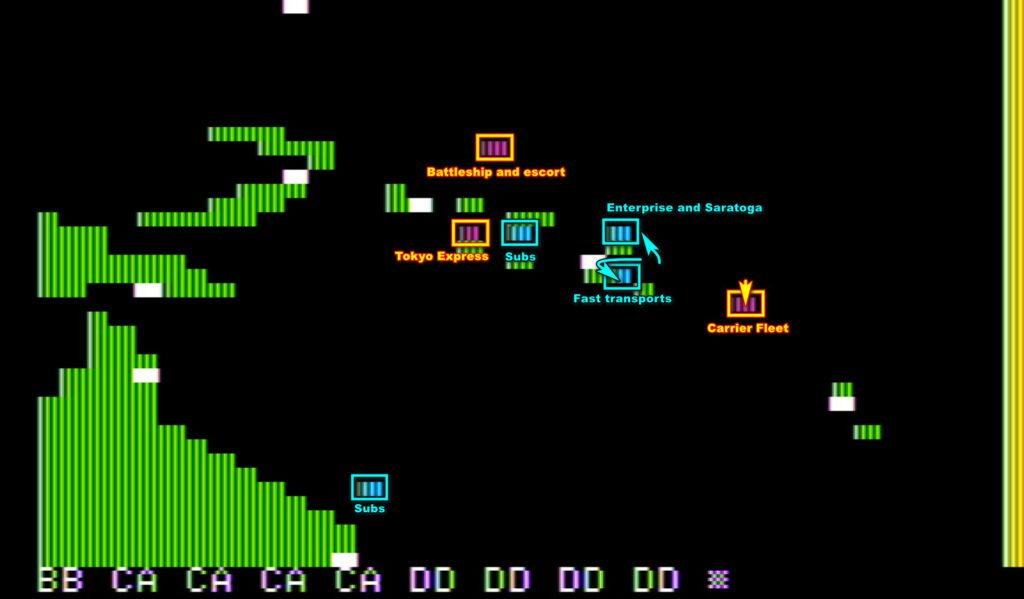
It is time to take my first decision : I can try to pursue the Japanese cruiser fleet, or let it escape. Pursuing means interrupting the air cover for the landing (which has not finished yet) and exposing my fleet to Betty attacks as I will get well into range of Rabaul. But it is also a unique opportunity to remove some Japanese assets from the theatre since there are no Japanese carriers in the area yet. In addition, I believe the full fighter complement of three aircraft carriers (close to 100 Wildcats in total) can shoot down a fair few of the Bettys before they can attack my ships.
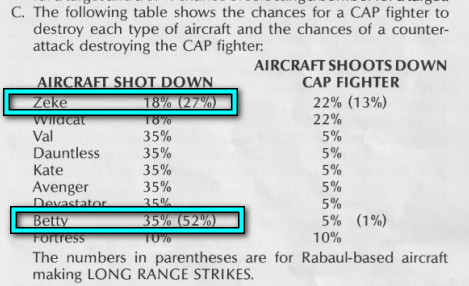
After that, the surviving Bettys will be unlikely to score a hit : Bettys are 4 times more inaccurate than a Japanese dive-bomber, and accuracy is further decreased by the range of the strike and the speed of the targets, and let me tell you that my carriers won’t be waiting for anyone ! What about the President Jackson you say ? Nah, they got lucky.
And so, I am in pursuit, and easily find the Japanese cruiser fleet during the day.
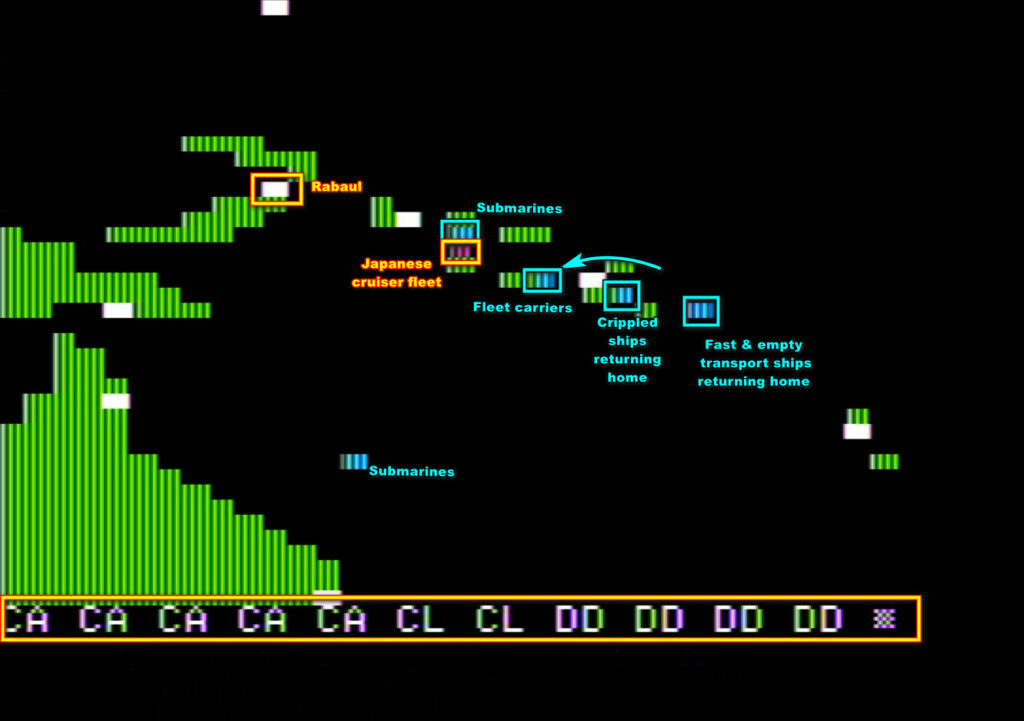
All my bombers and torpedo bombers (TBD Avengers, replacing the obsolete TBD Devastators from the Battle of the Coral Sea) are sent against the cruisers, while all my Wildcats are waiting for the Bettys.
The Bettys attack, as expected. I shoot down more or less as many as expected (16 of them make it through), and their torpedoes don’t hit any of my ships.
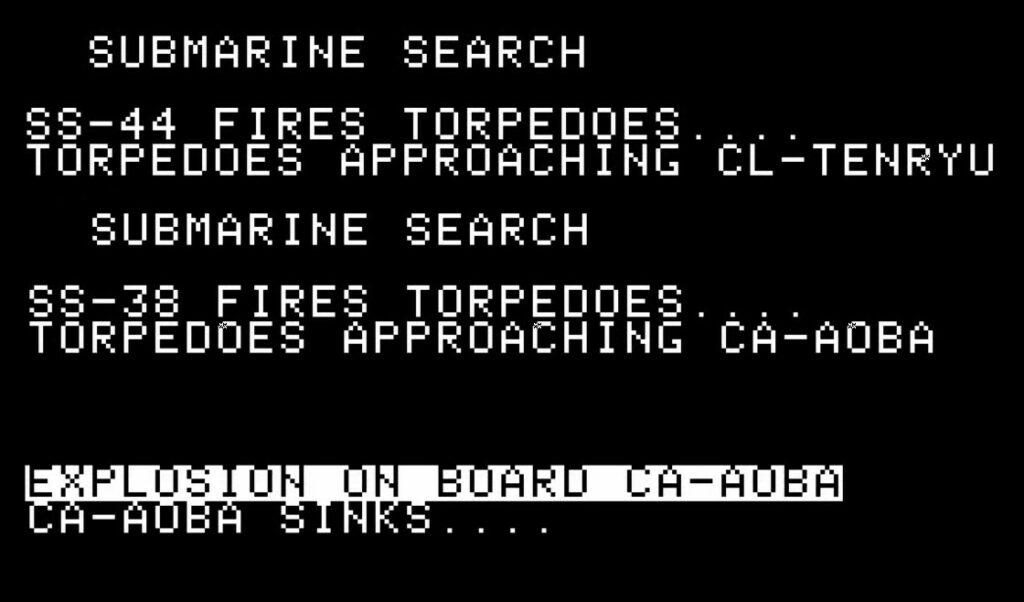
As for my own bombers, they find their targets. Most if not all the enemy ships are hit by bombs and/or torpedoes. The destroyers Yayoi and Akikaze, and the cruiser Kako are sunk.
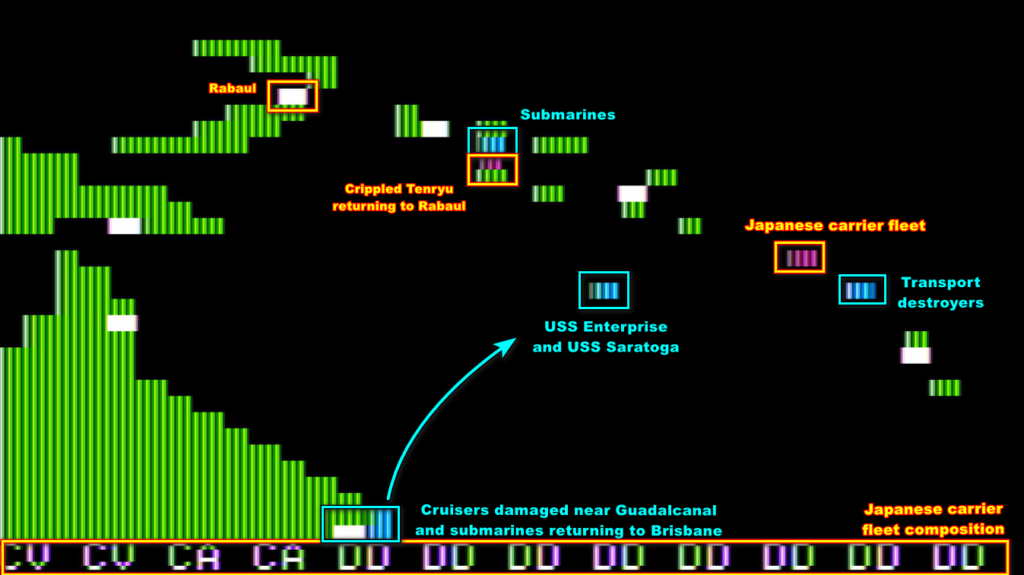
During the night, one of my submarines manages to finish off one of the cruisers I had crippled :
With Rabaul out of planes (an airbase only has 1 chance out of 7 to be refilled every night), I decide to stick around for one more day to finish off any straggling crippled ship. I find the cruiser Furakata and the destroyer Uzuki almost where I had left them the day before (they are moving at 5 knots) and they soon join the Kako and the Aoba. I then withdraw South toward Brisbane.
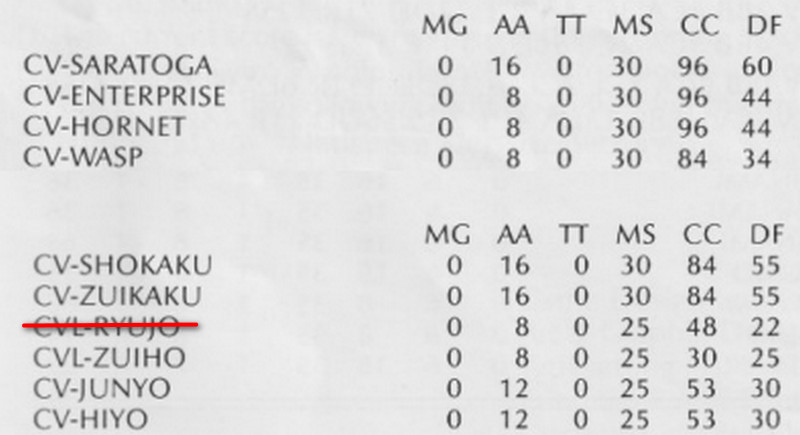
In two days, I sank 3 heavy cruisers out of the 14 that will be available to the Japanese for the campaign, in addition to three destroyers (out of 69…). Sure, the cruisers are from the 20s and the oldest available to Japan, but that’s still quite a dent in their capabilities.
11th-20th of August 1942 – The San Francisco Express
While my carrier fleet is returning to Brisbane (it takes only one week to refuel large ships in Brisbane, against two in Espiritu Santo), my fast transport destroyers (APD : Transport destroyers, and DMS : Destroyer Mine-Sweepers, converted for this campaign to more transport destroyers) are doing supply runs between Espiritu Santo and Henderson Field. I have 9 such destroyers at the moment, and each of them can carry 1 supply by run (the garrison consumes 1 supply by day).
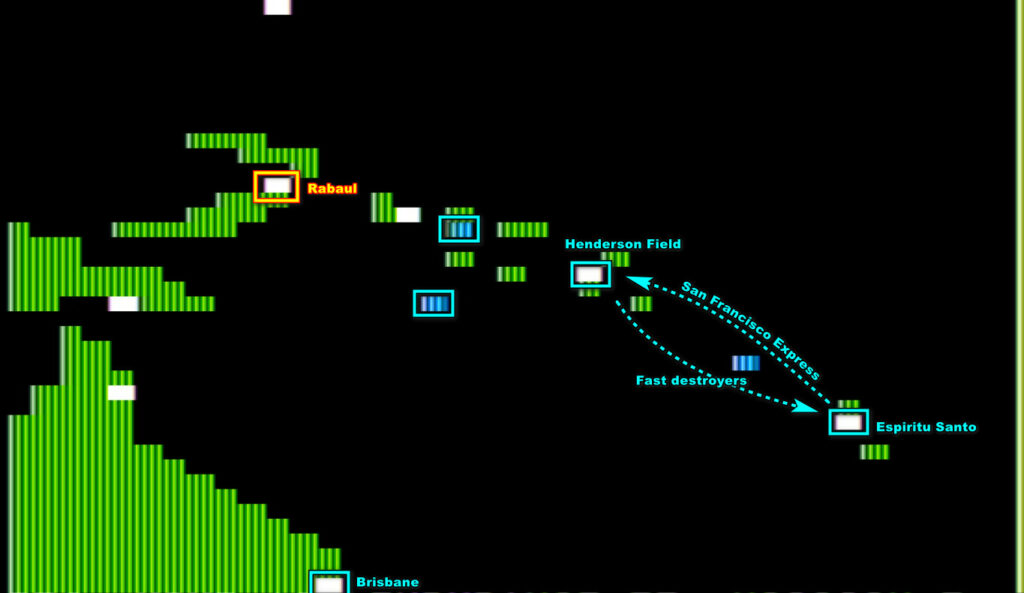
A back-and-forth run takes 4 days, and due to the lack of air cover, I make sure to only drop the supplies at Henderson Field during the night…
… and it happens that the Japanese also feel safer unloading their own supplies at night during their Tokyo Express.
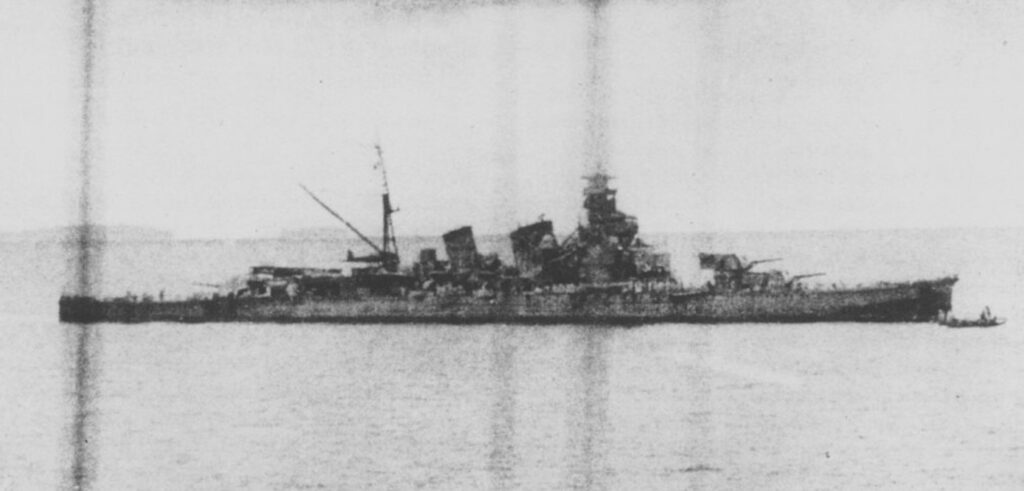
And of course, as was bound to happen, the two expresses collided during the night of the 18th of August, during my second run. Still, I could deliver the supplies as expected, though I received some mild damage – but eh, you should see the other guy ! Sure, I did not sink any of them either, but the Light Cruiser Tenryu received torpedoes and some direct gun hits, so she can’t possibly look too good now.
Nonetheless, a cruiser and a few destroyers need to be repaired and are heading for Brisbane, as reparations there are 20% faster than in Espiritu Santo.
21th-25th of August 1942 – Battle of the Eastern Solomons.
The 20th of August is a milestone : the airfield on Henderson Field, started by the Japanese, is properly finalized by the Seabees, and I can transfer planes from Espiritu Santo to constitute what was dubbed the Cactus Air Force (historically, the first planes were transferred from an Escort Carrier : the USS Long Island, which did not participate in the rest of the combat and for this reason is absent from the game).
But I cannot transfer my planes just like that – if the Japanese manage to pull a coastal bombardment the night after the transfer most of my planes will be gone !
Happily enough, the Saratoga, the Hornet and the Enterprise had finished refitting the 19th. Leaving the Hornet in Brisbane to train new carrier pilots, I use the Saratoga and Enterprise to investigate the seas leading to Guadalcanal the 21st. Well, it turns out that those seas are mostly devoid of Japanese, because said Japanese left Guadalcanal well behind them now.
Unfortunately, the reveal is a bit too late to prevent an attack against my third San Francisco Express run…
… an attack that totally fails, as the Express is intercepted by only 14 Kate torpedo-bombers (identified as being from the Ryūjō, a light aircraft carrier), which fail to hit anything. A submarine is luckier and sinks the converted destroyer minesweeper Zane.
Is it possible that the Japanese fleet only includes one carrier ? In any case, I have a clear course of action : trying to intercept the Japanese carriers as they evacuate North, while using the Henderson Field as a platform to launch additional fighters to protect my carriers. I transfer 100 planes to Guadalcanal – all my reserve !
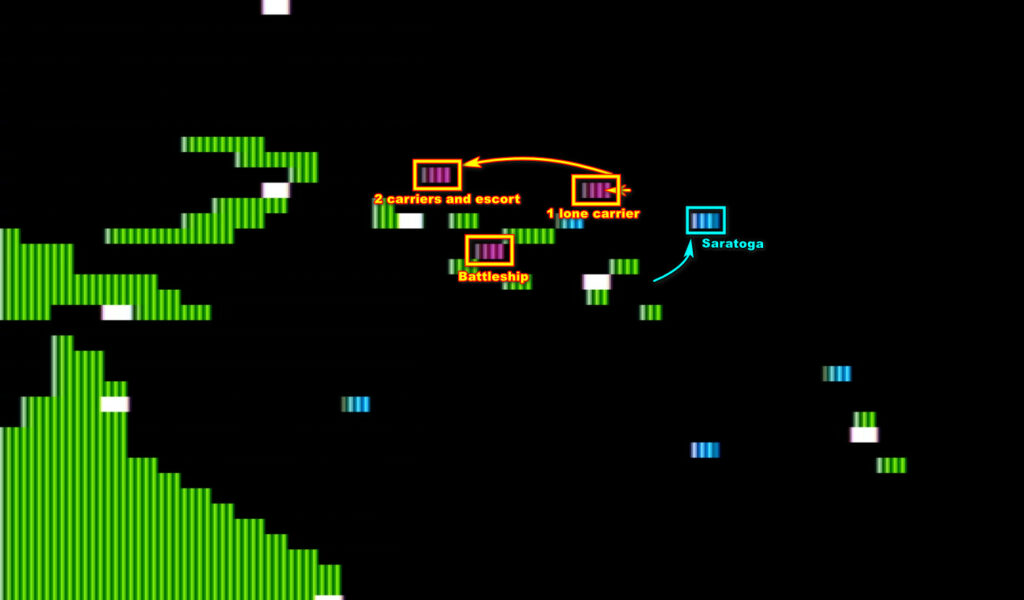
On the 22nd, the two carrier fleets are in range ! Barely in range, so the bombers will be particularly inefficient.
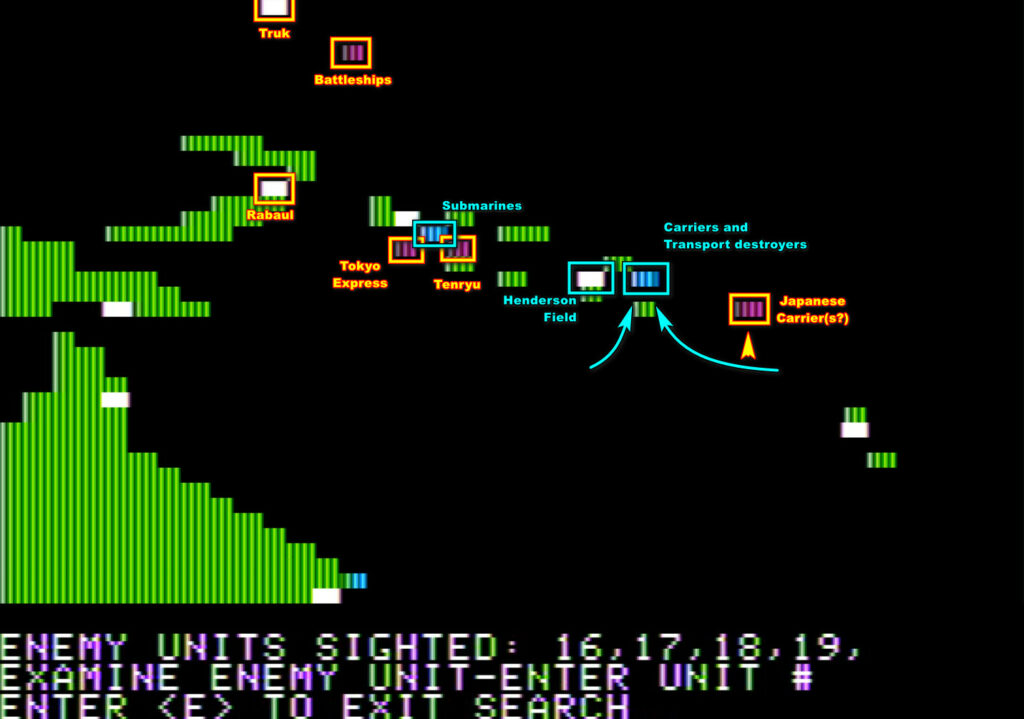
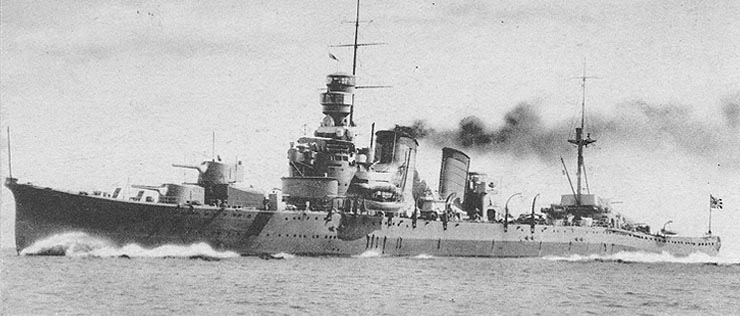
I launch all my planes, though my bombers and torpedo bombers attack unescorted, as I need all my planes to protect my carriers. As my bombers approach, it turns out there are not one, not two, but three aircraft carriers : the Zuikaku, the Shōkaku and the Ryūjō . There are 36 Zeroes flying combat air patrol over them, so my two waves of respectively 51 and 64 bombers make it through. This is almost for nothing though : my first wave hits the Zuikaku once and the Ryūjō once, the second doesn’t hit anything. 81 bombers make it back and I am waiting for them on the bridge to hear what they have to say for themselves.
It is the Japanese turn to attack me, and they are way more accurate : the Saratoga is hit by one bomb, the Enterprise is hit by three bombs and one torpedo – but it is still, barely, able to service aircraft!

At least, my fighters did their job (I had 90, including 13 that could assist from Henderson field) : out of 97 bombers sent after my carriers, only 48 made it back ! Presumably, their commander is waiting for them on their bridge with medals and a commendation from the Emperor.
During the night, I am informed that the CL Tenryu finally sank without further “assistance” from my side.
Later, the San Francisco Express and the Tokyo Express meet once again landing troops in Rabaul. This time, the Japanese prevailed. One destroyer is sunk on each side (the Blue for my side and the Natsugumo on the Japanese side), but my heavy cruiser Quincy receives several torpedoes and is down to 5 knots – it will sink on its own two days later, during the night of the 24th.
The 23rd, fully expecting the Japanese Carrier Fleet to move toward its bases, I move the carriers North, while the San Francisco Express tries to escort the cruiser Quincy to a port.
… but the Japanese instead moved South. They are in range of my fast transports, but only the Ryūjō sends its last planes, most of which being shot down by the Wildcats from Henderson field. Rabaul also tries to send Bettys against my carrier fleet, but few survive and they don’t cause any damage.
The 24th however, the two carrier groups are in range again !

Once again, I send all my bombers without escort (“and this time, try to aim“). The first attack by the Enterprise does not go well, with only a bomb hitting the Zuikaku, but then the pilots from the Saratoga finally, FINALLY make the difference ! Two bombs find the Zuikaku, one of them causing further explosions, so I am pretty she is disfigured now. In addition, one torpedo hits the Ryūjō . 49 bombers make it home.
As for the Japanese bombers, only 18 survive their attacks, but one of them hits the Enterprise, and that’s all that’s needed to disable her. The planes from the Enterprise find their way either to the Saratoga or to Henderson Field…
… but Henderson Field is not so safe after all, during the night a Japanese battleship and its escort shell the base, destroying maybe 40 planes and countless supplies.
The airport is unsafe, supplies are low, and I decide to fly the planes back to Espiritu Santo. The Saratoga is alone.
The 25th is my last chance to destroy a Japanese carrier. I expect the Japanese fleet to be slowed down by their damaged carriers, so I sail North with the Saratoga which must, unsupported, deal the coup-de-grace to the Zuikaku. The now-useless Enterprise follows.
I find out that the Japanese carriers split, with one carrier left behind !
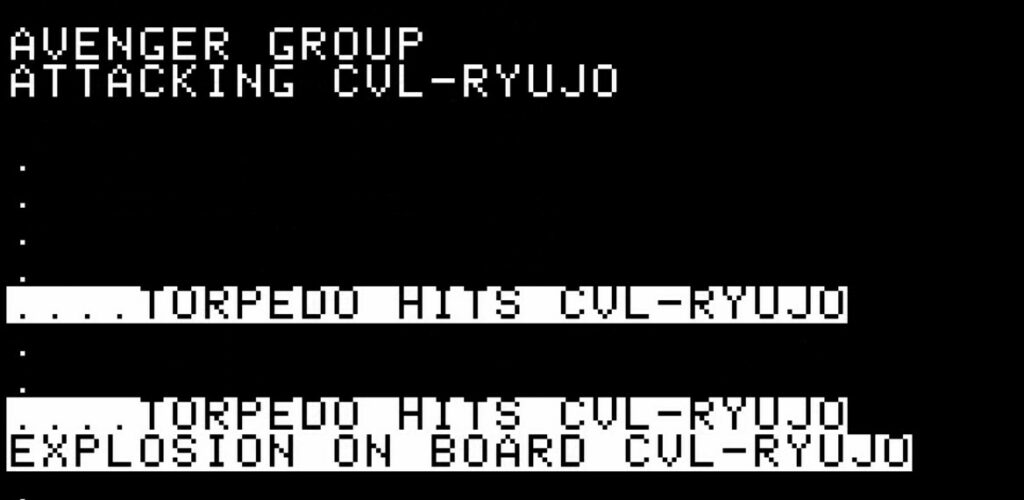
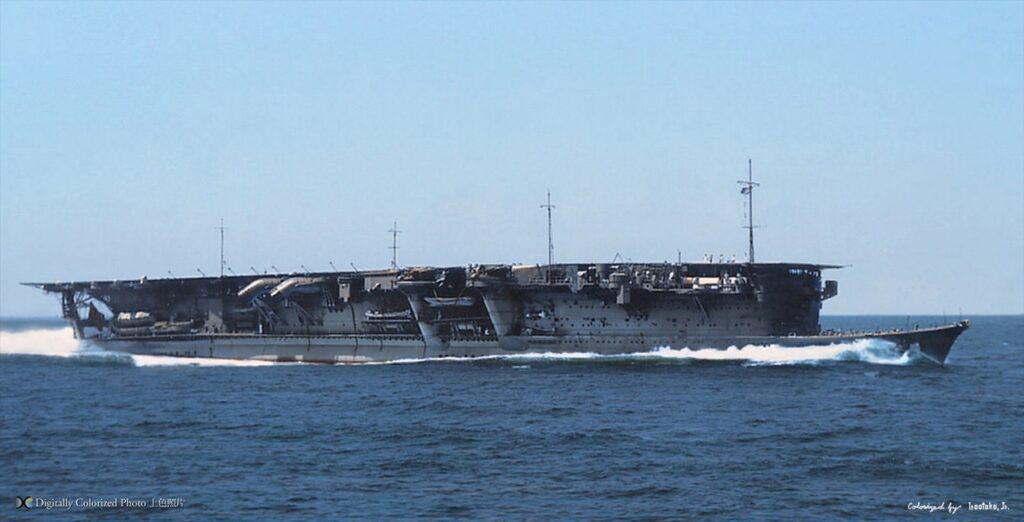
I thought it would be the Zuikaku, but my pilots instead find the Ryūjō . Absolutely defenceless, it is easily sunk by two torpedoes.
And with this ends the Battle of the Eastern Solomons. The Enterprise and the Saratoga return to Brisbane, which they reach on the 31st of August. The Enterprise will require close to 60 days of repair and refit. The Zuikaku and the Shōkaku also managed to return to Truk (presumably) and given the damage it received I don’t expect to see the Zuikaku any time soon, if ever.
Historically, the Battle of the Eastern Solomons happened at the same time (24th – 25th of August) and had similar results (Ryūjō sunk, Enterprise disabled), with a lot fewer planes from either side shot down.
Interlude (26th of August – 1st of September)
The last week of August is calm, as neither me nor the Japanese have any carrier at sea. I run an eventless San Francisco Express. Ït has no impact on the campaign though, as Henderson Field is attacked several times by battleships and planes from Rabaul, and eventually loses all its supplies. The US Marines start starving (I lose 1% of the garrison every day – acceptable, as long as I get my two hot meals a day as the commander-in-chief!).
My heavy transport ships are refuelled, but there is no way I try another run, fast or slow, without air support when there are Japanese battleships in the area.
But on the 30th of August, the Hornet and its planes are ready. I receive cruisers and destroyers transferred from Brisbane the 31st. I also know that the Wasp will be ready for action on the 3rd of September… it is time to plan on retaking the initiative, and to sink those battleships !
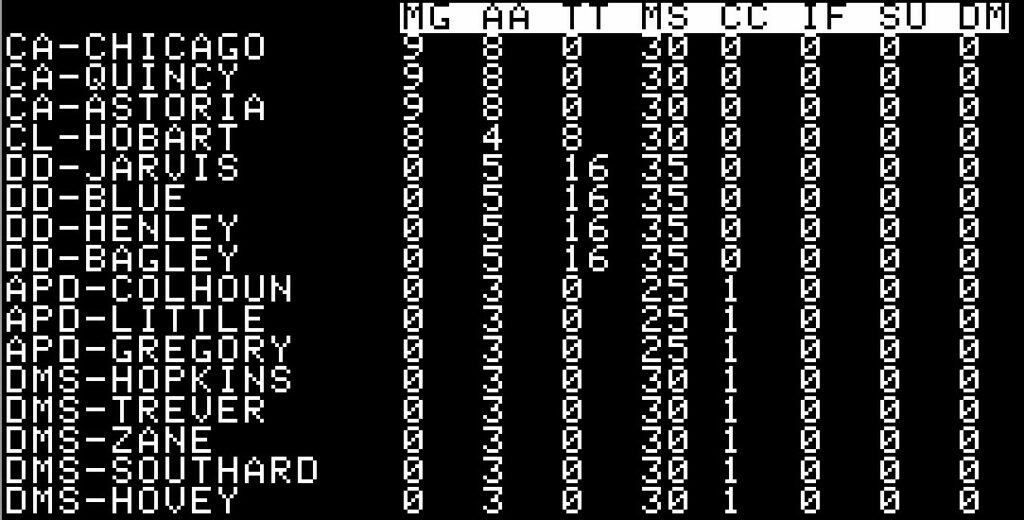
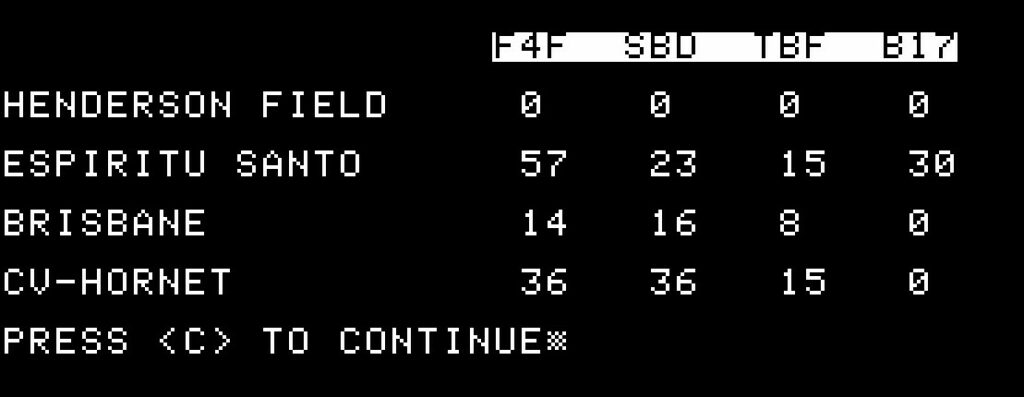
I stop here for now, here is the current list of sunk ships :

This first month has not been too bad. I neutralized two aircraft carriers (out of 6 Japanese carriers for the campaign) at the cost of one (out of 4 American carriers for the campaign), and I managed to limit my other losses.
There are several lessons learned though :
- I lost planes a lot faster than I can replace them, though at least the Hornet arrived with a full complement – I will have to escort my bombers better in the future !
- Japanese are devastating in surface night combat, even when outnumbered. It is due to their very powerful torpedoes, but also because according to the game rules, Japanese attack first when they meet an American “Transport” task force. I need to escort my transports by surface ships in a Combat” task force to even out the odds, or even better – sink their ships with airplanes before they can engage.
So far, I am very enthralled by the game, I have played less than 1/5 of the campaign and there have already been several gambles, hide-and-seek against the enemy carriers, tension as I checked the results of Japanese or American attacks, difficult decisions like abandoning the garrison for a week…
I don’t know if the game can hold my interest for 4 more months, and there are some simplifications I don’t like very much (finding enemy forces seem a bit too guaranteed provided you are in range), and having to manually move every task force every turn is getting tiresome (the game could have had a “go to” command like in Empire), but for now I really want to know where this campaign will lead me.
Next episode : September
Time played so far for the campaign : 3 hours 20 minutes