Earlier episodes of the North Atlantic ’86 AAR : Early November, Late November
Back to North Atlantic ’86. In November, I had managed to retake Iceland from the Soviets and to resupply Scapa Flow, at the cost of a good chunk of my ships, including my two aircraft carriers : the USS Kennedy and USS Vinson. They were not sunk, but disabled all the same. My last strategic objective for the campaign is to retake the Faroe Islands, which will help me resupply Scapa Flow if needed, but more importantly will earn me a lot of Victory Points !
Compared to early November, I have lost between one-third and one-half of my escorts, so I cannot protect everything anymore. I have to make some hard choices :
- I allocate most of my escorts to the Carrier Group, which is almost as powerful as my initial carrier group in early November (it only has one less destroyer, and of course one less carrier).
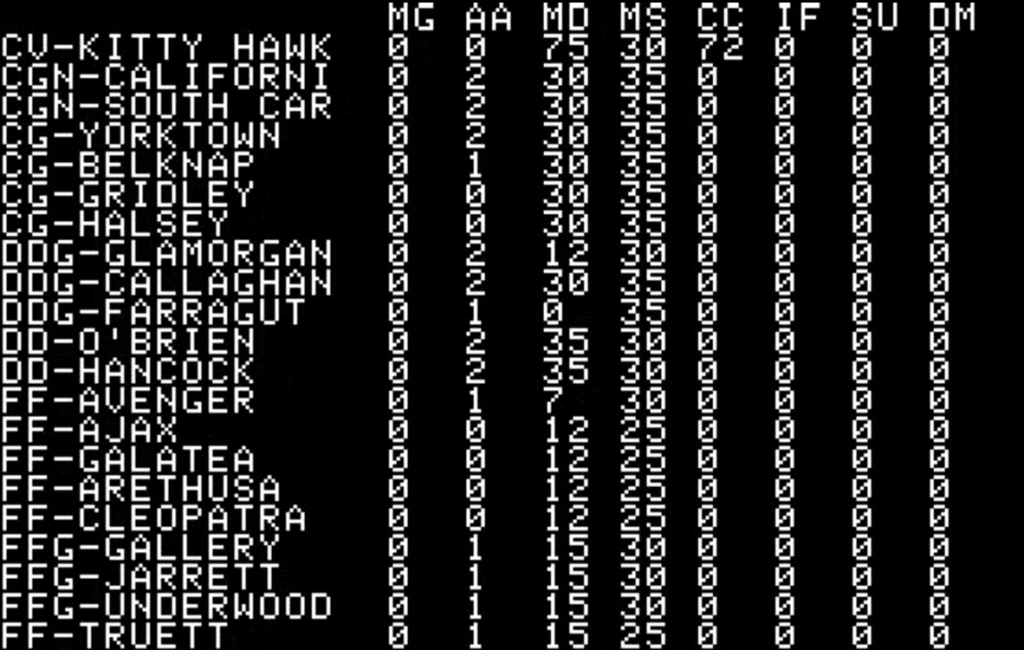
- The transport force only receives 7 escort ships,
The convoy almost exclusively transports supplies. The men will drop from the air : the Faroes are in range of Starlifter transport planes taking off from Iceland. While my convoy travels, I will reinforce Iceland with 30 000 men earmarked to land on my target.
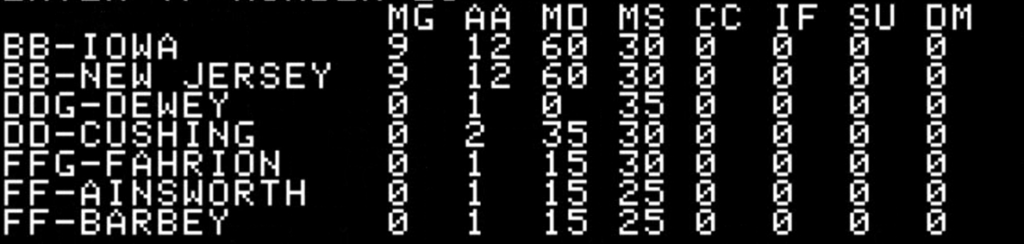
- Finally, the bombardment fleet receives only 5 escort ships. From my experience, they are not going to be a priority target so its best defense is going to be its inconspicuousness.
December 1st to December 5th – The approach
Learning the lessons from November, I decide to first head North-East toward Iceland, and then sail South-East to the Faroes. This should leave me in range of the devastating Tu-22 Backfires from Hamburg for as little time as possible.
I use the first day to transfer bombers from the Kitty Hawk to Iceland and from there to Scapa Flow, allowing me to pack the Kitty Hawk with Tomcats and even Harriers – hopefully compensating for having only one carrier. Moreover, I want as many bombers as possible in Scapa Flow, first to destroy all the supplies the Soviets have in the Faroes and prevent Soviet air missions from there, and then to fly support missions for the landing force.
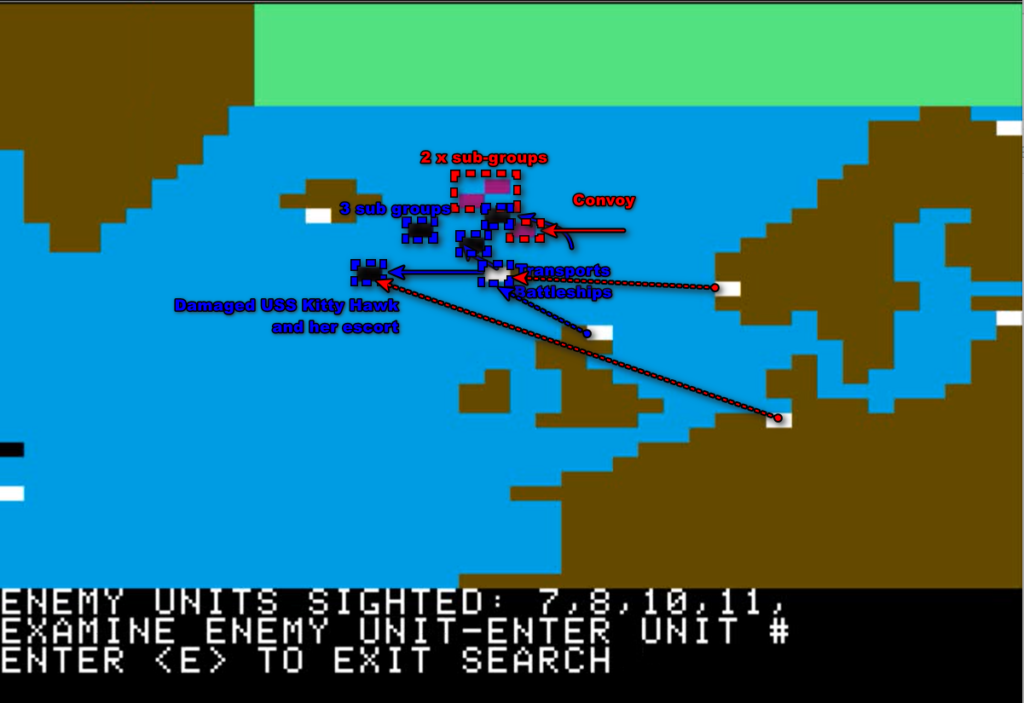
I am not discrete for long though – a soviet submarine group tails me almost immediately :
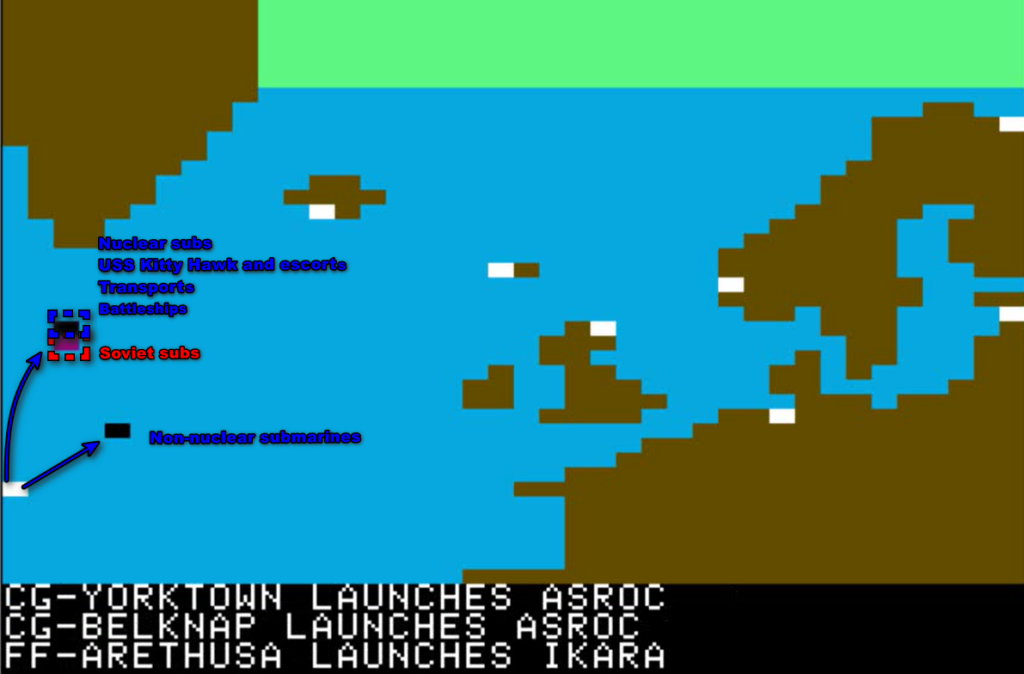
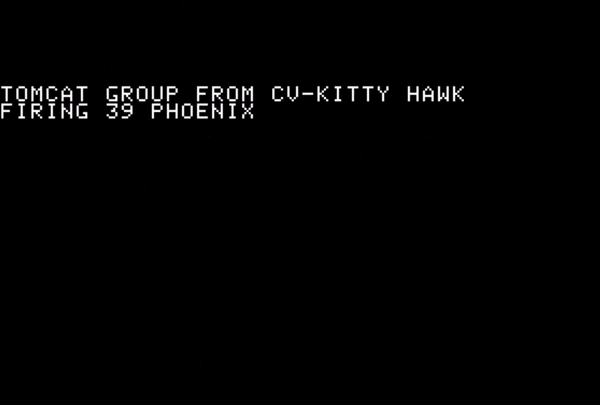
It follows me for the night, and starts sending missiles the 2nd of December, but nothing my Tomcats can’t handle :

Their torpedo attacks are more effective. They sink or cripple a couple of transports and manage to hit one of the battleships :
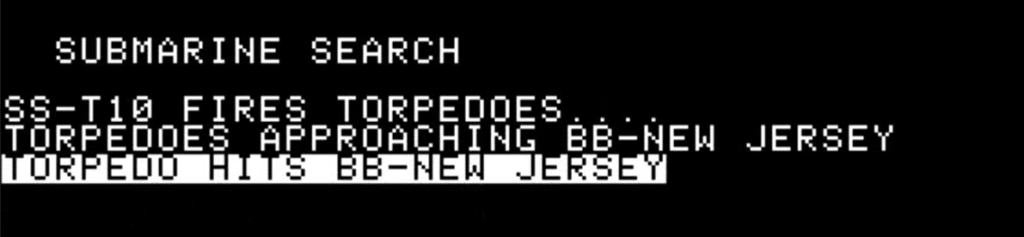
Not great, but the USS New Jersey is still going at the speed of the transports, so it will carry on.
On my side, I sink a small number of Soviet submarines, though not 3-4 submarines by turn like in November. When I reach Iceland, the submarines stop following me, and I wheel South toward the Faroes.
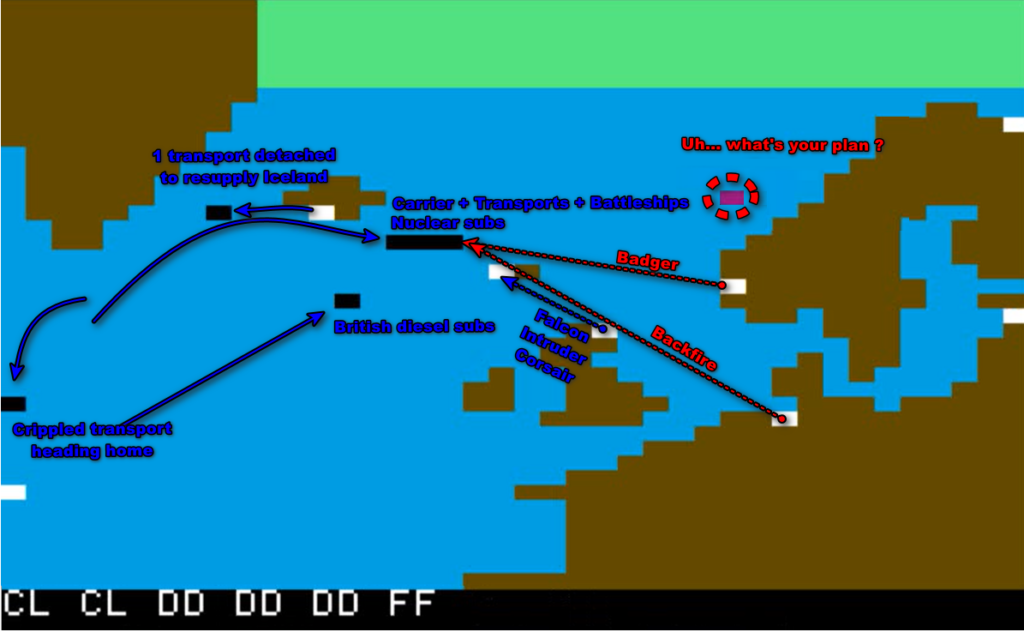
December 5th and December 6th : The turning point
The last leg of the journey from Iceland to the Faroes is the most dangerous. The airport on the Faroe Islands has been suppressed, but the Soviets can hit me from both Hamburg and Bergen.
And they immediately do :
Three escorts are lost. That stings. The Badgers from Bergen did not reach sufficient critical mass to pass the Phoenix barrage, but there are now more than 70 Backfires in Hamburg, and that’s definitely critical mass. Moreover, not all my Tomcats could engage. As always in this engine, I have the choice between :
- Combat Air Patrol, where all the planes will defend their airport or carrier group, but only it,
- Long Range Combat Air Patrol, where the planes will defend all task forces in range (so including the transport fleet in my case), but with only a fraction of our planes,
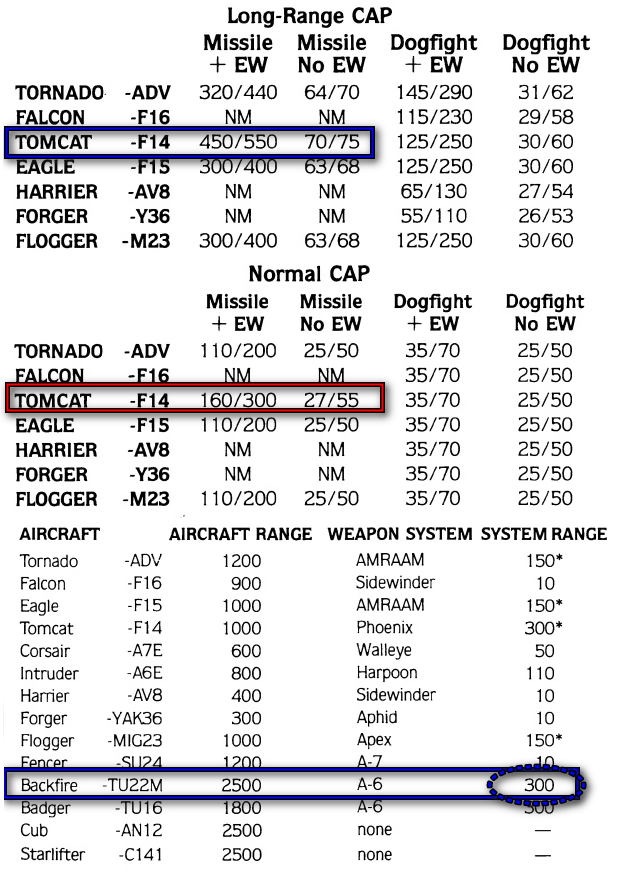
In North Atlantic ’86, there is a slight twist. In Long Range Combat Air Patrol, the distance at which air targets are engaged increases, reaching an average of 500km in good conditions for a Tomcat instead of only 230 km. As the range of the AS-6 anti-ship missiles carried by the Backfire and the Badger is 300km, the only way to intercept the launchers rather than the missiles is to have Tomcats in Long Range Combat Air Patrol.
I want to slowly reduce the number of enemy anti-ship planes, and incidentally protect my transports, so I used Long Range Combat Air Patrol for all my planes, and consequently not enough Phoenix missiles were shot at the AS-6 missiles ; some made it through.
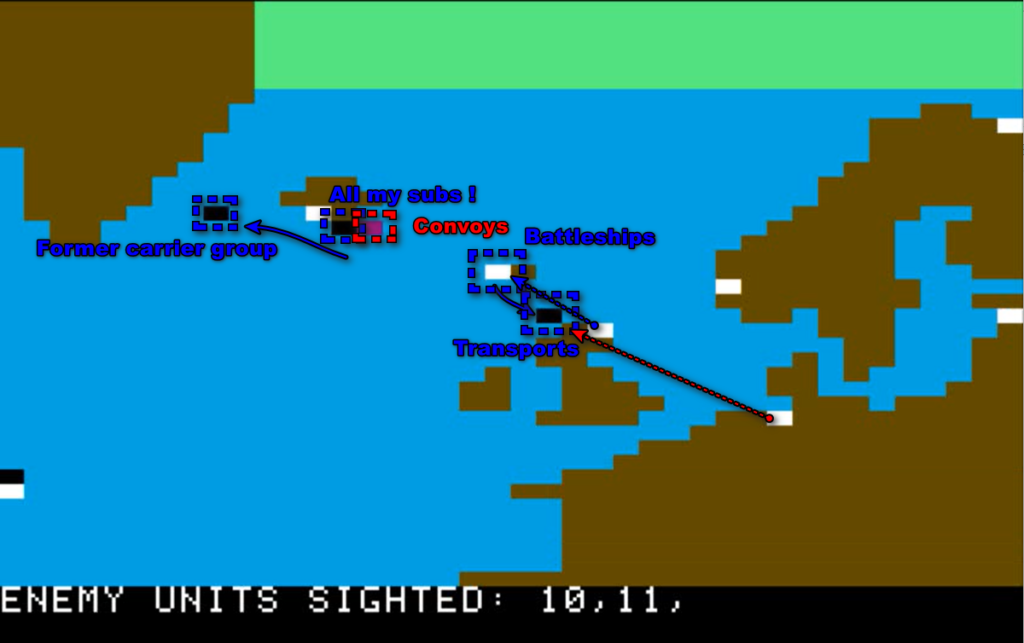
That’s for the air combat. On the sea, there is another surprise :
A Soviet fleet of cruisers seems to be heading, well, somewhere…
I learn more about this the following day with additional reconnaissance reports : transport convoy.

In all likelihood, the Soviet convoy is slowly heading toward Iceland, and I don’t expect it to be rerouted to the Faroes. I detach submarines to harass them, but I decide that my planes from Scapa Flow will keep their original mission : support the paradrop from Iceland.
My ships are attacked once more from Hamburg and Bergen. Fortunately, the Soviets exhausted a lot of their Su-24 Fencers to Scapa Flow and they don’t seem to be using them, so I only have the usual Badgers and Backfires to fend-off. This time, they hit mostly my transports, with a couple of escorts destroyed here and there.
Finally, my transports arrive at the landing zone in the afternoon. The first air assault wave jumps on the islands :
Supported by almost all the planes currently in Scapa Flow (even fighters that I equipped with bombs), the air assault is an unexpected success : the airport is immediately seized !
Unfortunately, the silver clouds have a dark lining : the ships are under attack again…
… whoops… this one is not good. The Kitty Hawk is badly hit and unable to service aircraft.
And consequently…

There goes my capacity to escort anything with planes until the end of the campaign.
December 7th to December 9th : Dramas in the Atlantic
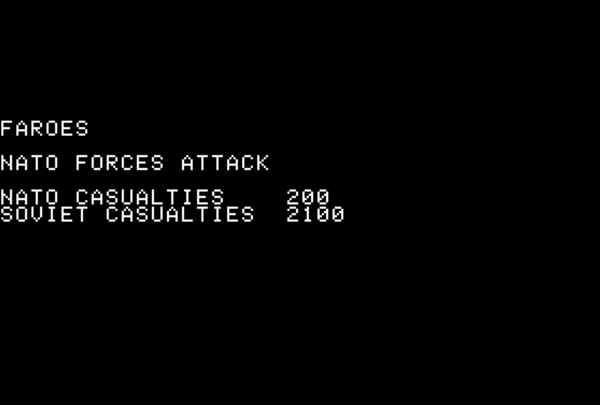
The past two days have brought a lot of objectively terrible news mitigated by one good piece of news : I took control of the Faroese airport, which means the Soviets cannot airlift supplies on the islands – and I know that they do not have reserves to live on after I bombarded them day and night for the past week.
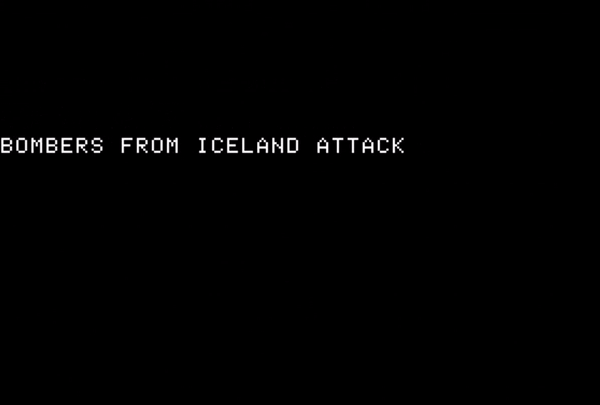
On the 7th, the Soviets paradrop 30 000 men to the Faroes from Bergen to the Faroes (half in the morning, half in the afternoon). I bring roughly the same number from Iceland, in addition to the 10 000 or so men already there. Both sides also fly ground support missions, but from the output of the land battles I deduce that mine are way more effective :

The difference must come from the planes, because I am actually not unloading any supply for my men. It seems to be a bug, possibly because my men took the airport but not the harbour. As I own the airport, the game considers I own the “base” and that I need neither naval support nor to land the supplies directly on the beach, but as I don’t own the harbour the game does not want to unload my supply ships there either.
It takes me a full day to realize this, during which my transports sit idle doing nothing. The only reason they survive is that the Soviet anti-ship planes are focused on the fleet carrier. The Kitty Hawk is trying to flee back to America, but the force is attacked by the usual horde of Backfires – the Badger have been badly depleted the previous turn and the Soviets decided not to use them this turn, even though they had no risk of being intercepted anymore.
The AS-6 hit almost defenceless escorts (they are sea-skimming missiles, which means the escort ships cannot shoot them down, only try to jam them) :

At least the Kitty Hawk was not hit and can reach a safe are..

Ah. Oh, well. my carrier fleet is now carrierless.
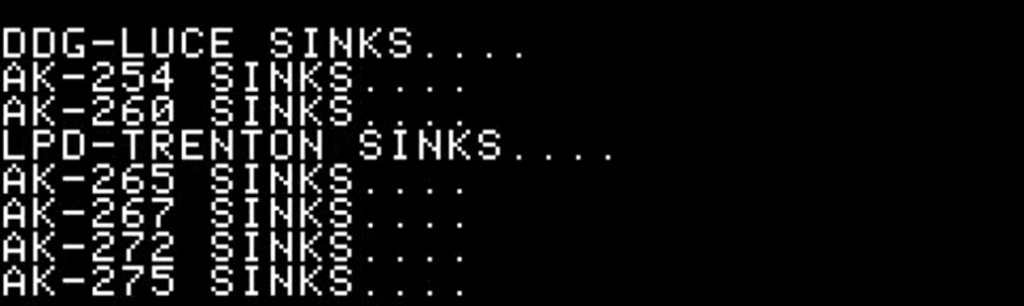
Meanwhile, the Soviet fleets are harassed by my submarines, and I sink a good number of escorts and transports :

The following day, I finally understand the situation with my idle transport ships ; it will take me slightly more time to realize that my battleships are not doing anything either. I decide to reroute the transports to Scapa Flow. During one turn, they are very conspicuous unescorted targets, and the Soviets just rack up kills :
But soon they arrive in Scapa Flow in which they can unload safely – the anti-ship planes cannot hit ships in harbours and dumb bombers are currently busy supporting the Soviet Marines in the Faroes.
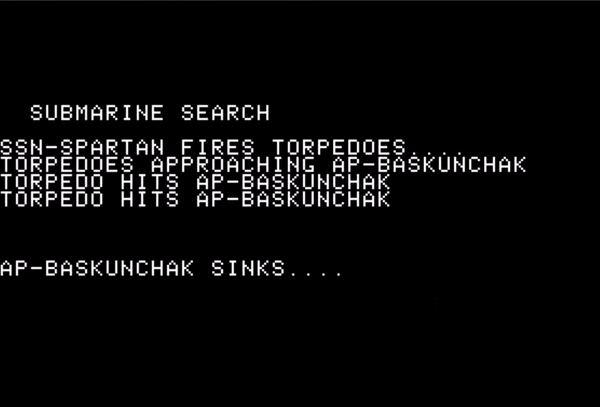
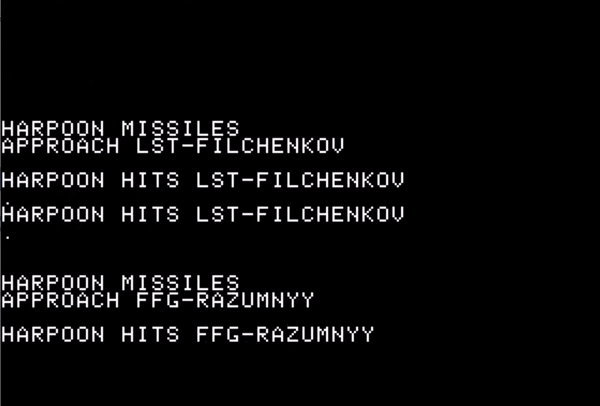
On the 8th of December, I am finally able to consistently predict the trajectory of the Soviet ships, and I attack them every turn with every single submarine I have, using both anti-ship missiles and torpedoes. In one turn, I manage to sink 8 ships.
The Soviet carry on, and a much depleted force manages to reach Keflavik the night of the 8th.
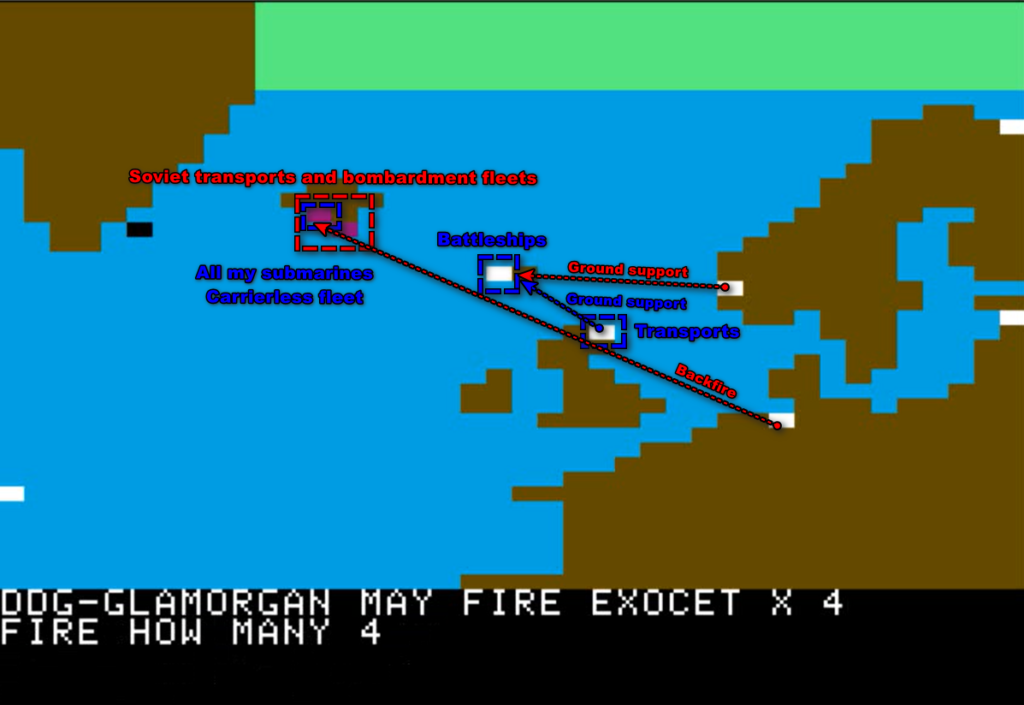
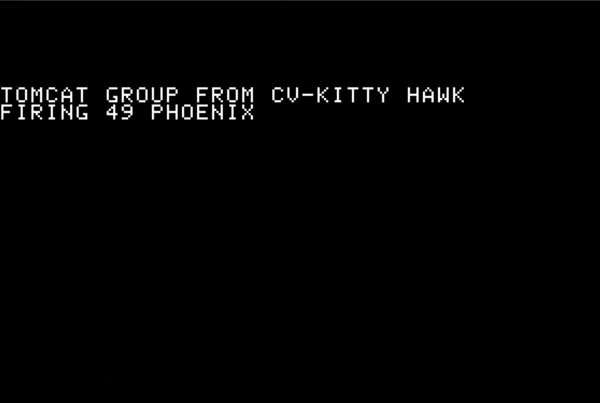
That’s when I decide to unleash a fury of missiles from my carrierless fleet, which had turned back for one last combat. Those missiles join the ones launched from the submarines, and the damage is devastating :
This is not a complete free lunch for my surface ships. They are very much detected now, and of course the Backfire don’t miss the opportunity as the Icelandic port is actually within their range. They sink a good chunk of my remaining ships. Immediately thereafter, we have the only surface combat of the campaign, as remains of the Soviet ships engage my fleet in Reykjavik harbour. Both fleets are too crippled to do any significant damage to the other.
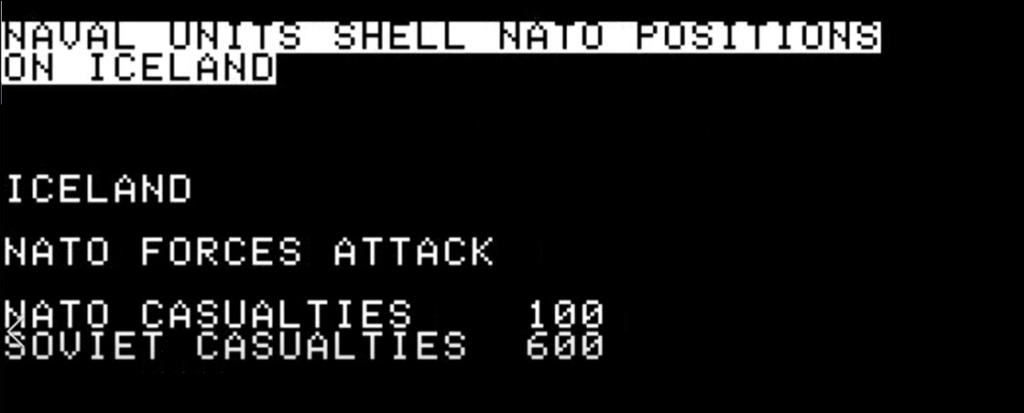
The Soviets made it ! They reached Iceland !
They unload a grand total of 600 men, supported by naval artillery – no fewer than three frigates, and maybe even a couple of old dushkas from the surviving transport, too ! The 600 men are immediately disposed of by the 10 000 or so defenders of the island.
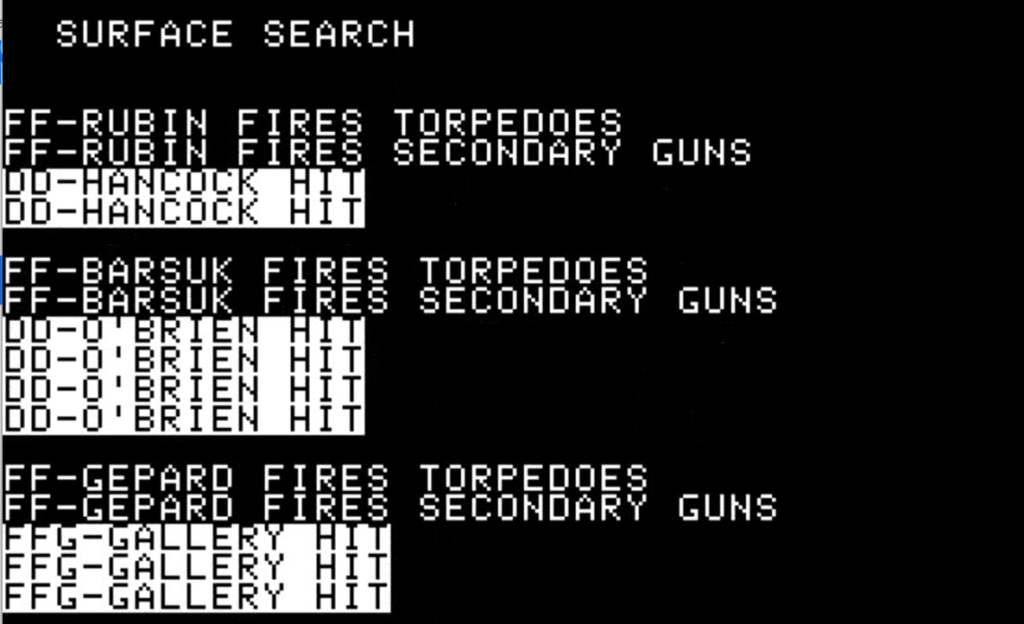
The last Soviet ships – all 4 of them – are sunk by my submarines on the morning of the 9th. Both Soviet fleets have disappeared from the map.
December 10th to December 15th : The final retreats
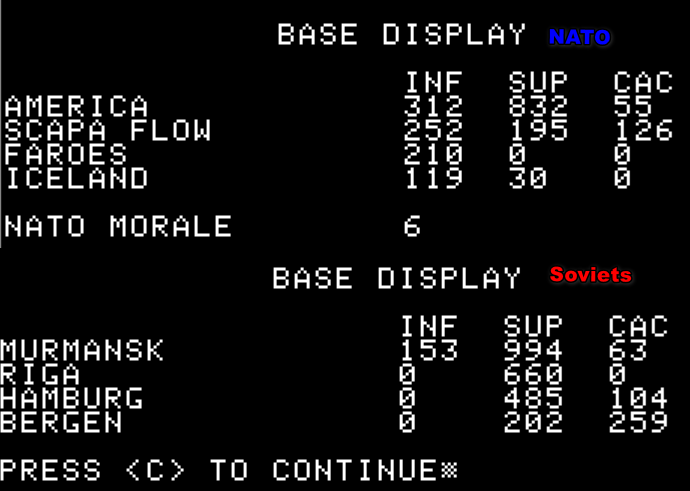
The Soviet fleet is gone, I sank every single transport available to them (which are all replaced by AK-XXX ships, but these cannot transport men). As for their troops, they don’t have any more to send to the Faroes.
In the Faroes, the Soviets never manage to out-air support me. The lack of supplies doubles the losses of both sides, but efficient air support prevents losses in the first place, and turn after turn I see results like this one:

Eventually, around the 15th, the last Soviet soldier is removed from the island. Still, the AI will fail to recognize this situation and the Soviets will run absolutely useless ground support missions every single turn until the end of the game – removing all pressure from Scapa Flow.
I recognize the uselessness of my bombardment fleet on the 10th. I turn its electronic warfare off and head home. It is as inconspicuous as ever, and the Backfires don’t come knocking. It also somehow avoids the Soviet submarines and all the ships make it home.
The last fleet in a predicament is the transport fleet. I try to use heavy overcast weather to escape undetected, to no avail. Scapa Flow is just too close to the Soviet bases to be unnoticed, and the transports are harassed by Backfires on the way out, before being engaged by some of the last Soviet submarines. Very few ships make it back to their home base on the 14th.
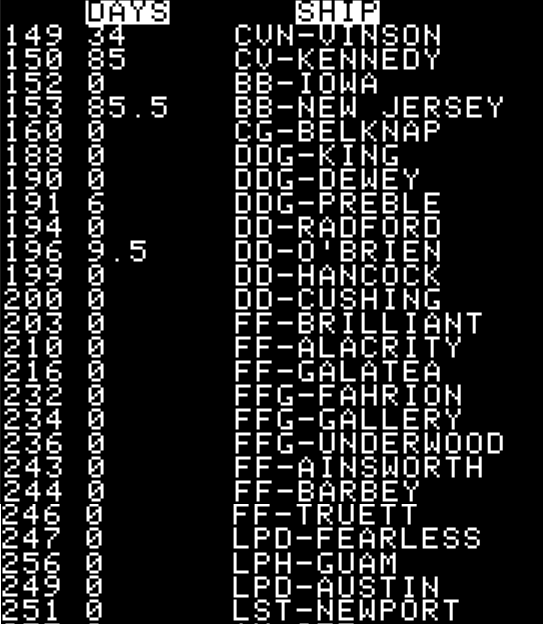
Here is what’s left of the (formerly) carrier fleet and the transport fleet :
December 16th to December 31th : The end
I have won, but the game does not recognize it. It takes me a bit more than one hour to reach the last turn, during which I organize a few more supply runs to Iceland. From Iceland, my planes transport can fly supplies to Scapa Flow, just for the sake of it.
On their journeys, my ships sometimes encounter what’s left of the Soviet submarines : they sink a few of my ships, I sink a lot of them. Once, I am even attacked by the Backfire as I enter Reykjavik harbour, probably because subs spotted me. That’s all that happens – even Scapa Flow is calm as the enemy from Bergen is still flying its useless support missions to the Faroe Islands.
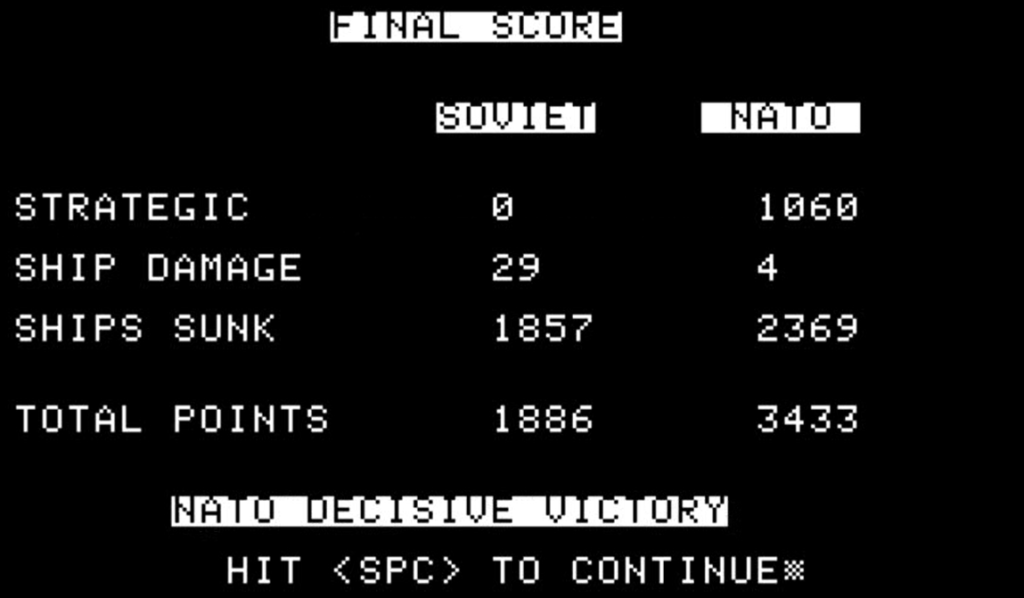
Finally, on the 31st, the game ends and confirms my victory :
The Soviets were totally out of steam :
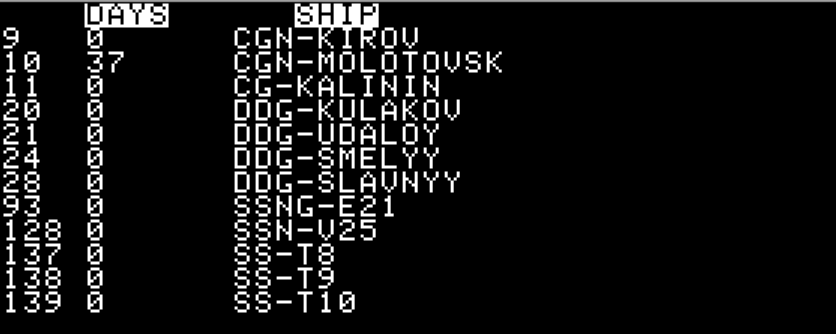
- They had no more ships or submarines :
- While they still had a lot of planes, they had no troops to send to the meat grinder:
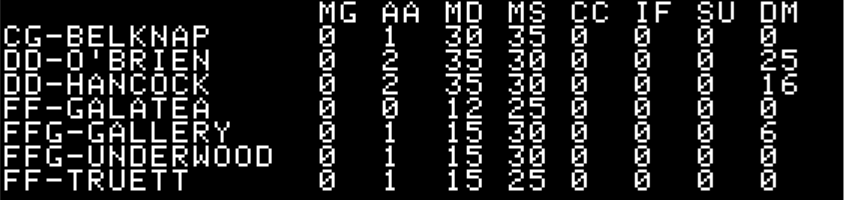
But on my side, I am not looking much better – very few ships survived the campaign. Here are my survivors, replacement transports and submarines excepted :
And here is a sum-up of the before / after, because I like Excel :
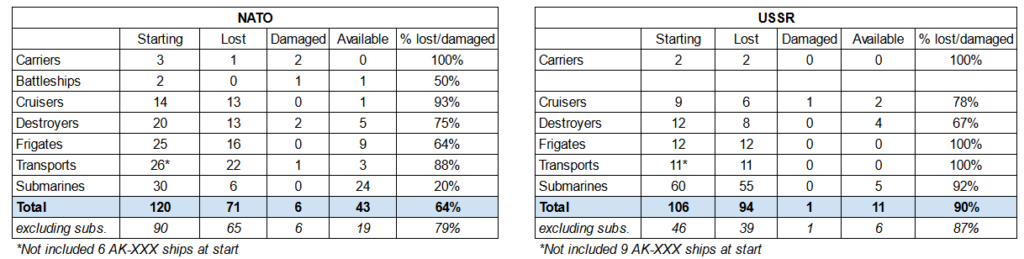
The losses on both sides are staggering. In more than four months of Guadalcanal Campaign, I had sunk 1/3 of the Japanese fleet. In two months of Bomb Alley, I had destroyed 1/3 of the Allied fleet. Here, I lost almost 80% of my surface ships – and almost all of the best ones – and I destroyed 87% of the Soviet surface ships.
I was well-advised not to play the long campaign. The two months of North Atlantic 86‘s short campaign took me 11 hours to complete (Guadalcanal Campaign : 15.5 hours) and the long campaign would have added almost two more months to that. Worse, the AI had nothing to offer for the last quarter of the game, and it would have barely more resources to work with in the long campaign (125 ships instead of 106), while NATO would have moved from 120 ships to 167 ships, including 1 US aircraft carrier full of Tomcats and 2 British aircraft carriers whose main purpose seems to be sunk early on. I suspect I would have had a fairly similar experience, except for a longer “twiddling my thumbs” period at the end of the campaign.
This concludes the AAR. I will soon publish the Rating & Review but spoiler – the game is probably a lot more impressive when reading about it than when playing it. Apart from this review, in the 2 or 3 coming weeks I am on holiday so I am likely to focus on more minor games – though not necessarily bad ones!
Time to complete the campaign : 11 hours