[Atari 8-bits, Game Designers’ Workshop]
The Battle of Chickamauga was fought in September 1863 and pitted Union forces under William S. Rosecrans against Braxton Bragg’s Army of Tennessee. The campaign centred on control of Chattanooga, the key rail and supply hub of south-eastern Tennessee. Chickamauga ended as the Confederacy’s last significant victory in the Western Theatre, forcing Rosecrans to withdraw into Chattanooga. Unfortunately for the Confederacy, Bragg failed to turn this promising tactical victory into a strategic one as the Union reinforced and broke the siege two months later, retaking the strategic initiative in Tennessee.
Game Designers’ Workshop (GDW), veteran of tabletop wargames and RPGs, chose the Battle of Chickamauga as the topic of their first video game. Since I know little about this battle (I know it is unseemly for a wargamer, but as far as pre-WW1 warfare is concerned, I am more into pike & shot and cabinet wars), I went into it absolutely blind, except for a test turn to understand the engine. I chose to play the Confederates because they’re on the attack in this battle and because the game seems to consider it the default in solitaire (though both sides are playable). Also, come on, I want to know if I can do better than Braxton Bragg, the most hated general of the Confederation – and mostly by his own side!
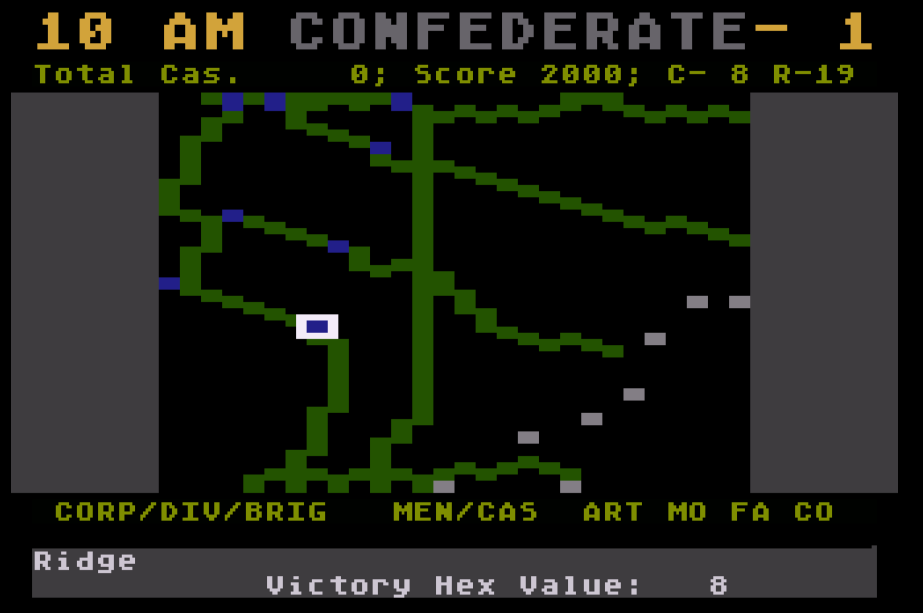
19th of September, 10 AM (turn 1)
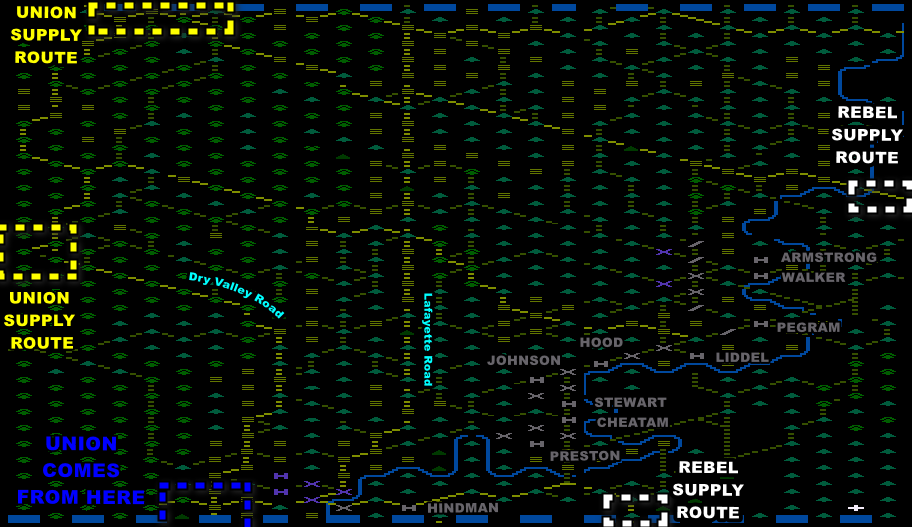
The Battle of Chickamauga starts on the morning of the 19th of September, 1863 and lasts for 2 days by “turns” of 2 hours (4 hours during the night) – I’ll report every two turns for brevity’s sake. Most of Braxton Bragg’s Army of Tennessee has crossed Chickamauga’s Creek and the first contacts have been made with the Union in the North in front of Armstrong and Walker’s Corps, and South in front of Hindman’s. There are 3 objectives (=ways to earn points):
- Inflict as many casualties as possible on the Union – simple,
- Control a bunch of objective hexagons on the other side of the map,
- Control the “supply routes” hexes (the game calls them “exit hexes”… except you are not receiving points for exiting your units so I prefer to consider them supply/communication hexes). If you control one of the enemy supply routes, you receive as many points as destroying 1/8 of all its remaining armies. If you control both, then you receive the value in points of 1/4 of its army. It’s obviously huge compared to the rest, so that’s my top priority.
I don’t have a lot of information on the enemy deployment. From my test turn, I know there are some Union units on the West-East road running in the middle of the map, and the manual states that the Union began the battle spread out and in numerical inferiority, but they’ll quickly receive reinforcements from the South during the first day. My strategy is therefore to immediately push my men hard to cut the two main roads leading North, first by taking the central crossroad and then crossing the forest to reach where the Dry Valley Road turns West. After that, I will simply fortify and play defense.
Based on that plan, I divide my army in 4:
- In the South, Hindman’s Corps will keep Lafayette’s Road under fire across the creek to inflict casualties and disruption (“fatigue” in game terms) to any enemy unit engaging on Lafayette’s Road
- Further North, Preston’s Corps will approach through the forest and try to grab the Union’s attention to pin down as many bluecoats as possible,
- In the North, Armstrong and Walker’s Corps will split: the cavalry (
 )will go around the map to grab victory hexes and then follow the main roads South, while the infantry (
 ) will engage the local Union brigades,
 - Everyone else – so that’s 6 Corps – will converge as quickly as possible toward the central crossroad.
In Battle of Chickamauga, you give orders to your Brigades for the next 120 minutes, and then the orders are executed simultaneously. This can be frustrating at times (eg: charging an enemy that moved away by the time you reach it), but at least your brigades always do what you tell them to do – neither Bragg nor Rosecrans had that privilege in real-life.
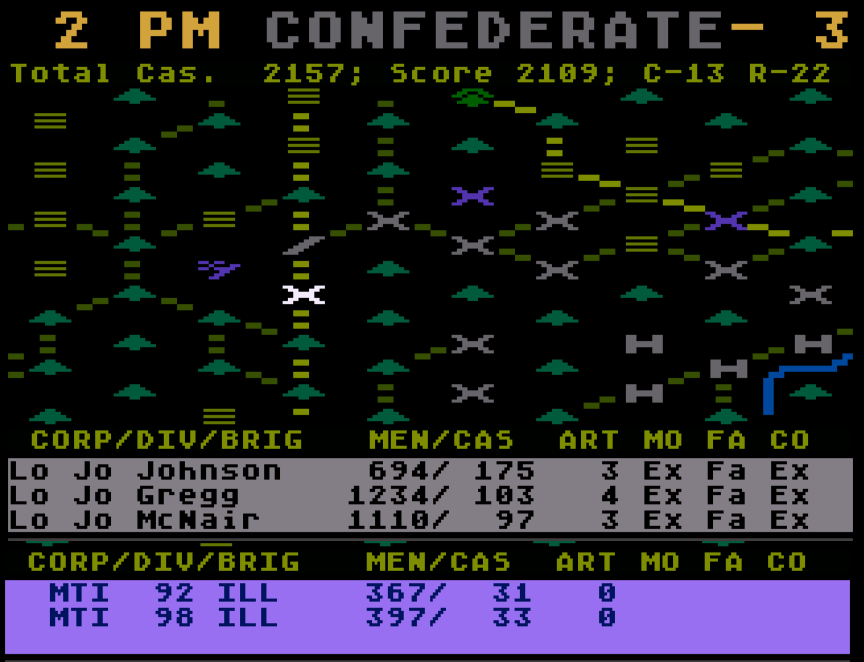
19th of September, 2 PM (turn 3)
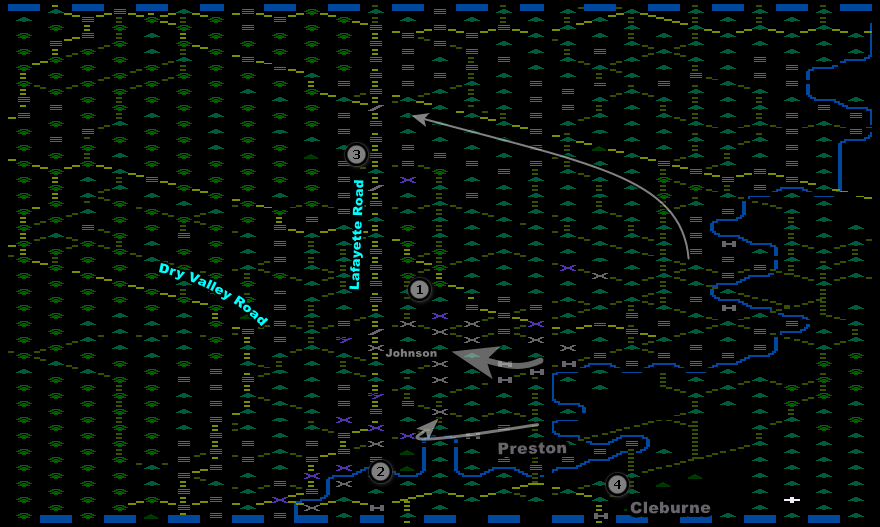
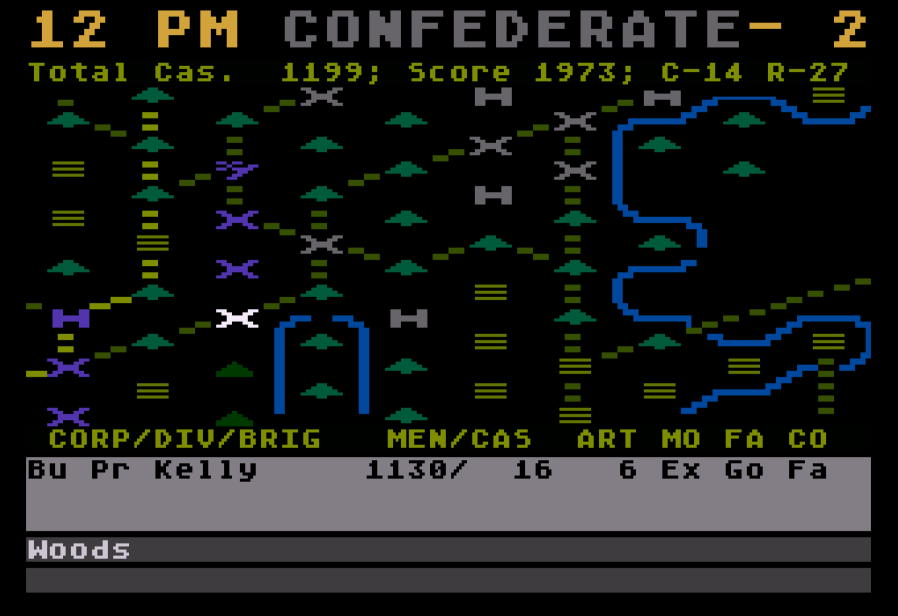
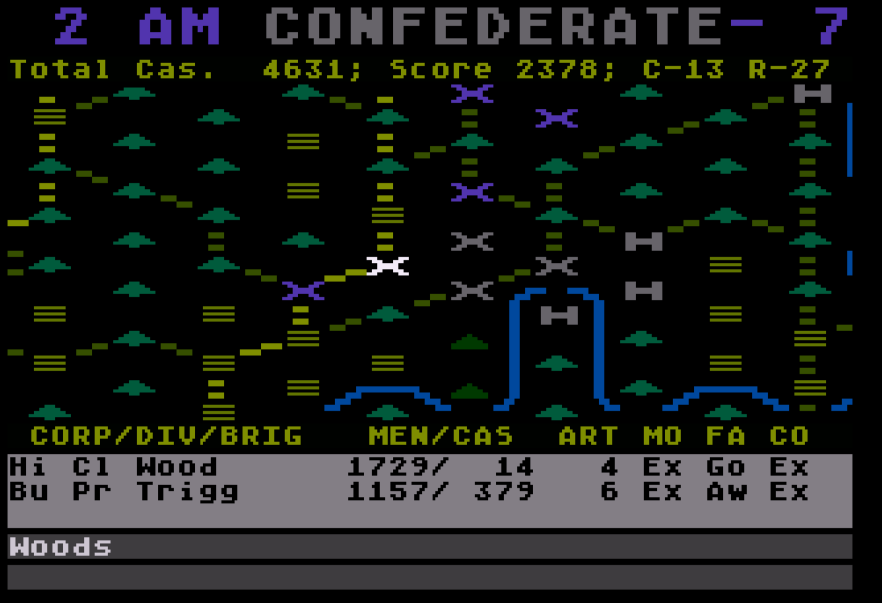
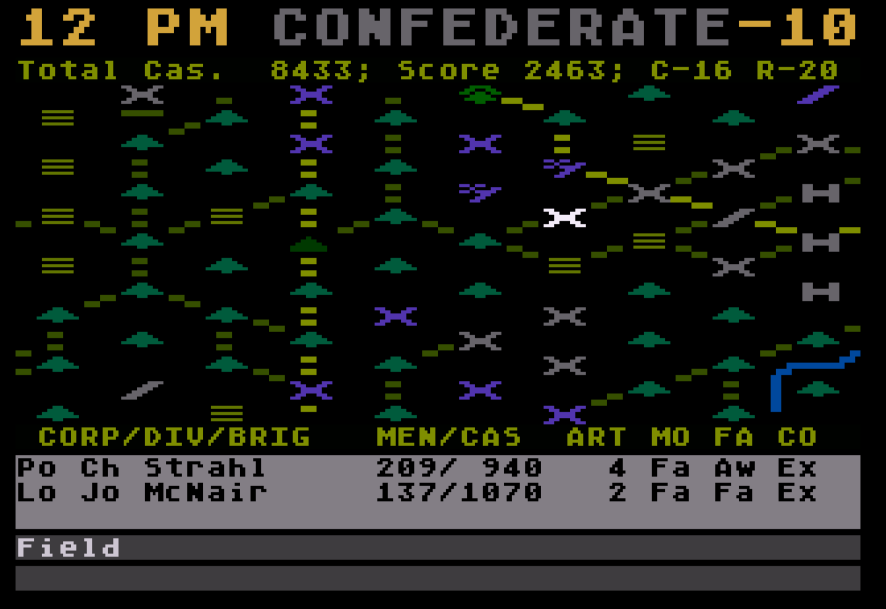
The first 4 hours went well. My main thrust (1) toward Lafayette Road went almost unopposed and I reached it with Johnson’s entire Corps (3 brigades). Even better, the only units blocking me from leaping to the Dry Valley Road are two mounted infantry squadrons ( ![]() ), small but powerful units exclusive to the Union. The mounted infantry are equipped with Spencer’s Repeating Rifles which can shoot five times faster than my own weapons, but they’re also unsupported at the moment. This is my chance: their bayonets won’t stab five times faster than mine, so I will charge them and level the playing field.
), small but powerful units exclusive to the Union. The mounted infantry are equipped with Spencer’s Repeating Rifles which can shoot five times faster than my own weapons, but they’re also unsupported at the moment. This is my chance: their bayonets won’t stab five times faster than mine, so I will charge them and level the playing field.
Johnson’s is such a favourable position because further South (2) Preston did what he was tasked to do with his Corps: pin a large chunk of the Union force. Unfortunately, he had to eventually fall back, leaving one brigade (Kelly’s) isolated. It can’t trace a direct route to its Corps HQ (![]() ) that avoids enemy zones of control, so it’s [CO]mmunication rating starts falling, with all sort of negative impact on its capability to move and attack down the line.
) that avoids enemy zones of control, so it’s [CO]mmunication rating starts falling, with all sort of negative impact on its capability to move and attack down the line.
Finally, my cavalry in the North (3) bypassed a few isolated Union brigades and is in position to simply collect the enemy strategic hexes. Also, I should note that I am starting to receive my first reinforcements (4). They”ll keep coming from the South and East, but won’t really get into action until the second day.
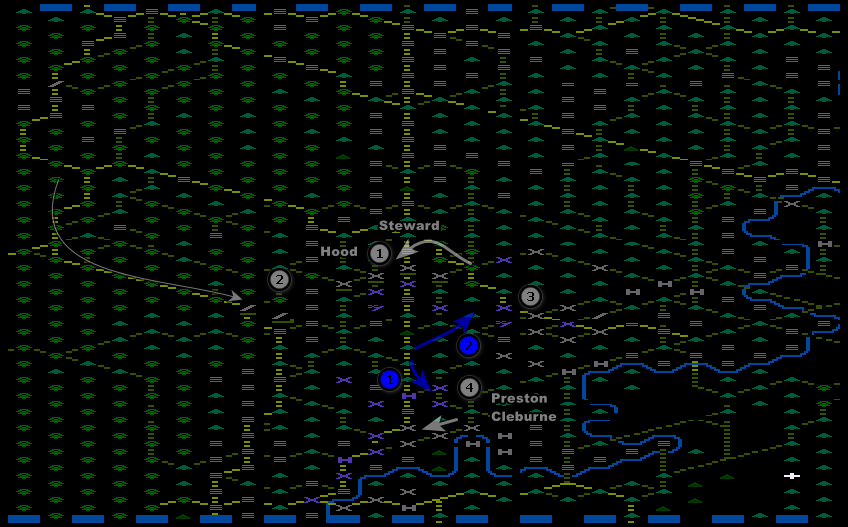
19th of September, 6PM (turn 5)
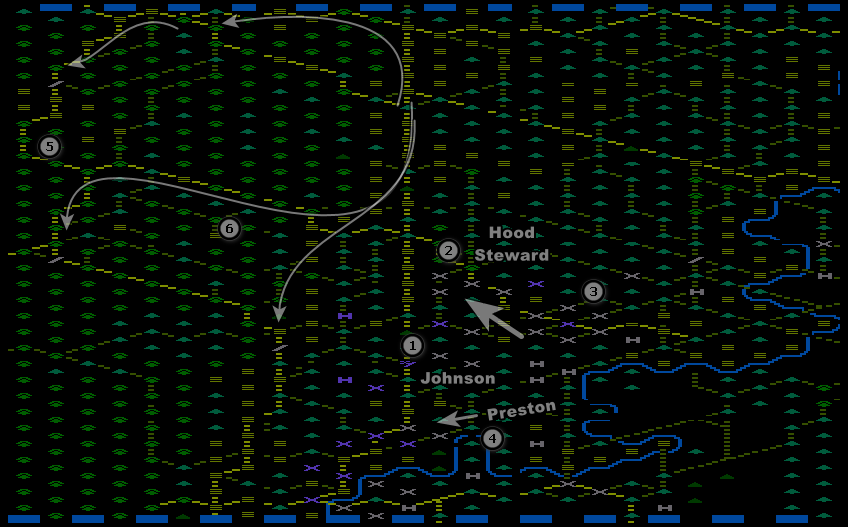
I encountered my first serious setback in (1). Before Johnson’s Corps could charge the enemy mounted infantry, it got surrounded by more mounted infantry with more Spencer rifles, and they all shot (movement: 20 mn + shoots: 20 mn) before my infantry could move (attack: 50 mn). Receiving some WW1 worthy volume of fire, the three brigades are broken and unable to attack. I have to fall back after receiving more than one thousand casualties in two hours.
I am not too frustrated, because further North my main force (spearheaded by Hood and Steward’s Corps) managed to reach Lafayette Road (2). I will be able to fortify the position for the night. I also secured the main East-West road and surrounded two Union brigades:
In the South, Preston pushed back again and even set foot on the road (4), though I don’t think I will be able to hold the position. Finally, in the North, my cavalry has grabbed ALL strategical locations without any opposition (5).
20th of September, 8 AM (turn 8)
The night falls at 8PM and while it does not really hamper movement and combat, it makes resting 3 times more efficient. It is only the moment in the game where brigades can fortify, so using night turns to attack has a high cost of opportunity. I hold my position on the Lafayette Road and fortify (1). My cavalry that finished its mission in the North also follows the Dry Valley Road to also fortify it (2). From now on, the Union will have to attack if it wants to reach the North of the map.
Along the main East-West road, the enemy brigades remained surrounded – I made sure they could not rest by rotating a brigade firing at them instead of resting. In the South, I receive a new Corps in reinforcement (Cleburne’s) which I immediately put to use to relieve Preston (4).
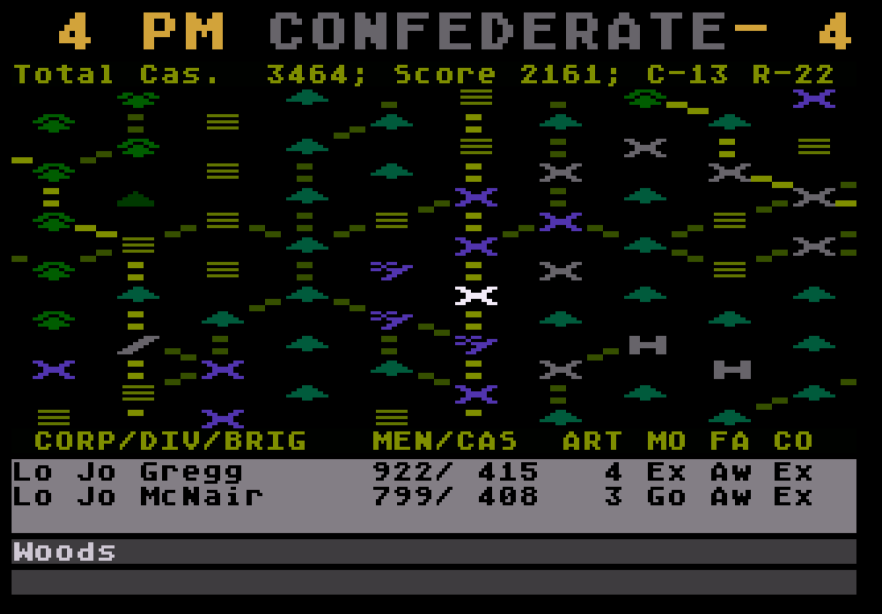
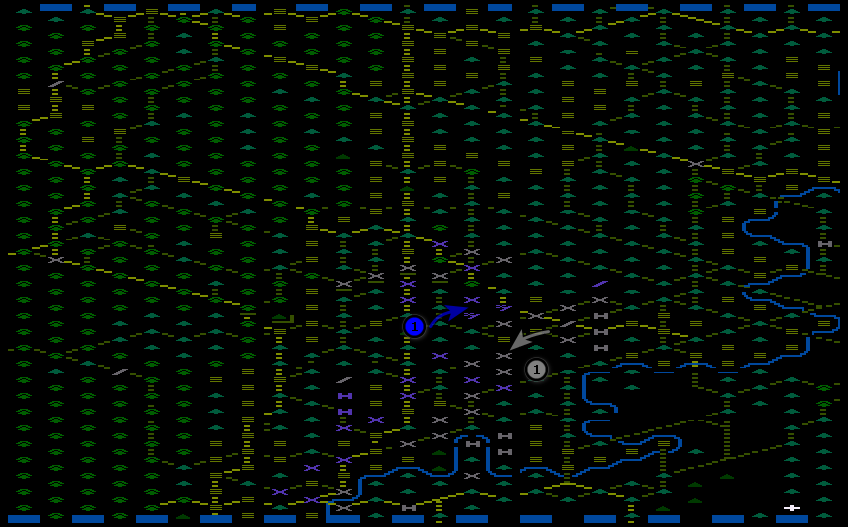
Unfortunately, the bluecoats spring into action with the new day. They launch an envelopment of Preston and Cleburne in the South (1) which will force me in the following turns to fall back to avoid being isolated. Worse, the mounted infantry presses hard against a chunk of road in (2) that was defended by the survivors of Johnson’s Corps. Those men had not been able to rest properly and fell back, separating the fortified Hood and Steward from the rest of my army – including their HQs. Their communication will quickly drop if I don’t plug the gap.
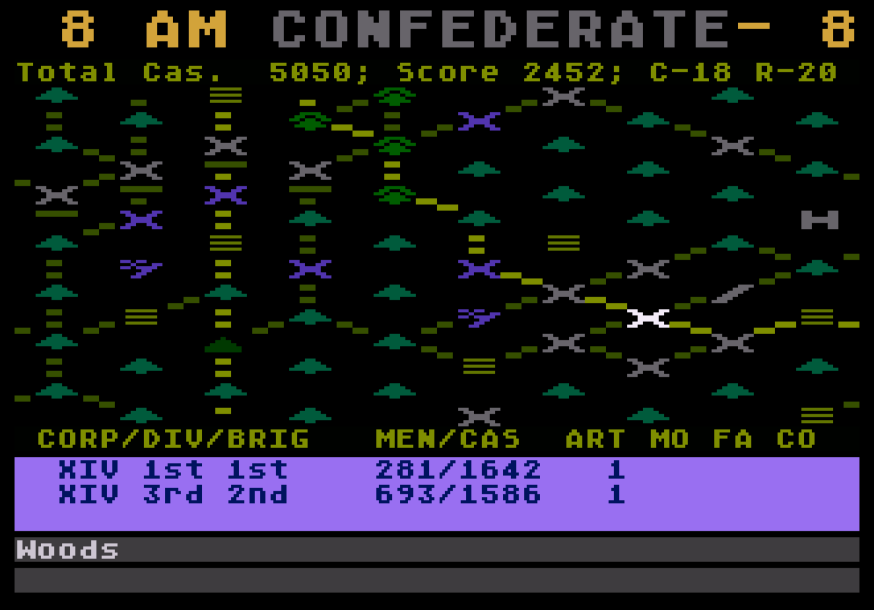
20th of September, 12 AM (turn 10)
The morning of the 20th sees mostly local attacks. My main achievement is the destruction of the trapped brigades at 10 in the morning, allowing me to free troops to envelop the bluecoats attacking my center in (1).
Meanwhile, the Union continued its attacks in the weak spot between my fortified position on the road (1). Two of my brigades are absolutely mauled and the Union drives a wedge between my fortified corps and the rest of my army – though so far they have barely tried to reopen the road.
With my control of the strategic hex and of the Union supply route, I know I have won – the only question left is “by how much”.
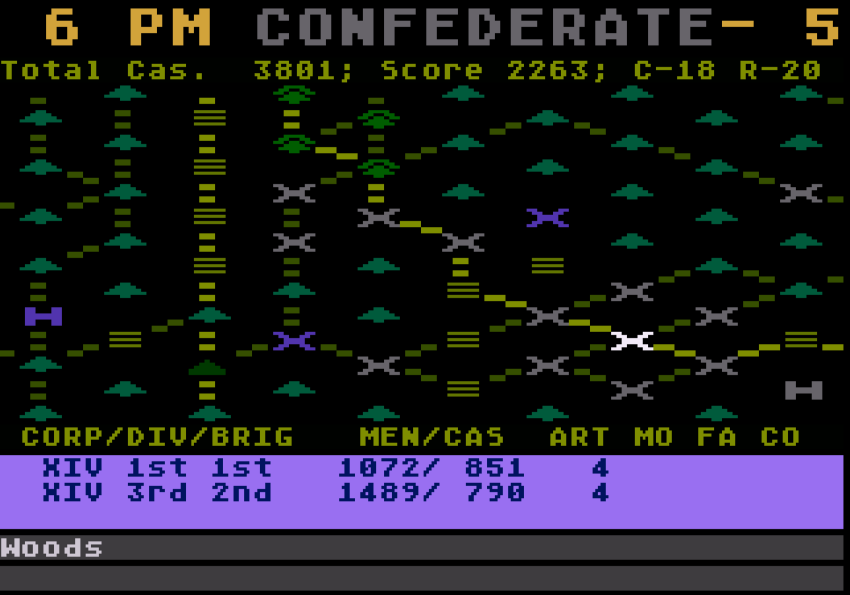
20th of September, 4 PM (turn 12)

The last turns are spent trying to restore a continuous frontline – North by plugging the gap that the Union mounted infantry opened (1) and South where I manage to surround one more brigade (2). Meanwhile, the Union tries to keep the gap open in the North and meekly attacks my fortifications on the road, without result (1).
20th of September, 8 PM – end of the battle
The game ends two turns later with no significant combat.
Frustratingly, the control of the victory hex and of the enemy supply routes does not seem to have awarded me any extra points. It is possibly a bug, but given the game already ended in a victory (any score above 2000 is a Confederation victory) I am not willing to test further.

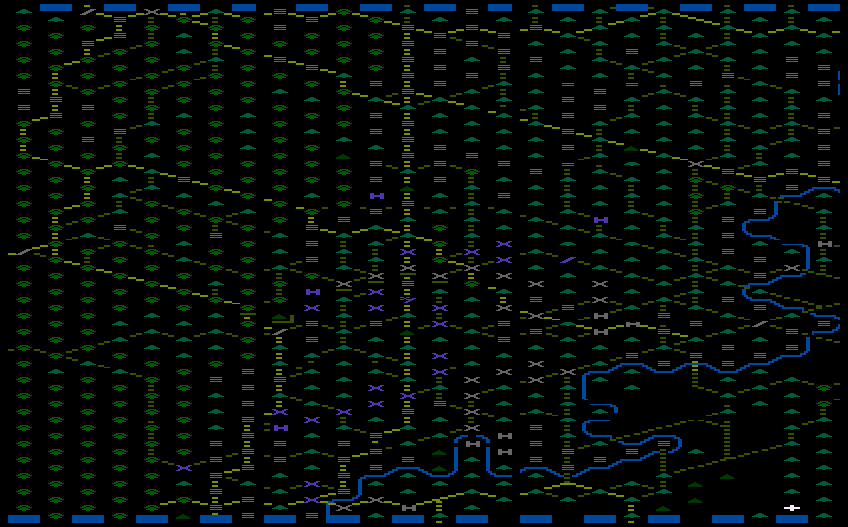
Generally speaking, I reckon that I not only managed to successfully implement my initial strategy, but it also paid off as expected – that’s pretty rare in this kind of game. Of course, I was certainly helped by the AI’s strategic failures, as revealed by the final view of the map:
- The Union never tried to use the Western Dry Valley road, instead fighting to go through the central Lafayette road,
- Even then, a lot of units were kept far from the frontline and the attacks were more probes than all-out assaults
- Finally, the Union had troops on the other side of the front (probably from the start of the game), but failed to do anything with them – I never felt pressed from both sides.
All in all, I am unsatisfied by this game.
I am not qualified enough to understand the consequences of the destruction of Rosecrans’ Army in 1863; in the best case scenario for the rebels, such a timely defeat makes Lincoln lose the 1864 election. It is also possible however that it wouldn’t have made any difference, except in placing Braxton Bragg much higher in the Civil War general Tier List – and amusingly it might have also improved Rosecrans’ position in such a tier list, given his behaviour during the siege of Chattanooga.
Ratings & Review

The Battle of Chickamauga, by Worlds to Conquer, published by Game Designers Workshop, USA
First release: January 1985 on Atari
Genre: Battlefield tactics
Average duration of a session: Nine hours
Total time played : Eight hours.
Complexity: Average (2/5)
Final Rating: Obsolete
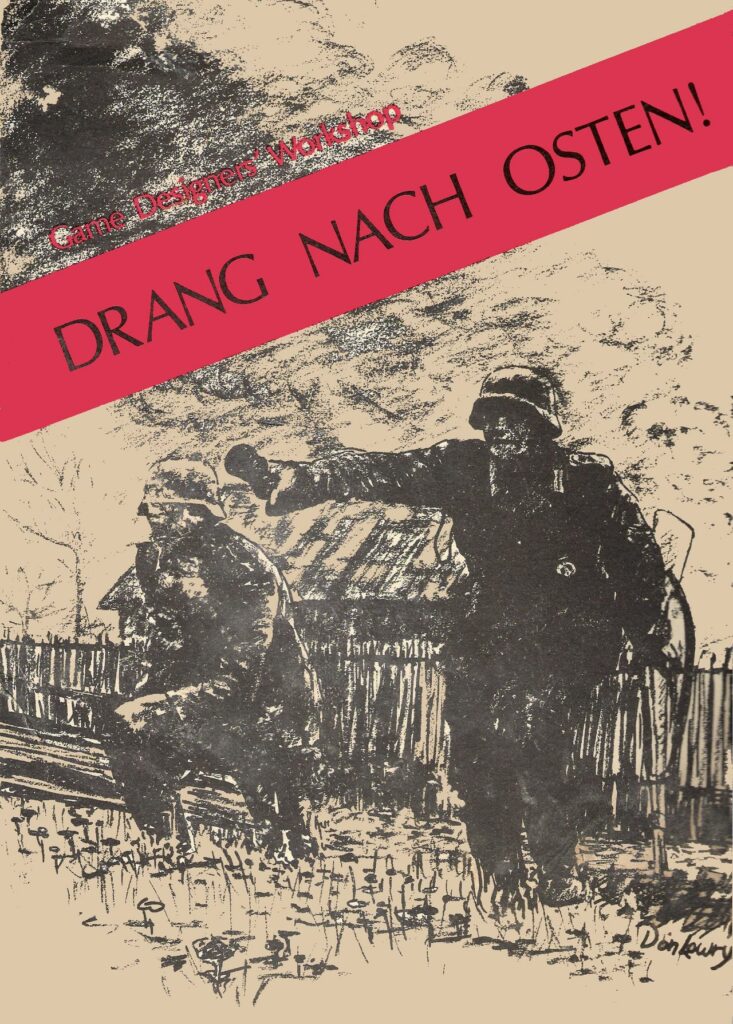
Context – Back in 1972, students Marc Miller, Frank Chadwick, Loren Wiseman and Rich Banner of the Illinois State University (ISU) were designing wargames for fun at their University Game Club. They managed to convince the ISU to fund their hobby for 18 months under the pretence of making educational games, but when the support ended, the group decided to go commercial and in June 1973 founded their company: Game Designers’ Workshop (GDW). They almost immediately released their first wargame Drang Nach Osten (1973) on Operation Barbarossa. GDW then released a sequel/expansion pack (Unentschieden) the same year, and then turned two games into the first parts of a very successful series of wargames (called Europa) covering several fronts and years of World War II, with consistent scale and ruleset.
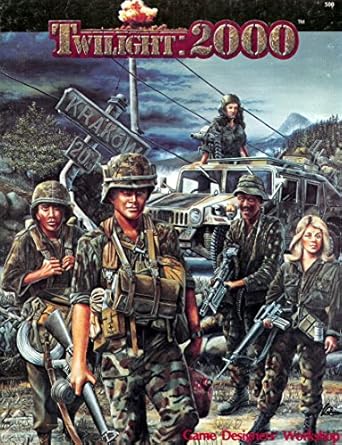
GDW’s interest did not stop at WW2 wargames. The team was incredibly prolific and covered all possible themes (from Antiquity to sci-fi) and scales. It also quickly diversified into roleplaying games, first with En Garde (1975) and then with the extremely successful Traveller (1977, sci-fi, ported unofficially on computers as Space). Still, the main products remained wargames (sci-fi or not) with around 70 titles published by the end of 1983. However, after a peak in 1980, sales sharply declined. The main cause of the drop was the shift of their traditional audience toward RPGs and video games, and so logically GDW tried to follow said audience with a third RPG (the popular Twilight 2000) in November 1984 and their first computer wargame in January 1985: the Battle of Chickamauga.
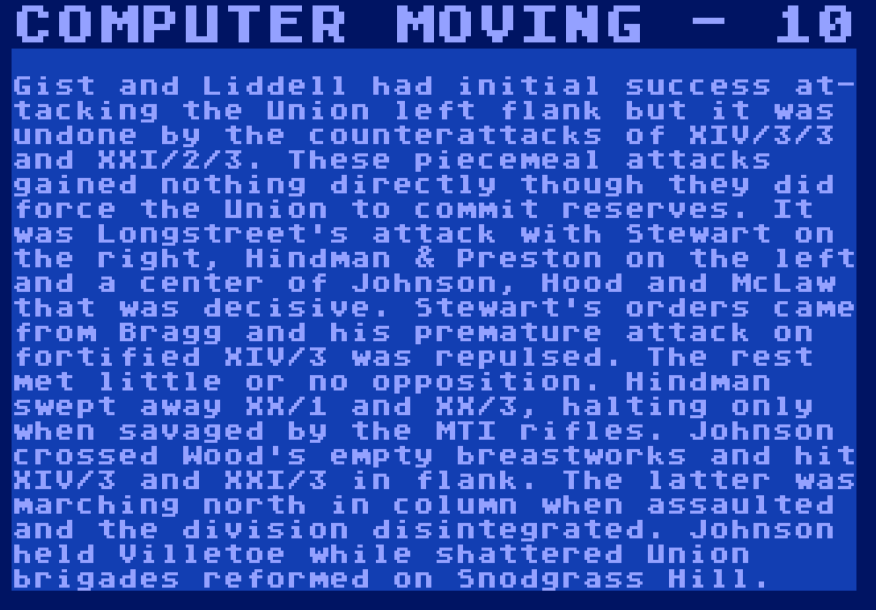
Battle of Chickamauga‘s “design and programming” is credited to a company called Worlds to Conquer whose only other production is the other GDW game (Rommel: Battles for Tobruk). Two historical GDW founders (Loren K. Wiseman and John Harshman) are mentioned as working on “development” (nowadays we would call that “executive producing”) and “research”, but I don’t know how hands-on they were with the project. In any case, whoever designed the game was passionate about the subject, given the level of detail on the history of the battle or the OOB included in both the game and the documentation: the game even replaced the loading screen between two turns with a description of the events of the battle at that moment.
The game is an Atari exclusive released for $35 without any ads in the video gaming magazines, (edit: as Jake indicated in the comments, that’s not true, I just missed them); I suppose GDW used its own channels to advertise it.
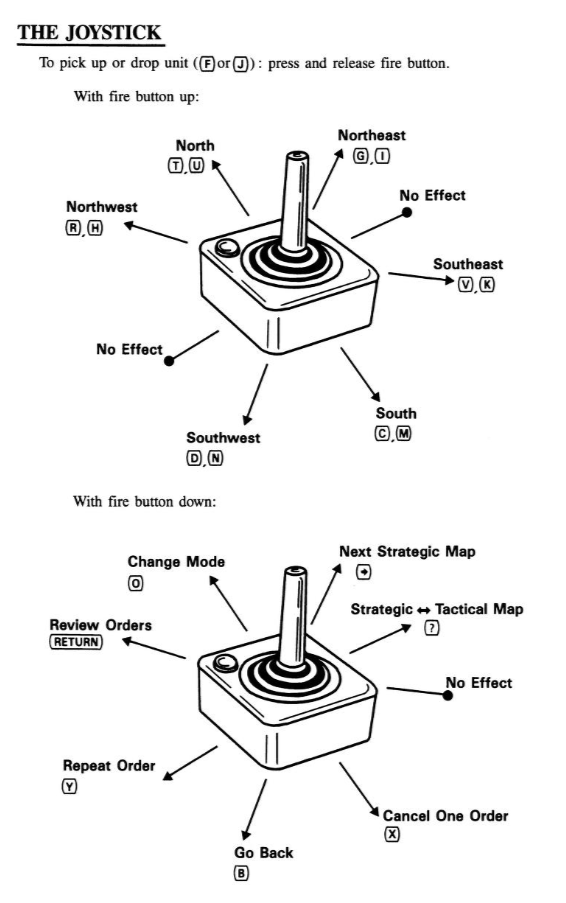
Traits – The authors of Battle of Chickamauga had clearly played and learned from a lot of other wargames, and there are a lot of things they got right. Controls in particular stand out: units can be taken in any order, orders can be cancelled at a whim and there are even commands to review orders or cycle through units without orders – all this with only the joystick, only the keyboard or a combination or both.
These good controls also serve a ruleset that’s fairly deep with fatigue, morale and communication, but still easy to understand – and there is an option to launch games without the effects of any or all of those factors.
Unfortunately, as much as the controls were well-thought-out, the game is extremely unrewarding to play: you spend a long time planning your movement, but all you receive for your efforts is a view at the strategic level where you barely see who is moving, who is firing and who is charging. Theoretically, there is a colour-code during turn resolution to help you understand, but in practice when a new turn opens, you don’t know whether you forced the enemy to retreat after your attack or if the enemy unit just marched to its new location. Similarly, you don’t really know if your units were attacked or not, and if so by who.
I wasn’t even excited by the combats anyway. Units are almost impossible to destroy (realistically so), so except in the rare case where you completely surround a unit, the best possible result is to cause some losses and force a retreat. Such tactical victories remain hollow though, because there are almost no strategic locations you really want to control (the road was an exception) and because the AI is passive anyway. I never felt a combat was really decisive, it was just something I had to do to kill Union soldiers and earn points. Add to this a few other frustrations with the ruleset (the lack of zones of control, or HQ units that are immediately destroyed on contact, which is really punishing in a game with simultaneous turn resolution – particularly combined with the lack of zone of control so your HQs are not even safe behind your troops) and you will understand I did not have a lot of fun.
Did I make interesting decisions? Yes, but except for my initial choice of strategy it was always very local (“do I push this unit further or allow it to rest? do I attack with 2 units or 3 units here?…).
Final rating: Obsolete. It’s a solid effort to simulate a Civil War battle, but the result bored me. What’s best in wargames? As Conan the Barbarian would say, to attack your enemy, to see their counters driven before you and to hear the lamentation of their generals as you destroy their units – but in the Battle of Chickamauga you only really get the first of those things.
Ranking at the time of review: 78/177. The Battle of Chickamauga is significantly deeper than the typical “obsolete” game, but it’s simply too dry for my taste.
Reception
I did not find a lot of reviews for The Battle of Chickamauga. The three reviews I found insist on how playable the game is, but James Delson calls it no less than the best wargame of the year (Family Computing, September 1985) whereas Mark Bausman (Computer Gaming World, June 1985) praises it only faintly with “Overall, I feel that GDW has a good first entry to the world of computer gaming”. The third review I could find is Steve Panak’s, who compares The Battle of Chickamauga to SSI’s Gettysburg: The Turning Point in the May 1986 issue of Computer Gaming World – the latter handily wins, though the former is still recommended for beginners. As for wargame specialist Evan Brooks, he never gave the game more than 1.5 stars.
In other news, I will postpone a few 1984 games to finish 1984 in February with The Ancient Art of War. As I said previously, I want to AAR a commenter-designed scenario. I have already received one, but if you want to send one, you have around 2 more weeks.