[Apple II, Strategic Studies Group]
Ah ! The luxurious Megez IV. The most fertile planet of the universe. They say anything you put in the ground grows into a tree within weeks. It could sustain billions. Alas, we will never colonize it !
But why ? Is it kept as a natural reserve ? Vicious aliens ? Deadly virus ? Poisonous air ? Some oddly specific rule about only needing 7 farming worlds ?
Not at all ! We just find the idea of a high population count inefficient.
Reach for the Stars ! Finally ! I have played many historically important games, but with maybe the exception of Empire through Civilization, none had so much direct influence on a genre (specifically 4X) to this day.
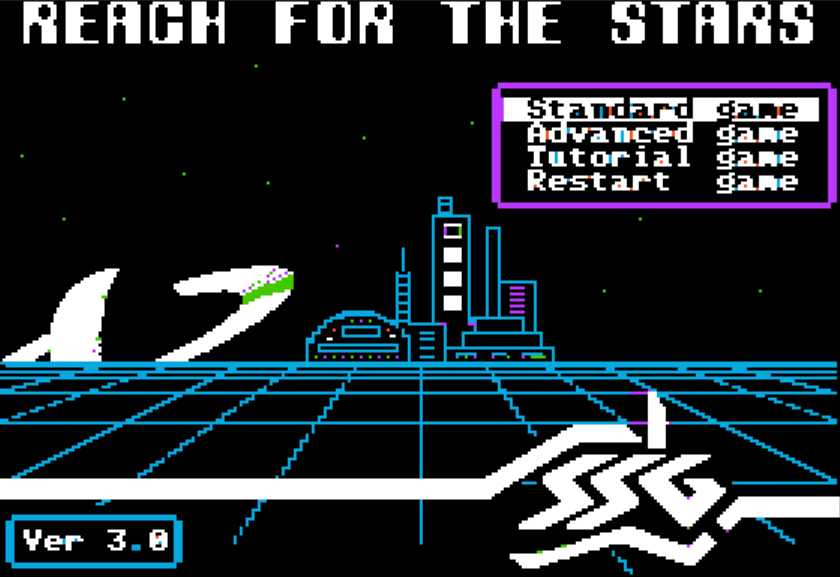
For my AAR, I face a difficult choice : versions. Reach for the Stars received 3 editions (1983, 1985, 1988) on 7 platforms in total – some of them with very different looks & feels. The 1988 edition also included an alternative ruleset that the designers seemingly considered better than their initial one. At least I can easily exclude the 2000 eponymous “sequel” and its improved reedition in 2005 – those are different games.
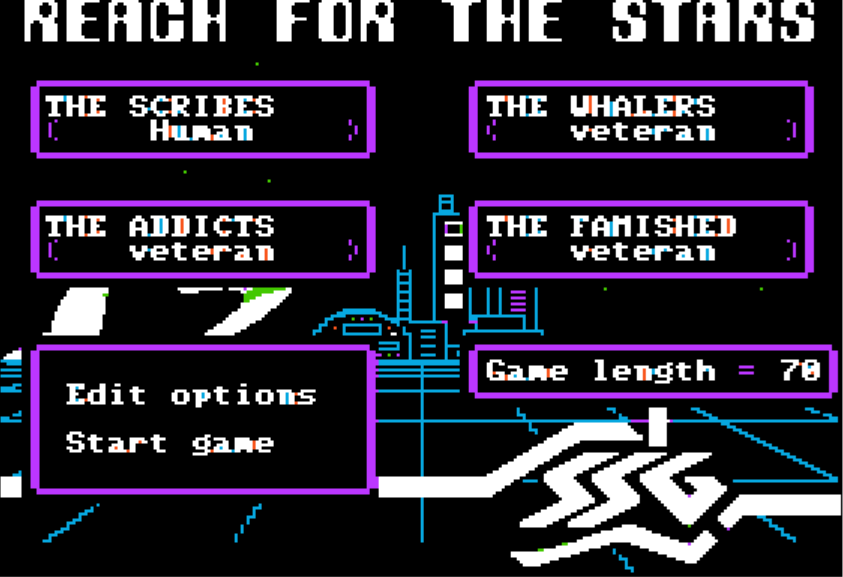
Fortunately, my work (and my research) is made much easier by the DataDrivenGamer. Unlike me, the DataDrivenGamer strives to play the earliest version of any game – so he used the 1983 edition to complete his impressive set of three AARs (introduction, 40 turns, 150 turns). This part of history covered, I can play focus on the more visually appealing, but exactly similar in gameplay 1988 edition. What’s left to do is to ignore the minor gameplay options proposed when starting the game, and to choose the length of the game between 40 and 150 turns. Always the centrist but leaning to the left, I choose 70 turns.
A. Introduction to spacefaring (turn 1 – 17)
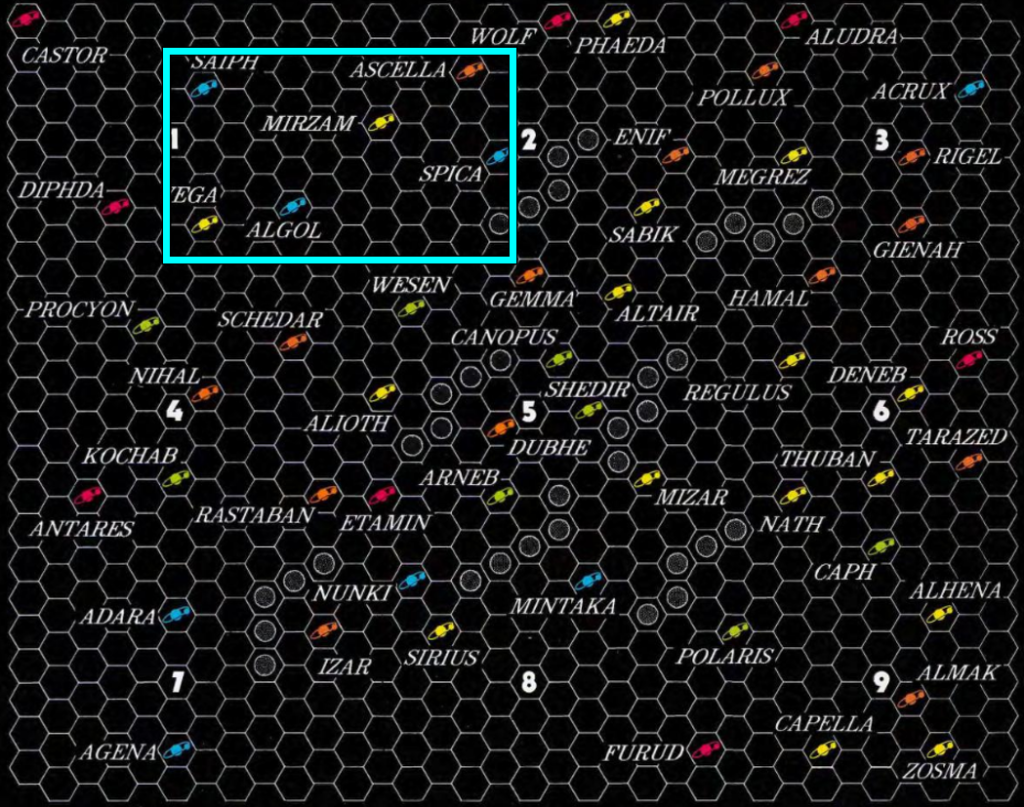
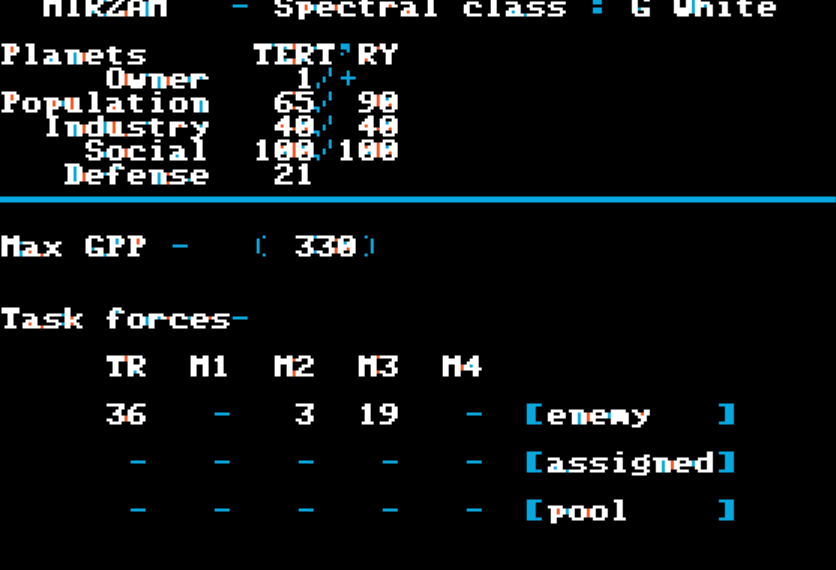
I start the game as the proud owner of a lone planet orbiting Mirzam ; for brevity’s sake I will call the planet Mirzam as well. Mirzam is the centre of the universe, I know that because the galaxy wraps itself horizontally and vertically. Sure, it means that every single planet is the centre of the universe, but I like to think that Mirzam is more so.
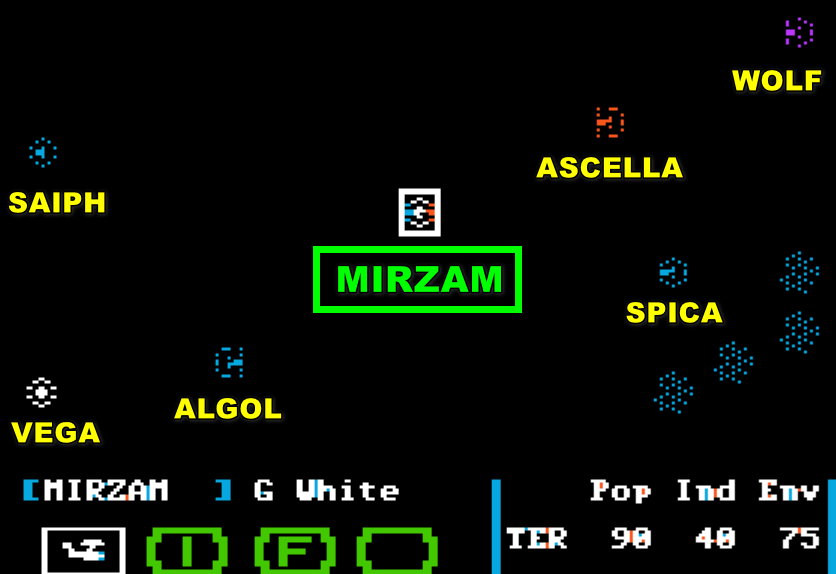
Mirzam starts in a pretty crowded corner of the galaxy and with a below-average industrial capacity. Not the best start, but I can work with that.
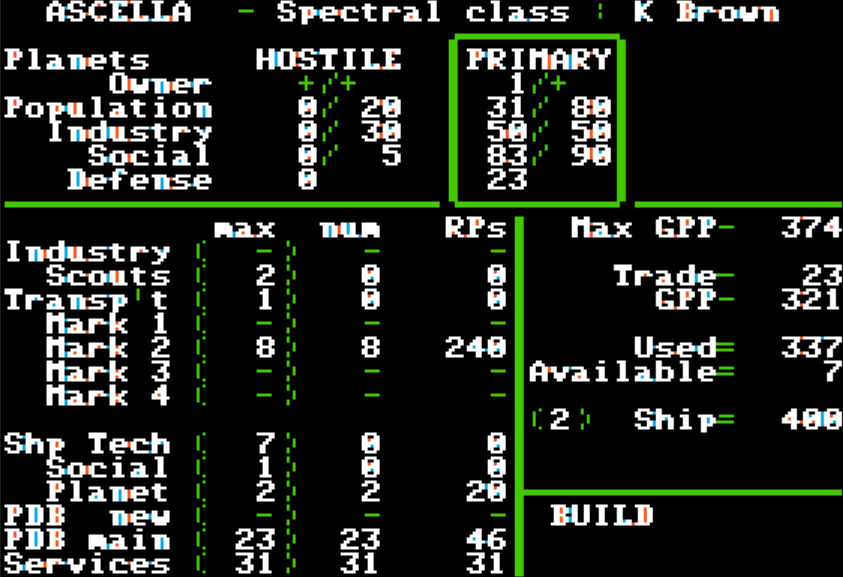
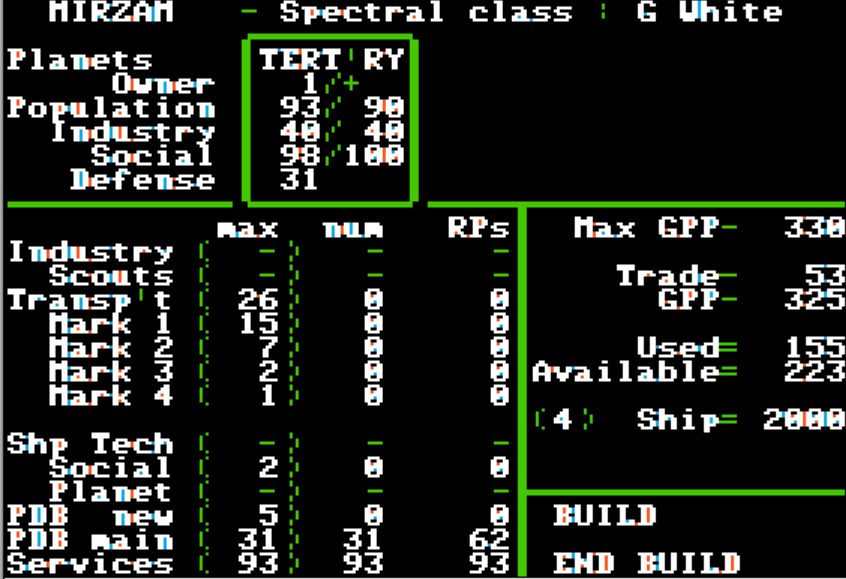
Inspecting Mirzam, I open the planetary status menu :

It is actually fairly easy to read :
- On top, there is the status of the planet in terms of ownership (player 1, aka “me“), Population, Industry and Social, all versus maximum. The only “maximum” I can increase up to 100 is the social one by investing in “planet condition”.
- At the bottom left, there is a list of things I can buy, research or that I need to maintain (for the latter : services for my population, and “Planetary Defense Bases” [PDBs] against pesky aliens).
- At the bottom right you can see how many resource points [RPs] I have : 126 coming from local production (Gross Production Point, or GPP) and 200 coming from “trade”. Trade is 200 by default on the first turn and, later, however many RPs I did not use the previous turns.
GPP comes from a combination of industry, social and population, specifically:
Minimum [Population, Maximum Industry]x2 + [Current Industry*Social]/16Based on this, I am producing :
Min[50,40]x 2 + (15*50/16) = 40 x 2 + 46 = 126It matches the screenshot. The maximum this planet will ever produce (with maximum planet condition) is :
Min[50,40]x 2 + (40*100/16) = 40 x 2 + 250 = 330This also matches the “maximum GPP” indicated in the menu.
Social increases on its own as long as the planet is not overpopulated, so for the time-being I invest almost all my RPs in Industry, keeping just enough cash to maintain some of my starting PDBs and to create a fleet of scouts. After all, I need to explore the galaxy !
My scouts do their work. As a quality-of-life feature of the third edition, they do this automatically by default. They jump from system to system, reporting on whether the various systems have planets, and how sustainable they are. Sometimes, the scouts stop reporting – it means they encountered an enemy fleet and perished…
… and what do you know, my scout from Vega does not report back. Just to confirm that it was not a mere accident, another of my scouts detected an enemy scout in Algol, an empty system with no planet at all.
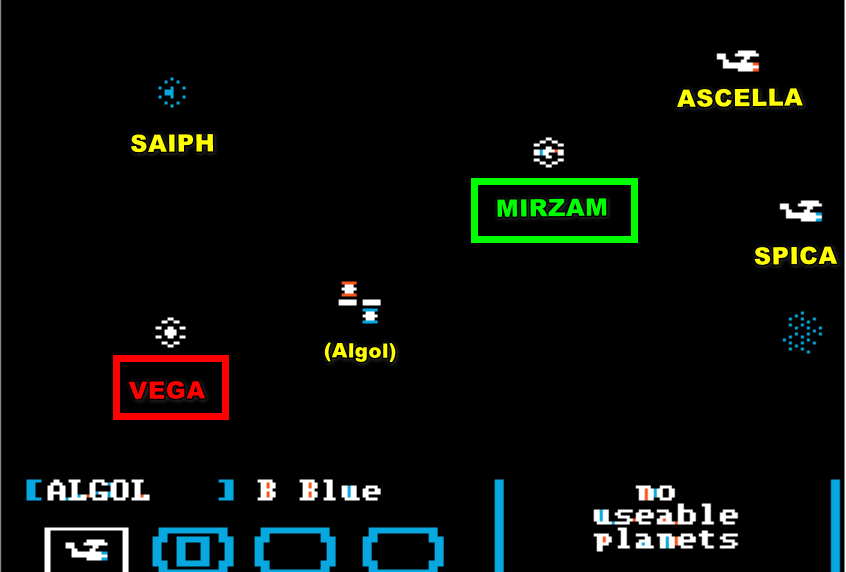
There is no diplomacy in Reach for the Stars, so I have a hostile neighbour next door. I already regret getting rid of my starting defences in the first turn to cut maintenance cost. At least, one of my scouts reports there is a very good planet on Ascella.
At least, Vega’s production looks even worse than mine. I don’t believe the AI will try anything funny in the first turns, so I rebuild my planetary defences and otherwise ignore the threat for now. Instead, I focus on colonizing Ascella – immediately transferring population there from Mirzam by using transport ships.
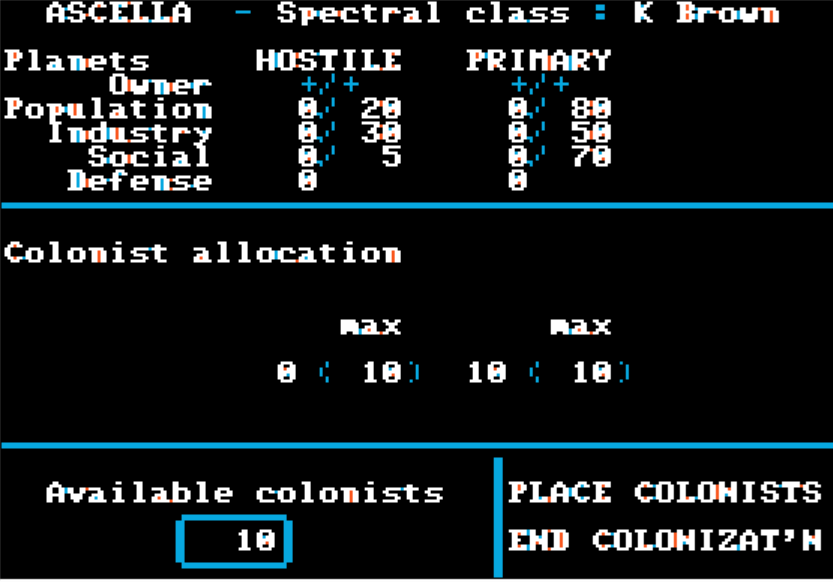
The following turns are spent trying to develop Ascella with the help of “trade” – those resource points not spent on Mirzam – and with additional population transferred from Mirzam.
Since I also develop Mirzam, this means I can’t invest in a combat fleet, but then I don’t expect my opponent to attack me so early. Meanwhile, my scouts keep exploring until they are destroyed. I replace them, and the new ones finish the job – I will not mention scouts ever again.
By turn 17, Ascella is almost fully developed, except for its population. I also finished researching Mk 2 Combat Ships (it required investing 400 RPs in research). I am in a position to strike first on the Vegans !
B. The campaign for Vega (turn 18 – 23)
With two planets churning out Mark 2 fighters, I quickly accumulate a fleet of close to 20 ships. I send them to Vega, with some slower transport ships following. The “population” carried by transport ships become marines when deployed on a foreign planet, probably much to the surprise of the newly dubbed marines.
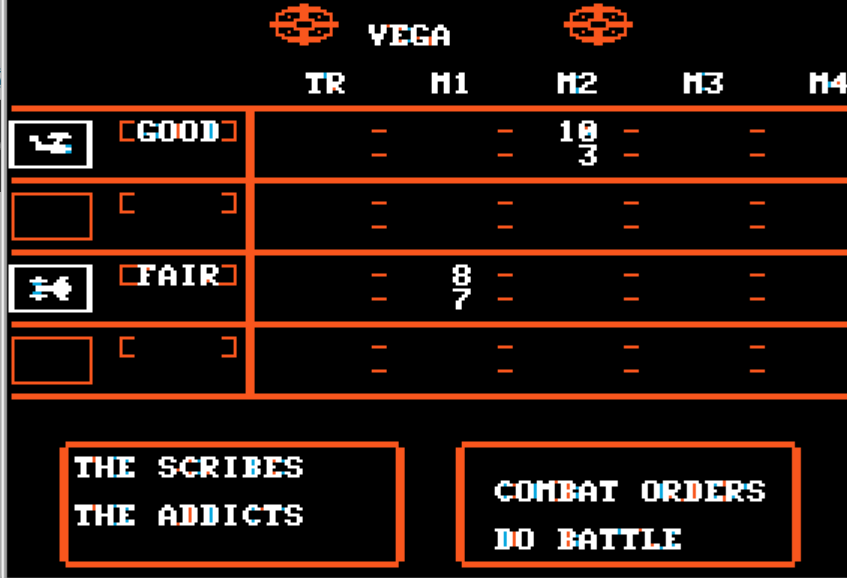
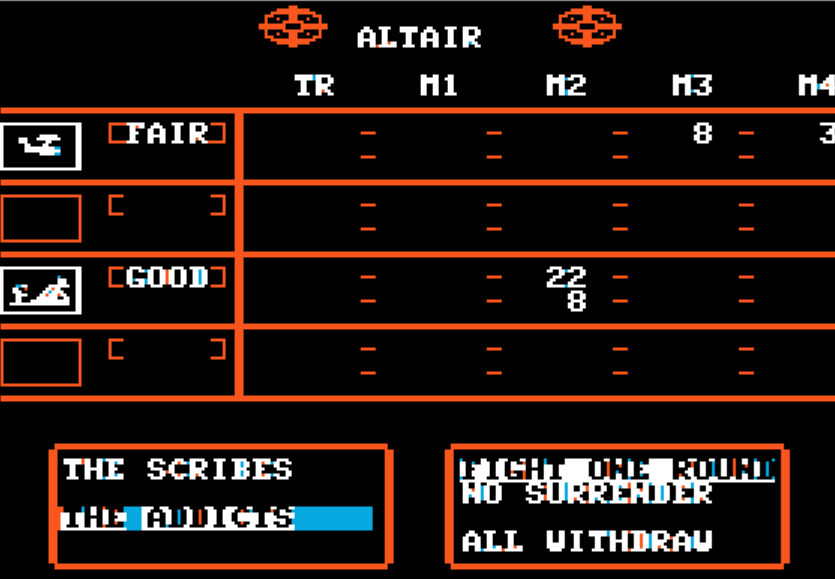
Arriving above Vega, I discover the planet is owned by the “Addicts” civilization. They only left a token defence which is quickly wiped-out
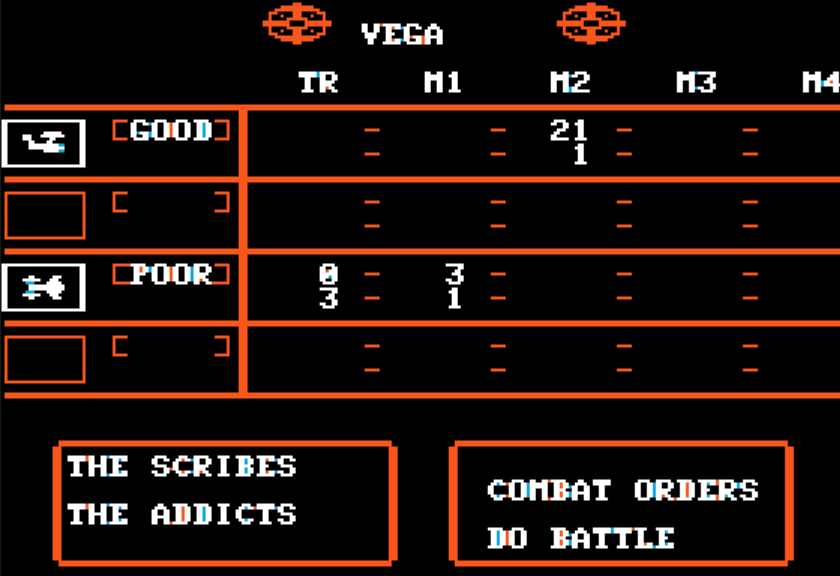
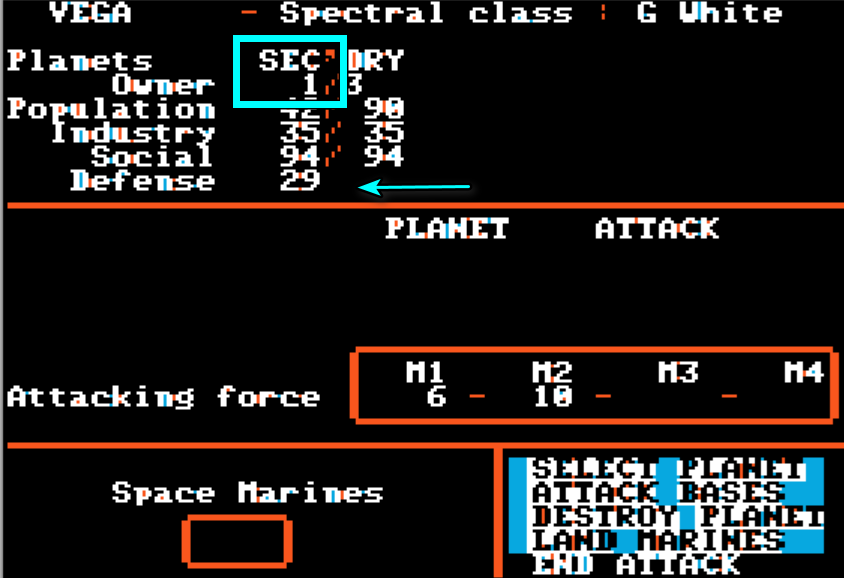
Having defeated the defenders and thus earned a few victory points, I can inspect the enemy planet. The most important intel is that the Vegans have 30 defence points (PDBs) to go through.
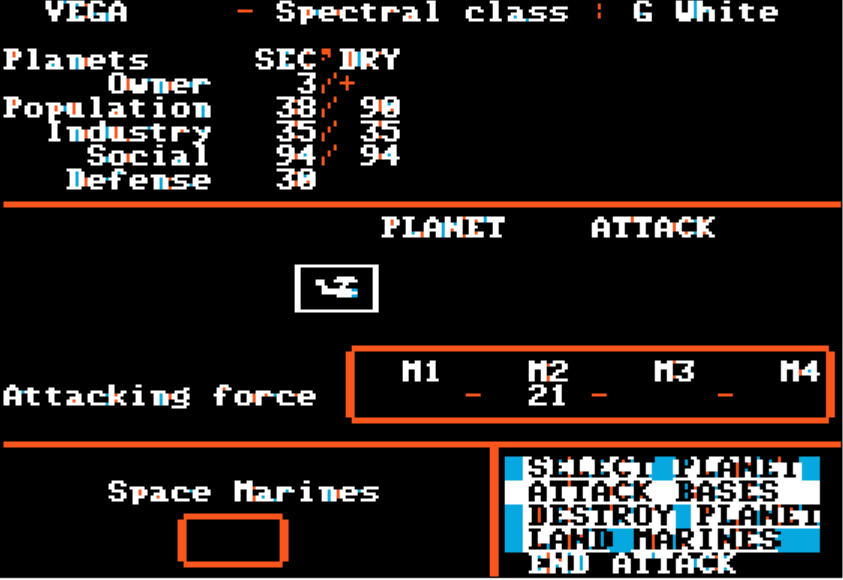
PDBs are as strong as a ship of the highest tech level available to its owner. I have only encountered “Mark 1” ships so I have good reason to expect the defences to be low-tech. I attack, and I am proven correct :
My transports have not arrived yet, so that’s all for my initial attack. My fleet is now interdicting the planet : no trade going in, no trade going out.
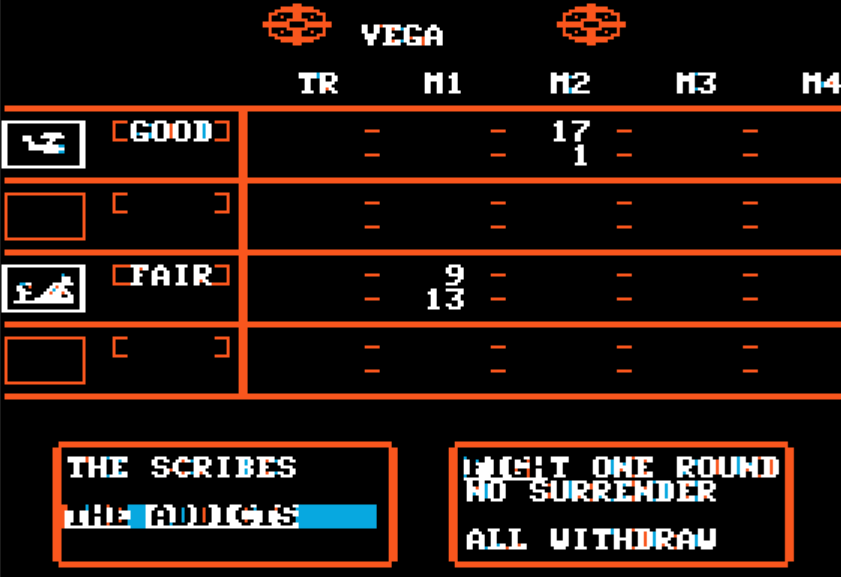
While I wait for my transports, the Addicts try to lift the siege from the outside, but they fail and lose their ships :
They also build 5 more PDBs, that I immediately destroy. This time they were level 2 – which means I attacked just at the right time.
Finally, my 29 transport arrive. You need 1 transport for every 2 points of enemy population so I have more than enough. Vega is easily captured, and the marines are converted into defence bases. I am now the proud owner of 3 fully developed planets !
In Reach for the Stars, conquered planets are not magically converted to their conquerors. Until the end of the game, they have a special “conquered” status. I cannot build defence directly there – I need to ship it through transport. Morever, I need to make sure my local PDBs represent twice the local population to avoid a revolt.
This is less maintenance than you might imagine though: I can build transports from a conquered planet, and then use those to build PDBs on that same planet. I guess we tricked the men into believing they have been shipped to a distant and foreign planet.
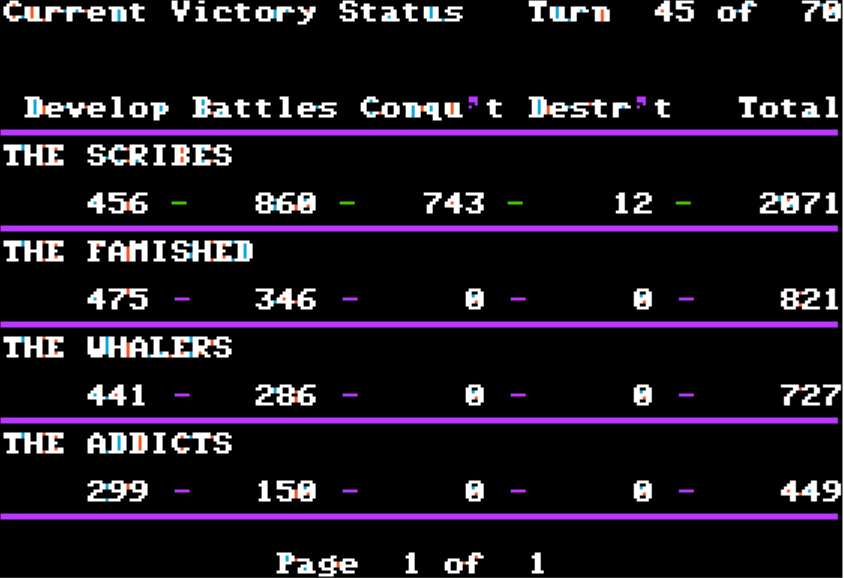
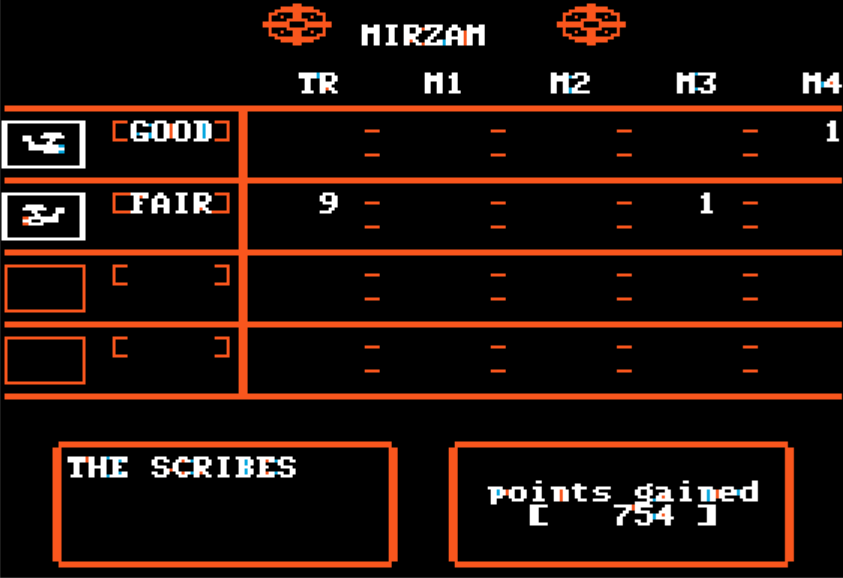
In exchange for this constraint, conquered planets bring a lot more victory points than regularly settled planets. I now have a significant lead in points :

C. Expanding the Empire (turn 23 – 47)
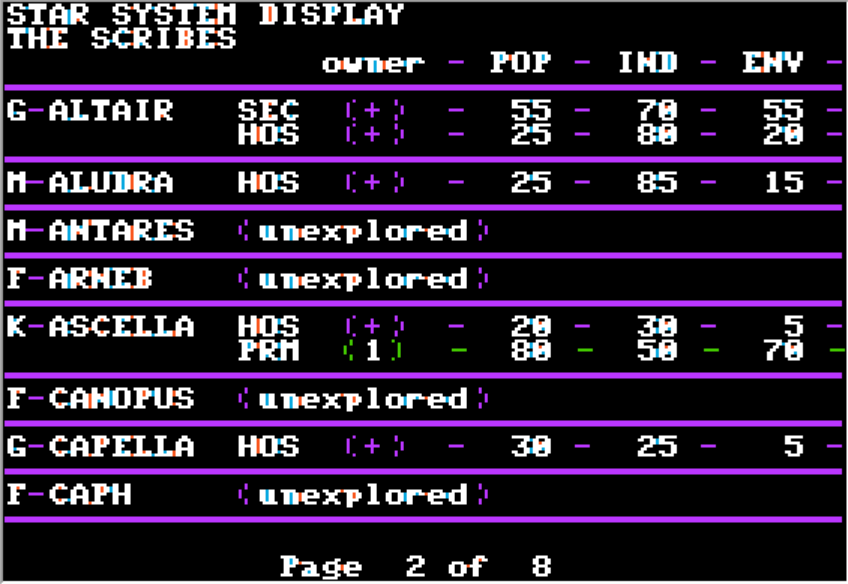
Having neutralized the Vegan threat, I can look at the broader situation.
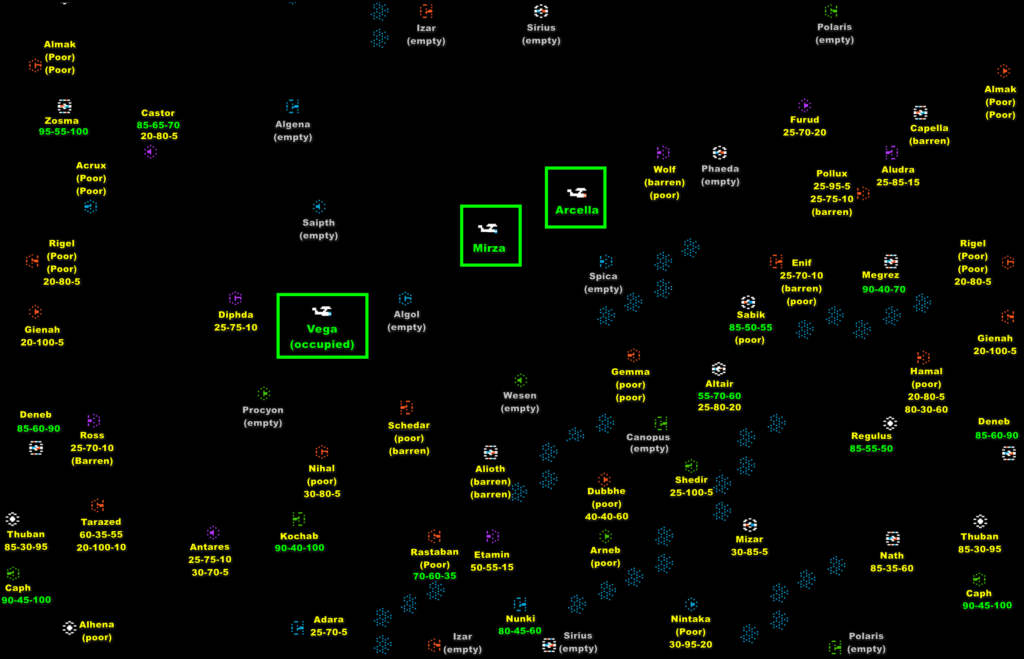
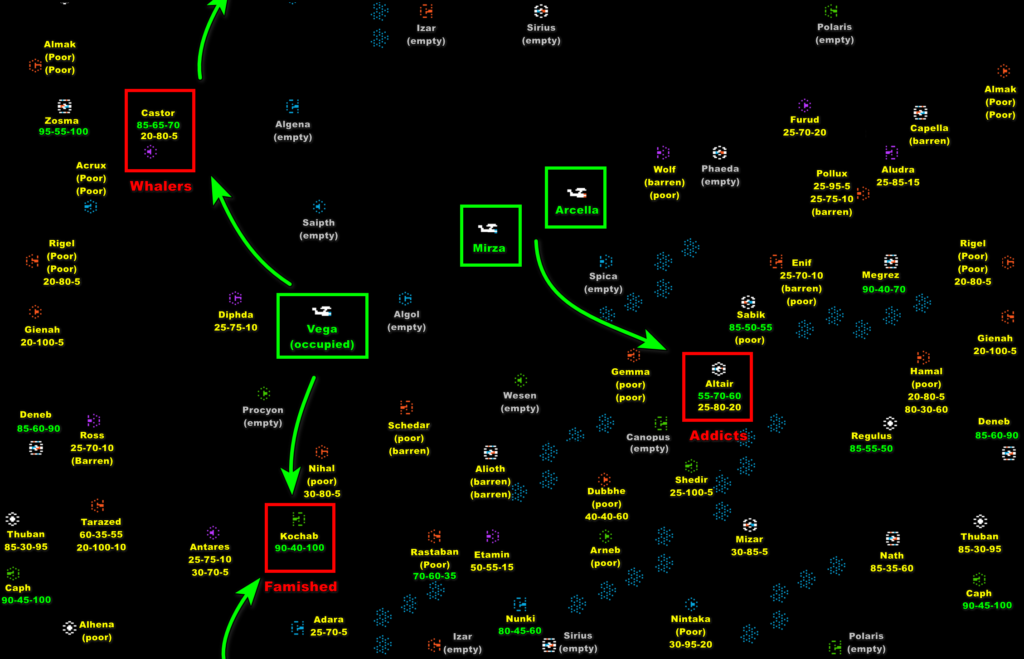
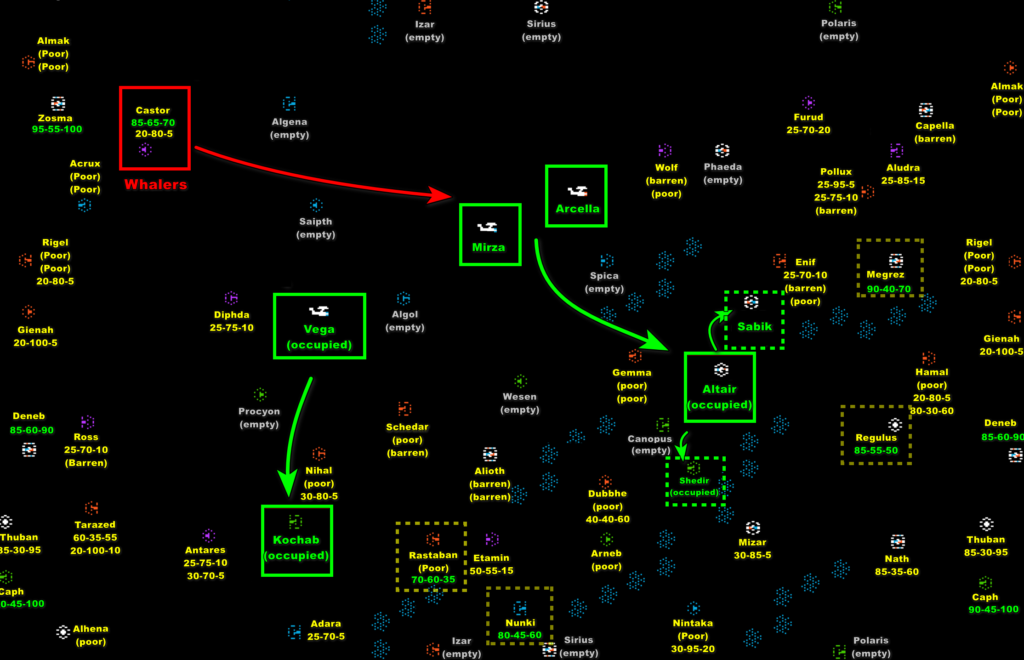
I am surrounded by a large number of empty systems (systems without any planet) – the additional distance should provide me with some minor level of security. As for the other worlds, I filtered 11 worlds that are possible cradles of enemy civilizations. The others are either too poor, or planets with “hostile environments”, typically with high industrial/production capacity (the second number) but very expensive to develop for now.
I build several medium-sized fleets and start sending them toward Castor (top-left ; the best planet in the galaxy), Kochab (bottom-left) and Altair (center-right). I strike true every time.
- In Castor, I find the Whalers. Unpleasant surprise : they reached the third level of technology.
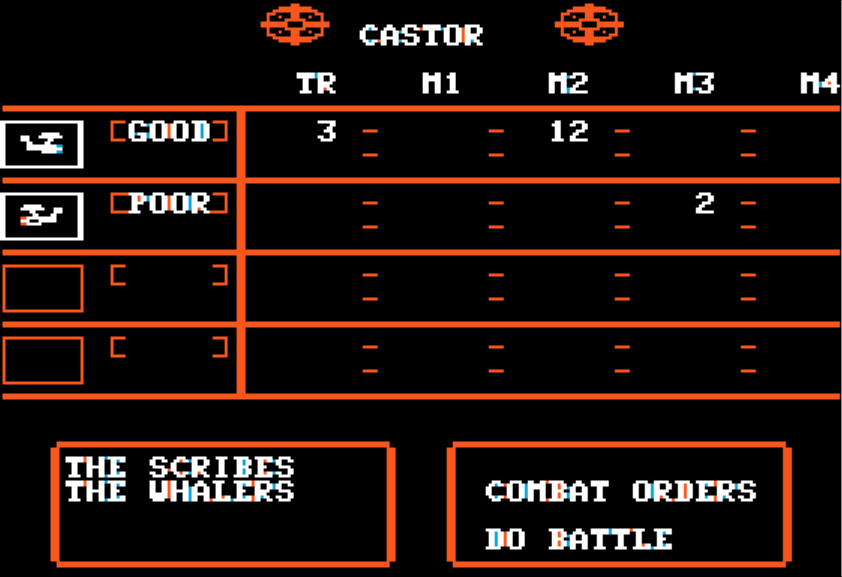
My larger fleet chases away the two enemy high-tech fighters, but there is nothing I can do against the level 3 PDBs. I relocate my force to Kochab.
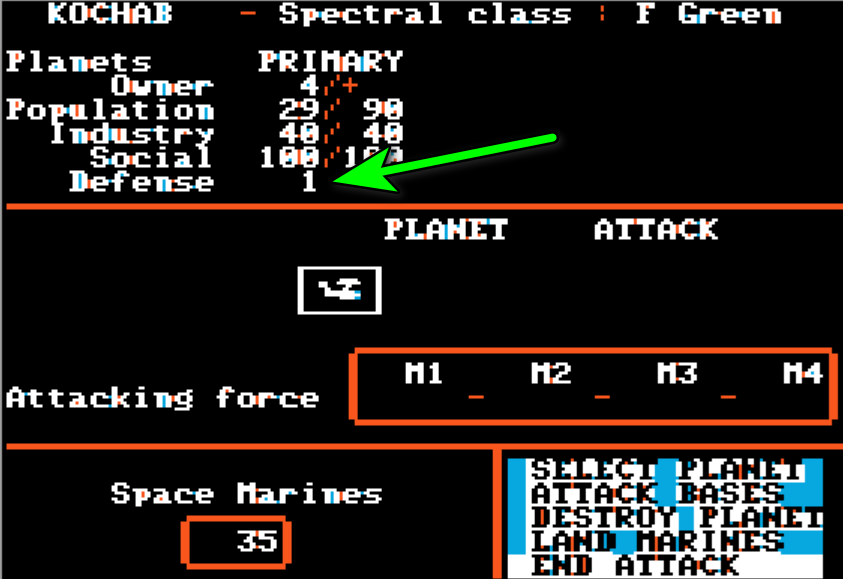
- Kochab is more promising. Currently occupied by the Famished, the space defence is nominal. I test the PDBs and find out they are only level 2. With the reinforcements from Castor, I can win this.
- Finally, in Altair I find my old nemesis from Vega, on a poorly developed planet. Here also, I have a good chance to destroy the few PDBs the Vegans have.
Soon, I assault Kochab, and win the battle against the PDBs. Unfortunately, the transport ships have not arrived yet, and I have only 3 combat ships left. An enemy force chases my 3 remaining ships, then I chase the enemy force, but in between the enemy has rebuilt some of the PDBs, and I fail the second assault with one PDB remaining. Frustrating.
In Altair, the transports are there, but I fail to destroy the two last PDBs and lose all my fighters. All my transports can do is drift harmlessly while waiting for reinforcements. But a small Vegan force arrives before said reinforcements, destroys a good chunk of the transports and forces the rest to retreat to my home planets. THEN my reinforcements arrive, chase the Vegan fleet and destroy the remaining PDBs, but the transports are gone. Also frustrating.
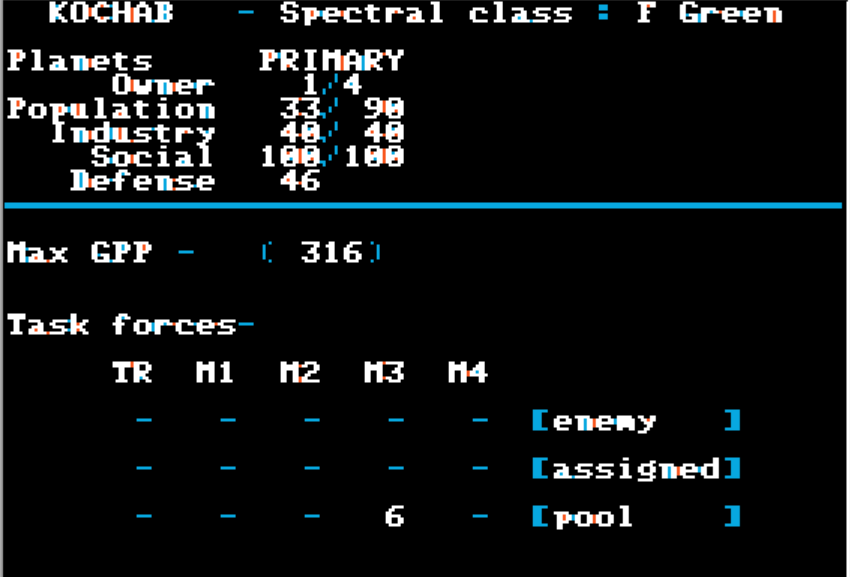
I stop spreading out, and focus on Kochab. After a large effort, it finally falls :
I pivot to Altair. I win a decisive battle giving me hundreds of points, but the Vegans have fully rebuilt their PDBs, so I need to fully rebuild my fleet.
That would have been easy, if the Whalers (whom I’ve left alone for a long time) had not decided to attack my home planet with more than thirty M3 fighters. This time, I am the lucky one. While they start outnumbered, my PDBs have a lucky roll, and unexpected losses force the Whalers to cancel their attack.
I was lucky once, I may not be lucky twice. I forget about Altair, and focus all my research on rebuilding my defence, patroling my space and researching level 4 fighters (PBDs will remain level 3). It takes some time (I need to spend 1000 RPs) but I finally finish my research.
With my home safe again, I switch back to Altair. They still have not reached the third level of tech, and they are an easy picking :
Finally, Altair is mine.
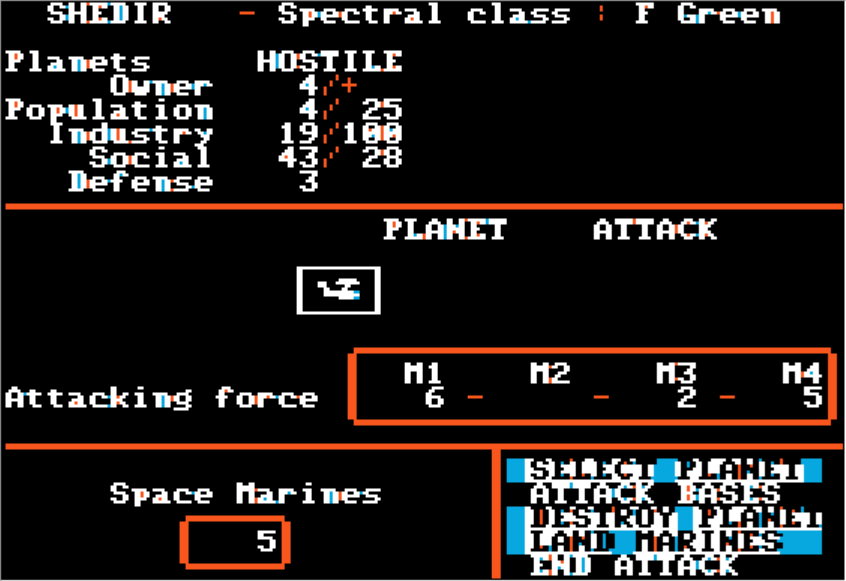
The Addicts still have some units flying around, and I try to figure out where they come from. I move to Sabik, but there is no one there. Leaving a colonization force, I try Shedir, a hostile world where I saw some enemy fleets earlier on. Instead of Addicts, I find some settlers of the Famished civilization. They are easily conquered.
At the end of this expansion period, my empire is 7 planets strong :
D. On the defensive
I have a very large lead in points and the Addicts are all but defeated. Still, the manual warns :
“Veteran [AIs] work from a hate index. All veterans hate human players simply because they exist (for which you can’t blame them). They also hate any player who takes a colony from them {very sensible) and the player coming first (quite human really).
If you are a human player, coming first, who takes a colony from a veteran, you have just guaranteed retribution. In such circumstances, veteran computer players will hunt you down mercilessly.”

I am pretty sure the Whalers have a fleet large enough to break through a planet of their choosing, and maybe a second one after that. The Famished have been weakened, but I don’t doubt they have some punch left as well, and it will add up. I need to prepare and spend a few turns to reform my reserves and develop Shedir and Sabik.
Before I can prepare enough, the Whalers fall on my home planet with the massive force I was dreading :
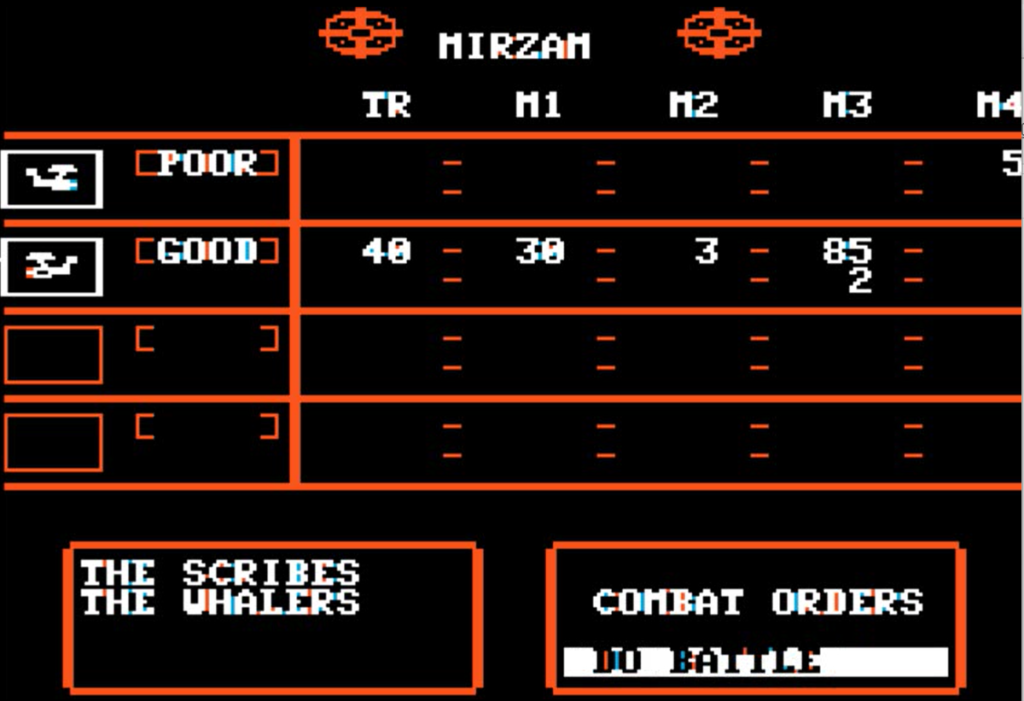
The battle does not turn as expected. My totally outnumbered Mk 4 fighters manage to inflict catastrophic losses :
The Whalers win the battle, but it is pyrrhic! Of course, they still have a lot of ships – way more than I have PDBs. I am ready to lose Mirzam – at least the Whalers won’t be in shape to take a second planet.
… wait ? I won with 2 PDBs left ? Well, that’s even more unexpected. If the Whalers had been controlled by a real player, they would have ragequitted immediately.
With the Whaler main combat fleet annihilated in their assault, I can immediately send reinforcements to Mirzam and rebuild the defence. At this point, I believe that my fleet is larger than the one of the Whalers.
I believe wrongly. Only 2 turns later, the Whalers send another large fleet, this time toward Shedir.
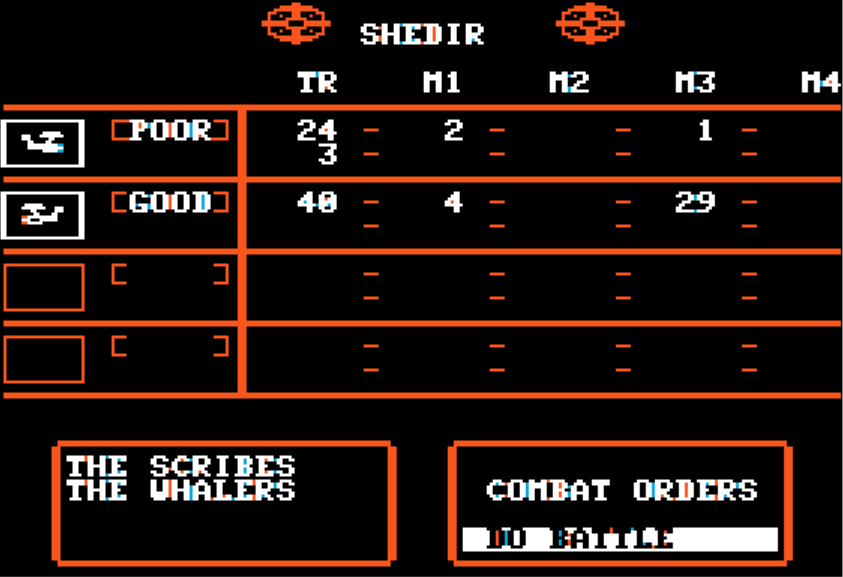
They take control of the space above Shedir, but again they don’t have what it takes to break through the planetary defence. After a timid attack, they have to pull back – this time early enough not to lose everything. The following turn, my fleet from Mirzam arrives and the Whaler fleet retreats with losses. Now I should be safe…
… or am I ? While my main fleet is chasing the Whalers, the Famished, who have been slowly building up all that time, attack Mirzam. My home planet is still pretty much depleted of its defences (I can only buy 5 by turn), and its protective fleet is above Shedir. Not good.
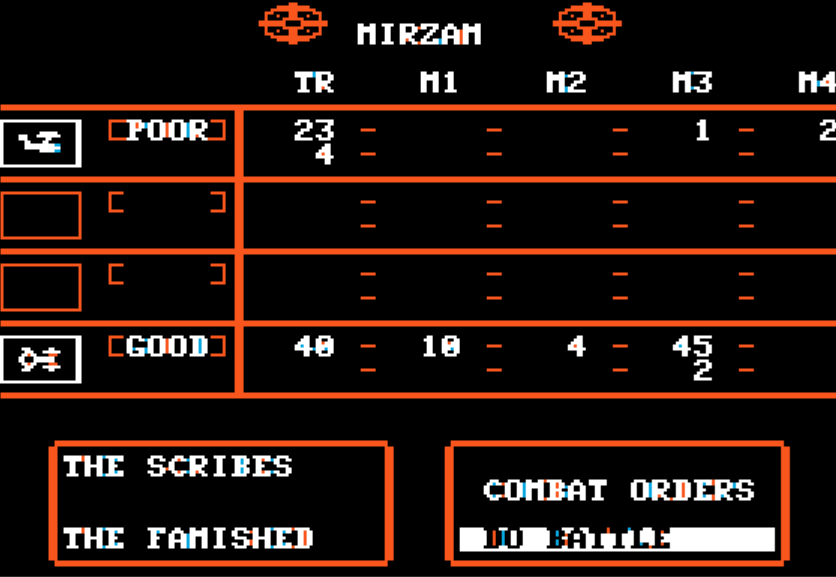
Finally, Mirzam falls to the Famished, who immediately set up 40 PDBs.
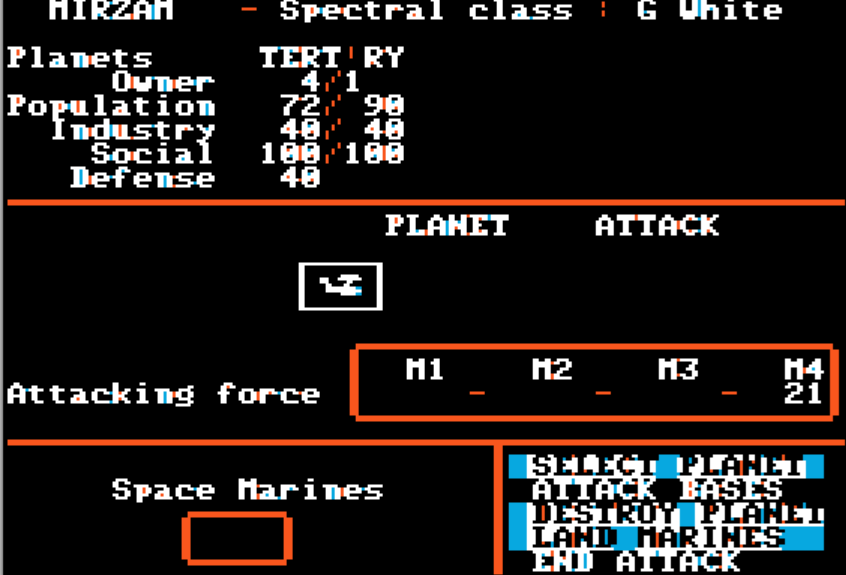
My fleet is back two turns later – I lost one turn sending the fleet to a planet called “Mizar” by mistake. My Mk 4 fighters demolish the Famished fleet and assault the planet. 21 level 4 fighters are enough to destroy 40 level 3 defences. I don’t need to land any soldier ; the planet was mine to start with, so without any defence it revolts back to my side immediately. That’s just as well, my sluggish transport ships have still not arrived in Mizar…
My much-diminished fleet, of course, is a tempting target for the Whalers. They go all in with what they have left :
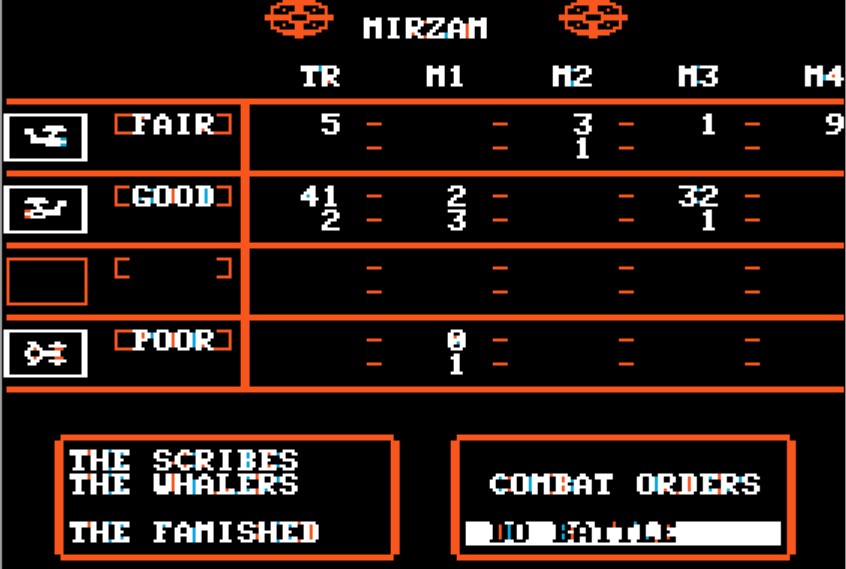
I win that battle with only one ship left – earning a bazillion points :
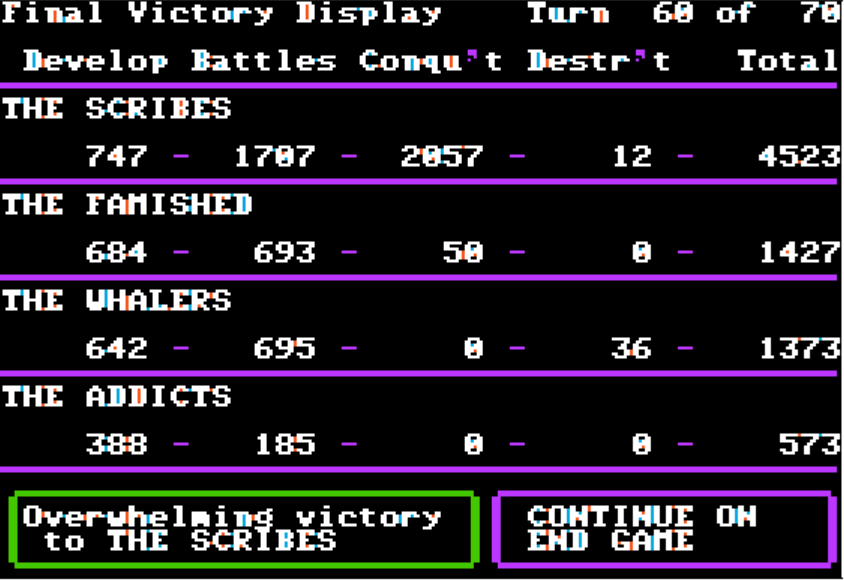
And that’s the end, 10 turns earlier than expected. My opponents throw in the towel. They yield the galaxy to me.
The game allows you to check the final situation for all players, so here is the final map :
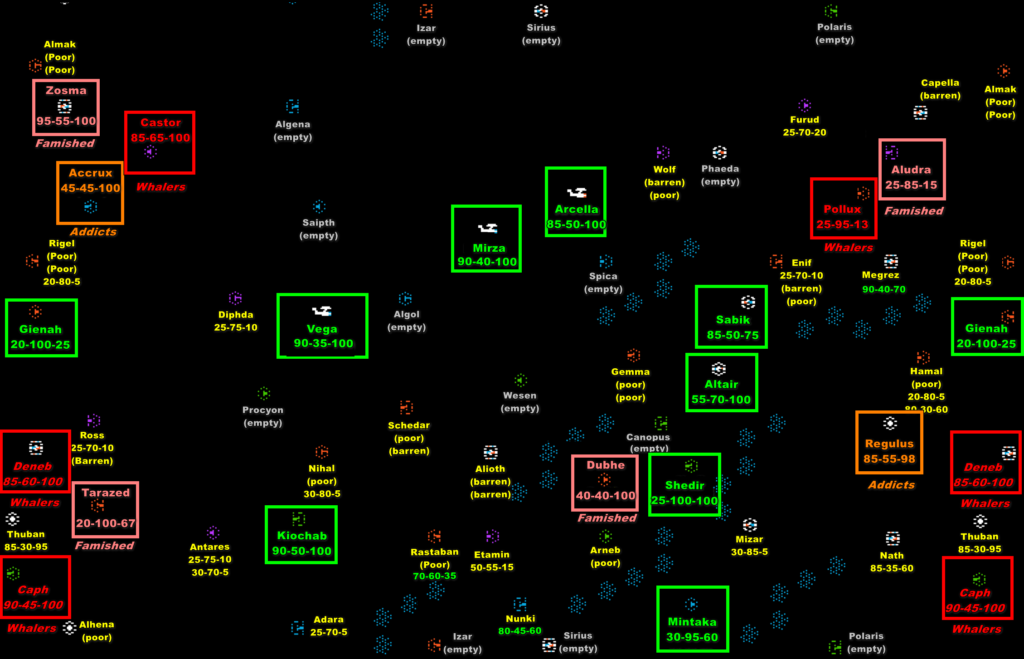
I had started some late-game colonization on Mintaka and Gienah, so I ended the campaign with 9 planets, including 6 fully developed, 2 well-developed and one just colonized. Meanwhile :
- The whalers had 4 planets, only 3 of which were fully developed. One (Pollux) had just been colonized,
- The famished had 4 planets, 2 fully developed, one half-developed and one just settled,
- The addicts had only 2 fully developed planets,
In terms of fleet, I had a large lead, being the only player with level 4 fighters and having more of these (18) than anyone had level 3 fighters. The Addicts were still fighting with level 2 ships…
This was a very satisfying campaign, as the game is well thought-out. On the ruleset, my main criticism is that population is more a drag than a boon. Each population point cost 1 in maintenance and brings a maximum of 2 in revenue, and even then only as long as you don’t have more population than industrial capacity. Worse, if population passes the maximum allowed on a planet, the “social” standing starts to go down so you need to regularly put everyone in a ship at the cost of 5 by population. But what do you know ! The advanced ruleset makes population important again – and that’s what I will test next ! You can also jump direcly to the review & history of the development of the game.