[Commodore 64, Free Fall Associates]
– Do you like Chess, Lieutenant Narwhal ? Do you like the battle of the mind ?
– Not really. Why ?
– Perfect ! You are the man we are looking for !
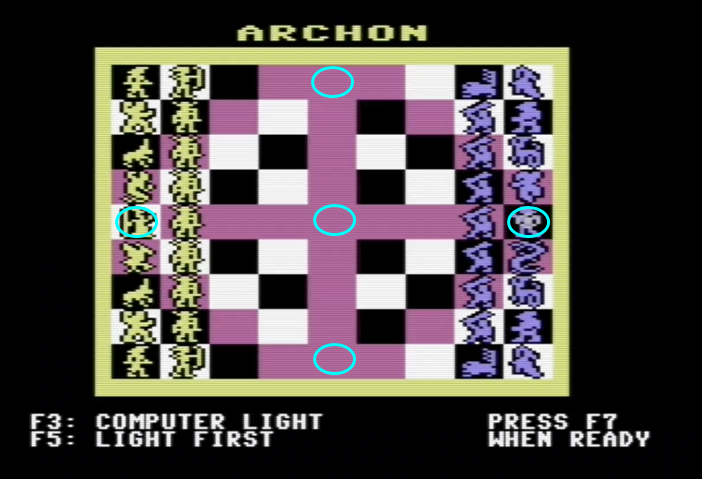
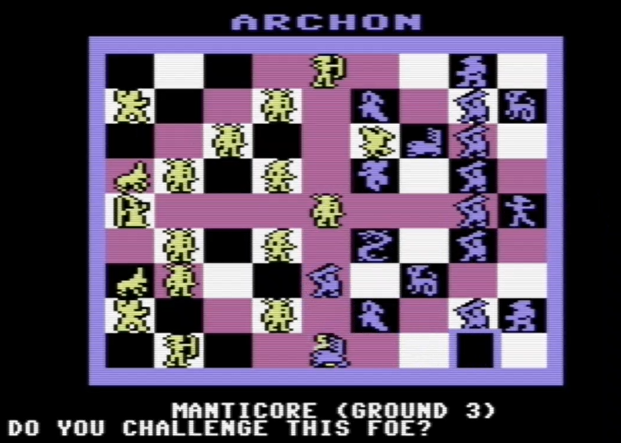
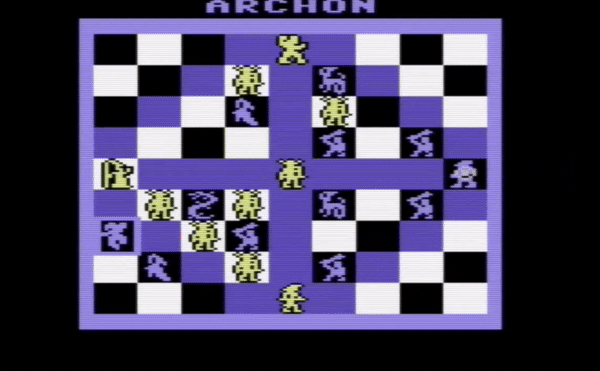
For this AAR, I will be on the right with the purple pieces
I like Chess, but I never loved it. It is too dry. Like Tennis and Golf, I feel that Chess would be much less interesting to people if it was not high status. I always preferred International Checkers, even entered a few tournaments. But although neither game involves luck, the uppity Chess-players looked down on us Checkers-players as playing the inferior game. Ha ! Of course we the 10×10 International Checkers elite players knew that the real inferior game was the crude and watered-down 8×8 American checkers. Sometimes I wonder who competitive Tic-Tac-Toe players look down upon.
Enter Archon, which is like Chess, but fun – at any rate that’s what its designer Jon Freeman claims. In Archon, the dull pawns, rooks and other knights are replaced by exciting dragons, wizards and valkyries, and “capture” is replaced by arcade combat. In this AAR, I will helm the Dark side toward victory by trying to control the 5 power points : 3 in the middle, one on each side of the board.
First thing first. In Archon, there are 3 kinds of tiles :
- Permanent dark tiles,
- Permanent light tiles,
- Shifting tiles, moving from “totally dark” to “absolutely light” over a cycle of 12 turns.
Creatures on their own colour have a massive bonus : up to 7 hit points, for scale only three creatures (the dragon, the djinn and the golem) have more than 14 base HP. My first move is to move to a dark tile all my good units starting on shifting tiles or permanently light tiles. My opponent does the opposite.
Instead of moving, both players can cast one of 7 spells with their wizard (for the light side) or their sorceress (for the dark side). Each spell can be cast once, targeting any tile except a power point. It also costs one HP to the caster forever. When the shifting tiles reach “totally black”, I cast my first spell, “summon”, and target the best enemy unit which happens to still be standing on a shifting tile : the djinn.

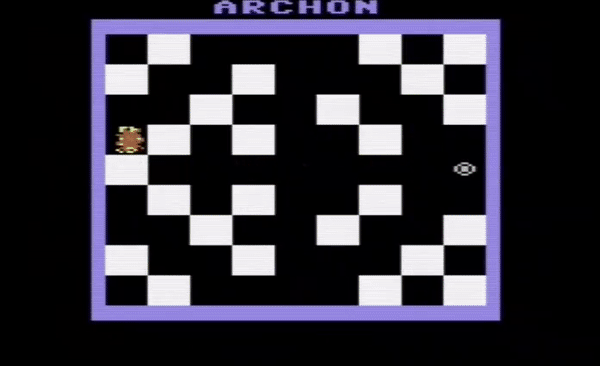
The attack is solved by arcade combat. The djinn has more health than my elemental, but that’s not enough to make a difference given how hard the fire elemental strikes : both units are going to die if hit twice. I manage to win the battle :
Elementals disappear after their attack, and the wizard of light immediately casts a “revive” spell, so the board looks exactly the same one turn later – but now my opponent has spent its best spell.
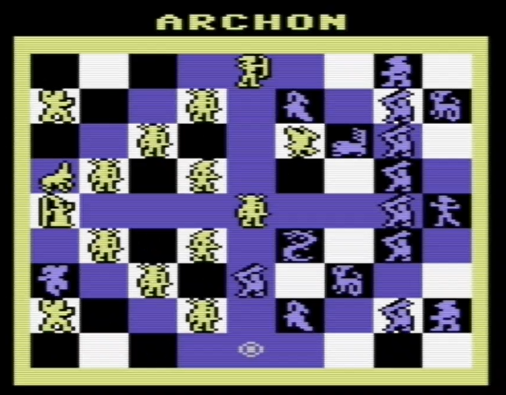
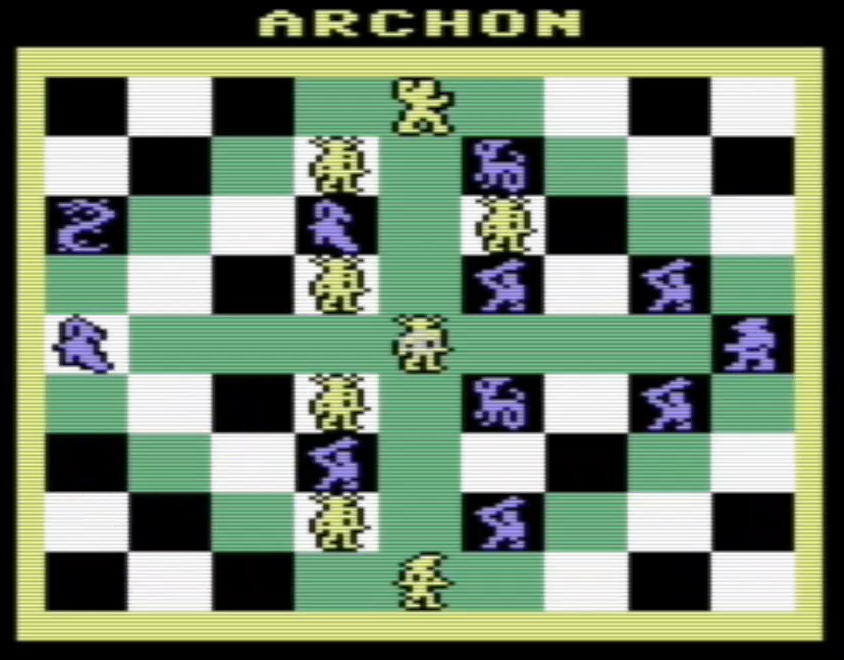
The game carries on. By the time the shifting tiles are fully light, a lot more important units are on the tiles of their colour.
When the computer positions its revived djinn on the Southern power point, I attack with a manticore. I don’t expect to win, but to drain a few HP from the djinn, health being tracked between battles.
After being defeated, I bring the shapeshifter, possibly the most interesting unit of the game. It takes the shape of whatever it copies, but still receives a bonus from dark tiles. It also recovers all its health at the end of combat, so no R&R is needed. The shapeshifter easily defeats the djinn, and this time there is no more revive available for the forces of light.

The computer tries to kill my shapeshifter with an archer but fails. I then attack a unicorn, defeating it, and then fend off an elemental. In a real Chess game, that’s the moment I would have toppled my wizard as the white player.
I am out of easy prey for my shapeshifter, so the next step is to kill the Light Wizard and claim the power point he is standing on. I start to bring my units one after the other to deliver a killing blow. Meanwhile, the Phoenix, fighting for the light side, mops-up 3 of my goblins in the top-right corner. I don’t see it as much of an issue as the goblins are the weakest units of the game (with the Knights, their light equivalent) and only attack in melee. Still, it is irritating.
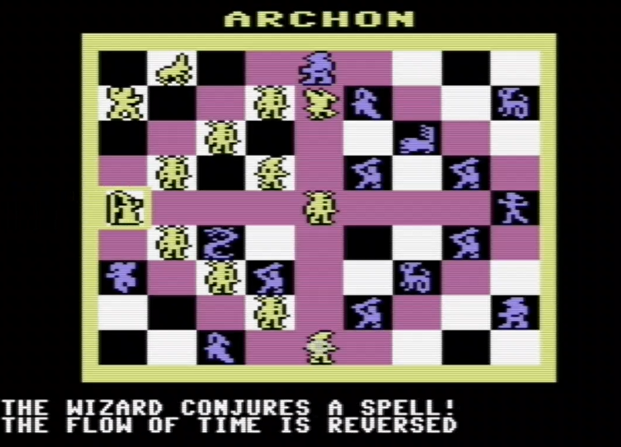
When the Phoenix is on a shifting tile, I cast “imprison” to keep it there until the tile becomes dark. The wizard casts “reverse time” so the tiles become lighter every turn rather than darker, and I cast my own “reverse time” to counter that.
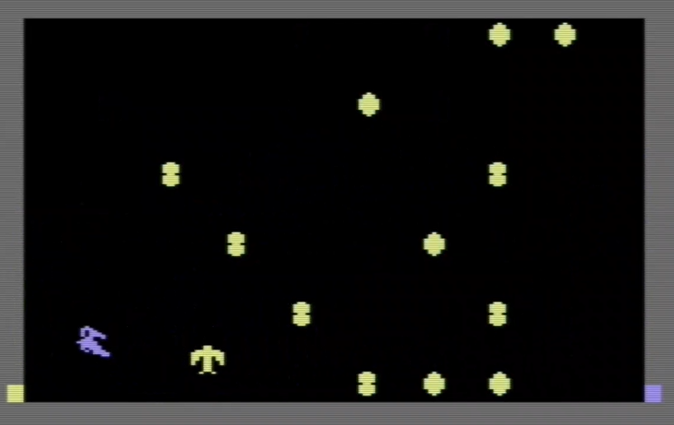
When the tile turns dark, I attack with a banshee. Both the Phoenix and the Banshee attack by unleashing an aura around them, but the bonus in HP given to me by the tile makes the difference, and I win with one HP left.
My joy does not last. A valkyrie attacks my sorceress, and the combat ends with a mutual kill ! I can’t cast spells anymore

After retaking control of my power point with a slow but powerful troll, I attack the Light Wizard. The first attempt with the shapeshifter ends after less than 5 seconds, but the dragon succeeds :
With the light power point under my control, I am confident I should win. I know I can also count on the weak strategic AI. The AI always tries to occupy the three central power points when they shift to its colour, and then does not leave when they shift to the colour of its opponent – forcing the AI to fight at a disadvantage.
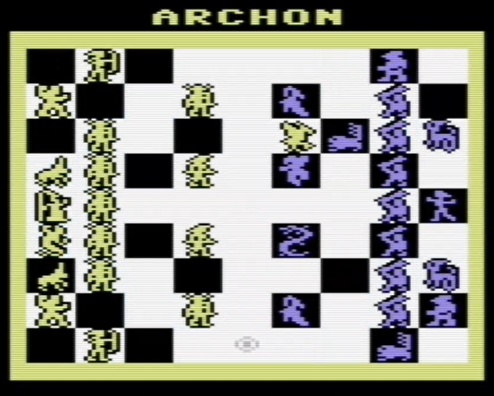
After trading several units in a series of combat, I take control of the 3 central nodes :
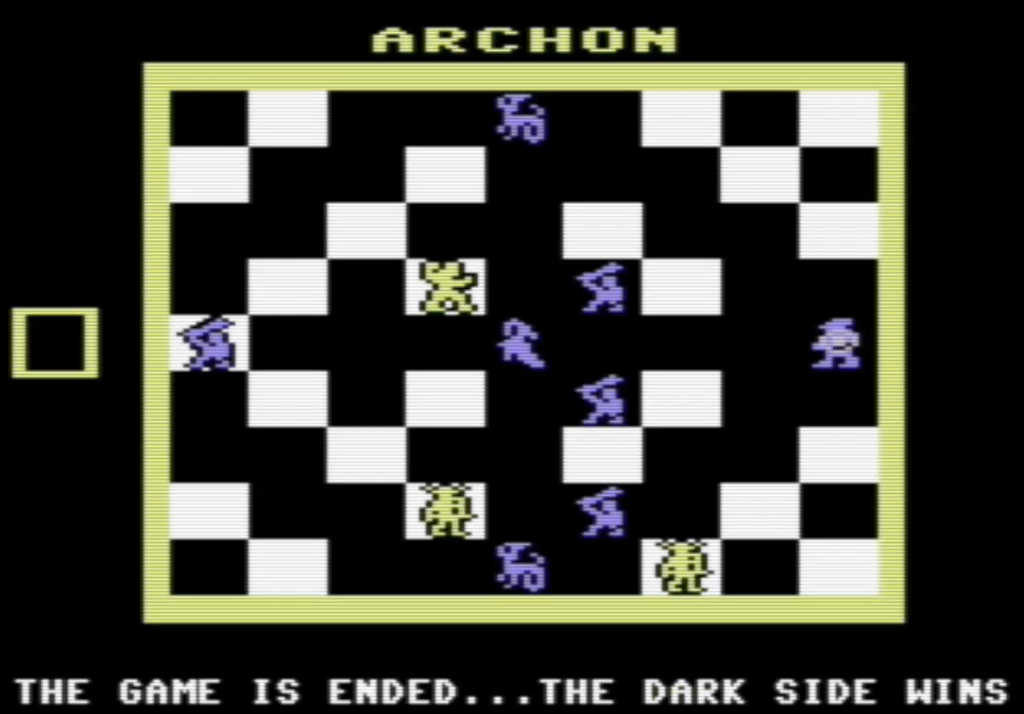
I won ! Of course, the dark side is usually considered the strongest, because the shapeshifter is so strong and the phoenix mediocre at best. But come on, I wanted to play with the dragon !
Archon combines two genres I don’t really cover on this blog : boardgame and arcade. Still, because it is so often called a strategy game I feel I would have not been exhaustive if I had skipped it, so review time.
Rating & Review
Archon : The Light and the Dark by Free Fall Associates, published by Electronic Arts
First release : June 1983 (multiplatform)
Total time tested : Four hours
Average duration of a game: 20 minutes or less
Complexity: Trivial (0/5)
Would recommend to a modern player : No
Would recommend to a designer : Yes
Final Rating: Well-designed but obsolete
Ranking at the time of review : 19/99
Summary
Immensely popular at its release and one of the first flagships of Electronic Arts, Archon presents itself as a mix of strategy and arcade. While fun to play, deep down it is primarily an arcade game and the good arcade player will crush the good strategists 100% of the time.
Archon: The Light and the Dark released in 1983 is a milestone in many ways. It is not the first strategy game with real-time or arcade combat resolution (S.E.U.I.S did it first), but it is the first good one. Jimmy Maher covered the history of the game better than I ever could in an article I already linked three times on this blog ; suffice to say that in late 1981 Jon Freeman left Automated Simulations after a divergence of view with the co-founder and lead developer Jim Connelly, and founded Free Fall Associates along with his wife Anne Westfall. After a weird project (Tax Dodge), Jon Freeman and another young Automated Simulations alumnus called Paul Reiche III designed two games : the adventure game Murder on the Zinderneuf and the strategy game Archon, the latter entirely programmed by Anne Westfall.
Archon was an immense success, though possibly as much due to the intrinsic qualities of the game as due to the work of Electronic Arts. Indeed, as a lesser-known historical “first”, Archon was part of the first batch of games ever released by Electronic Arts, along with Hard Hat Mack, Pinball Construction Set, Worms? and M.U.L.E. Not all of these were successful enough to carry the company founded less than one year earlier by Trip Hawkins, but Archon was. Thanks to EA support, Archon was ported on the main platforms that existed in 1983 (Atari, C64 and Apple II), and then later on foreign platforms (including the British ZX Spectrum or the Japanese PC-88) or on new platforms as they were released (Amiga, MacIntosh, IBM PC and even the NES). More platforms meant more press coverage and of course more customers, and I suppose that almost everyone who played in 1983 had heard about Archon.

I couldn’t muster the courage to test all versions, but I was curious to try two :
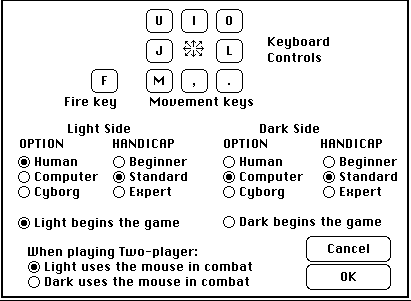
- The 1986 MacIntosh version (played thanks to emulation support from the Data Driven Gamer), which is rarely mentioned anywhere. It is an exceptionally sleek port…
… but not a very good one. The Phoenix is unplayable (the range of its explosive halo is divided by two) and the game feels extremely hard as units are, I believe, smaller relative to the battlefield than in the other versions, but much faster !
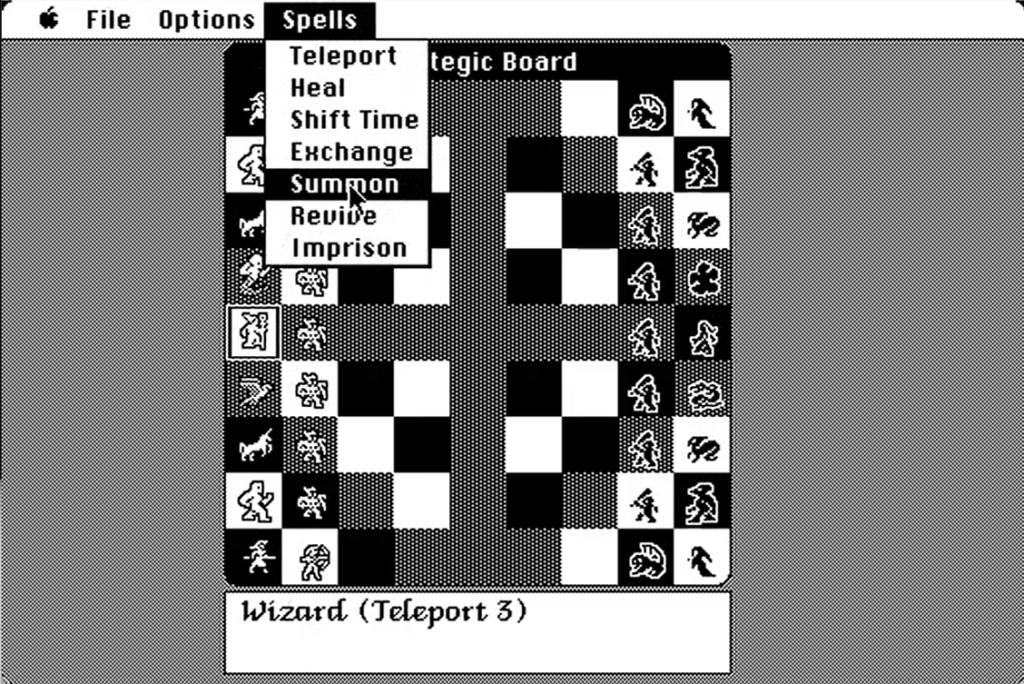
The options menu comes with a surprise that those of you who played Paul Reiche’s Star Control will immediately recognize :
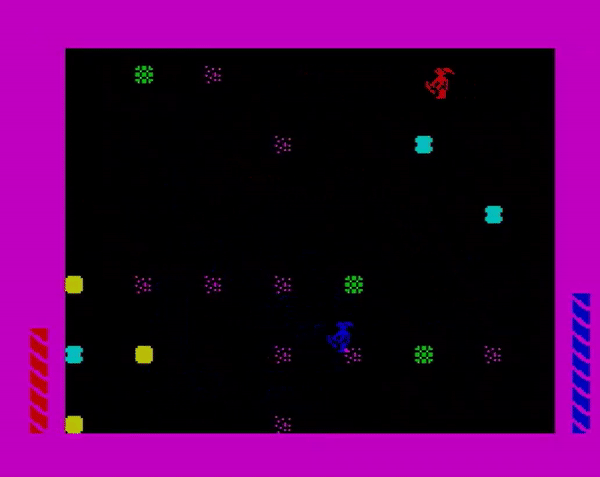
- The 1985 Spectrum version, which I tested because my Lothlorien articles apparently brought me a lot of Spectrum retrogamers. I am not sure what kind of agreement EA had with the British publisher Ariolasoft. The look and feel of the game is different. The middle tiles don’t visually change colour, instead they are always yellow and a balance in the top left corner of the screen indicates whether it is dark or light. It makes the game a lot less immersive.

More importantly, the balance of arcade combat is weird. The weapon reload times in the arcade section are long, very long and that changes all the dynamics of the game. Once your opponent has shot, you can come almost at melee distance safely to shoot, and then if your opponent survives they will be the one trying to stay at melee distance to deliver a shot :
Before you ask, it is unlikely to be an emulator issue : the strategic part of the game has a normal speed.
Overall, the later ports seem much weaker than the original versions, so I had no second thoughts about only reviewing the Commodore 64 version below.
A. Immersion
Good. Generally speaking, I don’t think Chess is immersive. I have a hard time imagining the bishops as real clergymen who took a vow to only move in diagonals. Archon does not have weird movement on the boards or towers racing across the board, so it is a bit better, but not much. What makes me rate it as “good” is the general atmosphere of the game with the thematic units and the change between the day and the night and the incredible packaging and manual. This comes straight from EA’s Trip Hawkins, who wanted to sell games as others sold music albums – hence “Electronic Arts”.
B. UI, Clarity of rules and outcomes
Good, helped again by a great manual.
C. Systems
Adequate. The high-level idea is, in my opinion, awesome and still fresh 40 years later, but I am less convinced by the final result. Players win by taking control of the 5 power nodes, but there is no award for partial control so the two power nodes that really matter are the ones on both sides of the board which happen to have the two best units of the game (the Wizard and the Sorceress) sitting on them, so soon enough the game will be about killing those units.
Alas, with a couple of exceptions like the shapeshifter, the game’s 16 different units (+ 4 elementals) can be neatly ranked from best to worst, with the melee units at the bottom and no “weaker” unit able to counter a specific stronger unit. If the skill of the two players in arcade is similar, the only way to kill a better unit on its colour is to be lucky or to bring several units to attack several times in a row. On the defensive side on the other hand, there are not many counters against the “attack until you make it” strategy either: your opponent will attack from tiles of his own colours, and because so many units fly there is little you can do about it.
Overall, the strategic layer is skin deep. With so many units flying and so many tiles of the “correct” colour on the board, there is very little reason to stay on a tile of an opposing colour. This creates the issue reported by both the Digital Antiquarian and the Data Driven Gamer : instead of trying to win an advantage by positioning better than the opponent like in Chess, both players will stay on their colour and hope that the other player will run out of patience first. Happily enough for me, the computer is not very patient.
D. Scenario design & balancing
Poor, I think ? Common wisdom is that the Dark side is stronger, because the Phoenix is mediocre and the shapeshifter extremely powerful. At least one strategy site comments that the Light side has its own advantage : the Unicorn. The Unicorn fights a “fair” match against the Sorceress even on a Dark tile (2 hits to kill for each side, provided the Sorceress has cast at least 3 spells) whereas the Basilisk, dark side’s equivalent of the Unicorn, can be one-shot by the Wizard.

Still, as I explained I don’t think the map is well-designed, and the AI is not good ; it leaves units on the shifting tiles as they turn against its colour. On the other hand, in the arcade section, the computer adapts its skill to your skill, getting a bit better or worse (through decreased or increased “latency” before and after an attack) depending on who has the most pieces on the board. It is the first game with autobalancing I have encountered so far.
E. Did I make interesting decisions ?
Not really at the strategic level.
F. Final rating :
Well designed but obsolete. This was a hard one, given that Archon is more arcade than strategy. I feel it could have easily be mended by putting the left power point on a dark tile and the right power point on a light tile – or possibly both on a shifting tile. I can’t exclude that Jon Freeman did NOT want his game to be too strategic, but for the purpose of my blog the subpar strategic layer makes the game obsolete, though I can’t deny it was fun to play.
Contemporary Reviews
With a release on 10 platforms over 5 years and EA’s marketing hard at work to make sure every magazine gets their hands on it, Archon received a plethora of reviews, so I’ll only quote two significant ones :
- The review done by David Willis in Computer Gaming World (October 1983), concluding thus :
“This is a very good game, with lots of care put into its development. I recommend it highly and would only hesitate to recommend it to those who love only purely strategic games. If you’re turned off by most arcade type games because you like to think a little, this hybrid may be for you. I play it frequently and do not find it predictable at all. The people at Electronic Arts are breaking a little new ground here by putting together some old and new ideas in a way worthy of your computer, and I hope they continue to manipulate electrons in such a delightful manner.“
- The review done by the 1983 Atari Book of Software, which concludes this way after giving it an overall A+ rating :
“Archon is one of the most creative and original games that has come along in several years. I’ll admit it has its roots in chess and maze-adventure type games, but it is this brilliant combination that works to make it an outstanding strategy and combat game. I tested it with both teenagers and adults. Both groups, regardless of their interest or lack of interest in chess, found Archon a totally fascinating game. Despite its complexity, it is quickly grasped by players of all ages. It has great graphics, and will will give a lifetime of pleasure.”
Note that most reviews realized the strategic layer of the game was superficial (Willis : “no matter how smart you are on the strategic board, if you fall apart on the tactical arena you will lose.“). The reviewers on the other hand strongly disagreed on whether the computer was predictable but good to train against, or almost impossible to defeat (Byte, June 1984 : The computer opponent is unmercifully skillful, making the single-player game an exercise in good sportsmanship (how can you be a good sport when you lose to a computer?).
For two decades, Archon consistently made it in the list of the best video games in history, though its ranking decreased over time. In 1996, Computer Gaming World ranks it 20th (just below The Curse of Monkey Island, but two slots above XCOM) in its list of the 150 best games. In 2003, IGN puts it in 50th position in a similar list, two years later it falls to the 77th position. That’s the last time – according to Wikipedia – that it is mentioned in such a list, though it makes it to the less selective 2010 book “1001 Games To Play Before You Die”
Archon’s disappearance from memory owes a lot to Free Fall Associates’ lack of subsequent activities. It released an Archon II in 1984, but nothing major after that. Paul Reiche III, of course, would release in 1990 (with Fred Ford) Star Control, the best strategy-arcade of all time – a hill I am willing to die on. I am sure we will cover the former and I hope we will reach the latter.