[Apple II, Avalon Hill]
If World War II vehicles were ranked by how much media exaggerates their importance, the Bismarck would undoubtedly be Tier S – perhaps even at the very top. Dreadnoughts is yet another game that casts you as the Kaleu of the Bismarck during Operation Rheinübung, the last sortie of the legendary battleship – but then maybe you can change history. As for having fun doing it, given this is a chasee game (a subgenre that so far was never good), designed by the untried Thomas Dowell and released by Avalon Hill, I did not hope for much. To my surprise, I was proven wrong.
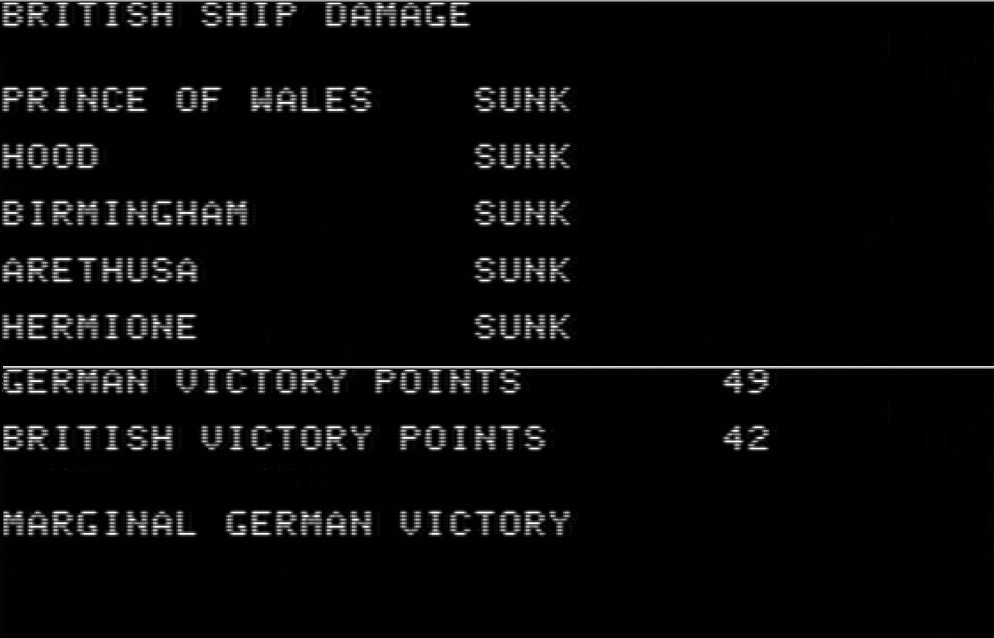
Full disclosure: this is my second attempt at completing the campaign, as always in Ironman mode. The session that should have become the After Action Report didn’t showcase the game as well as I had hoped. It turned into a fun but narratively dull surface battle, during which I sank five British warships before losing the Bismarck, earning a “marginal” victory on points.
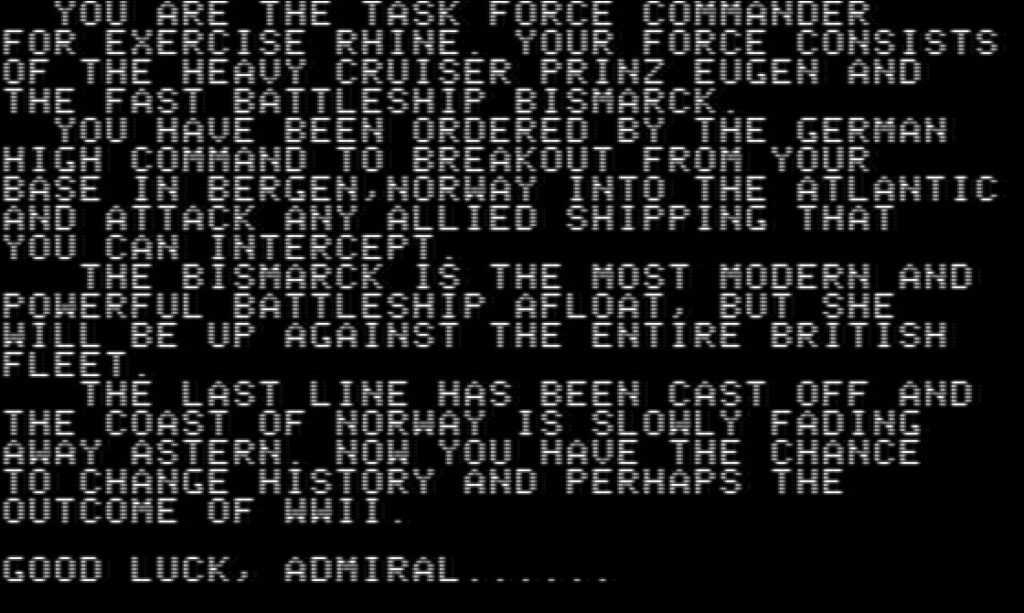
The campaign begins on the evening of May 21st in Bergen. The challenge for the Bismarck and the Prinz Eugen is to break through the British blockade running from Greenland to Scotland. Once west of the UK, the open seas promise a much more favourable convoy-to-warship ratio.
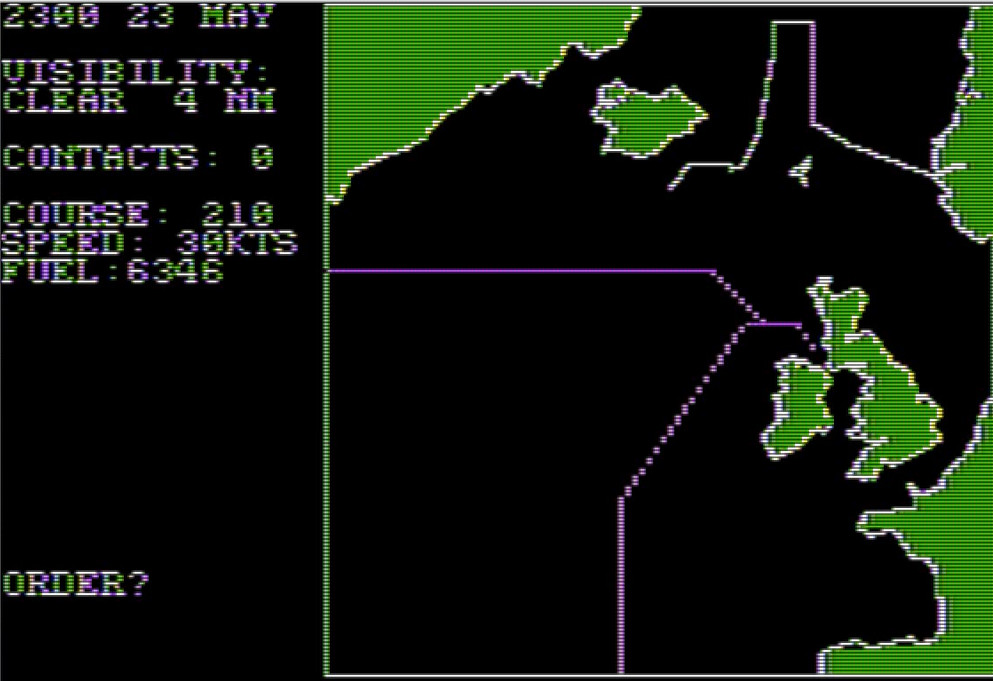
Balancing fuel consumption and avoiding passing too close to Scapa Flow, I decide to pass North of the Faroes, but before long I am detected by a British flying boat.
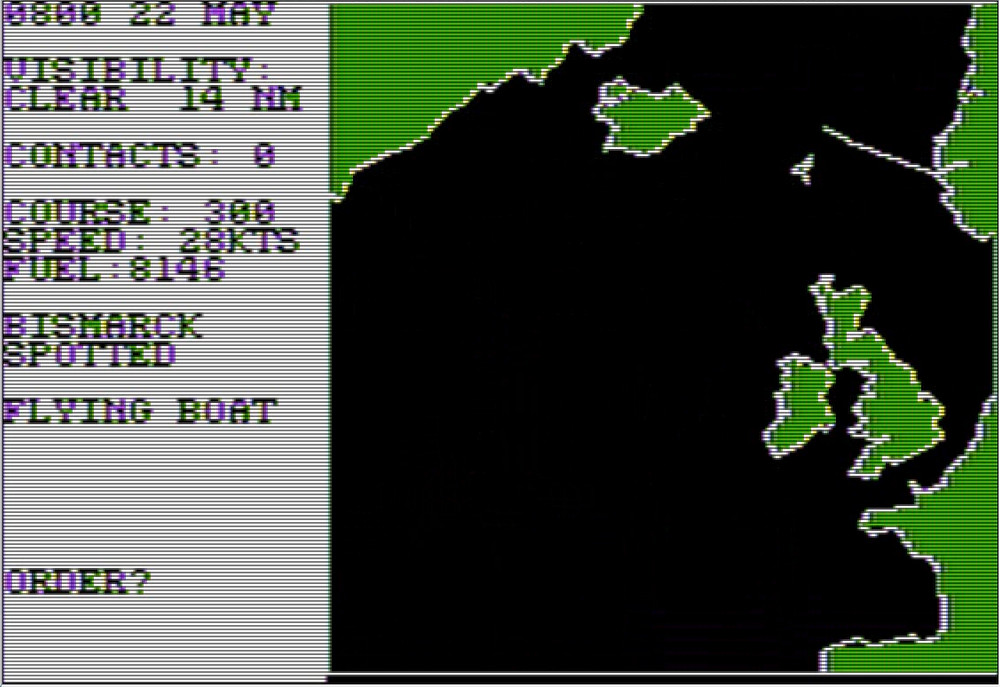
Knowing that scout planes often attract battleships, I head north to shake off pursuit. I lose them during the night, but by then I have ventured so far north that I spot pack ice. After traveling west for a time, I attempt to break through the blockade again.
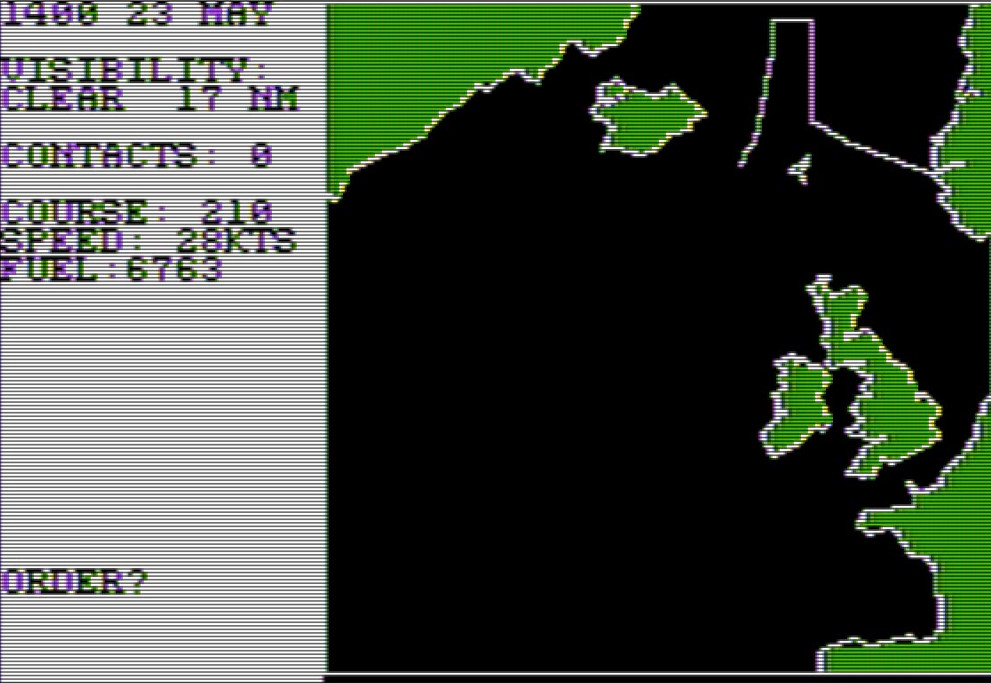
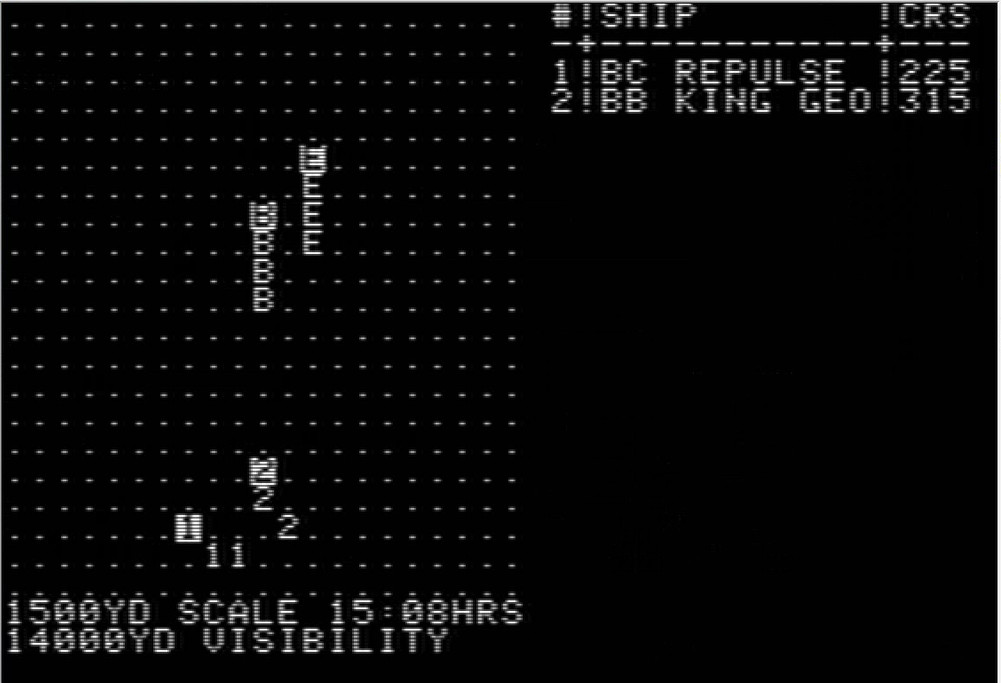
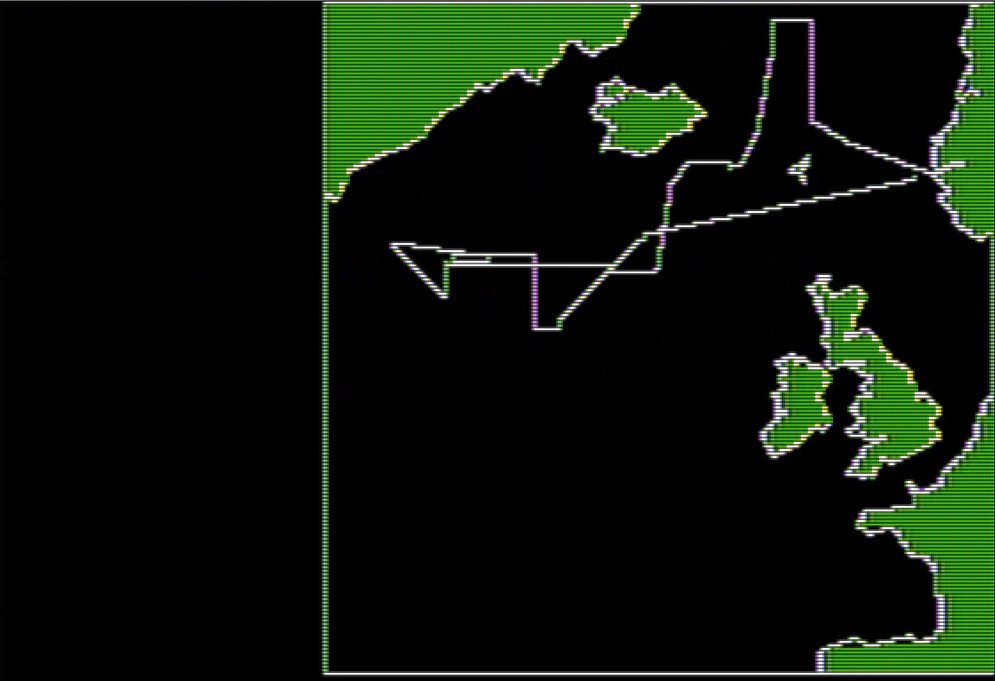
This time I go further South, but without any forewarning I am intercepted by two British capital ships: the HMS Repulse and the HMS King Georges V.
Both British ships start, logically, to my South. I don’t want to fight them – I could probably win, but one hit on the rudder or on the engine room and I become a sitting panzerduck for the rest of the campaign. Both fleets start 14 000 yards (13 km) apart, so I can use my slightly superior speed (30 knots vs 28 knots) to escape North.
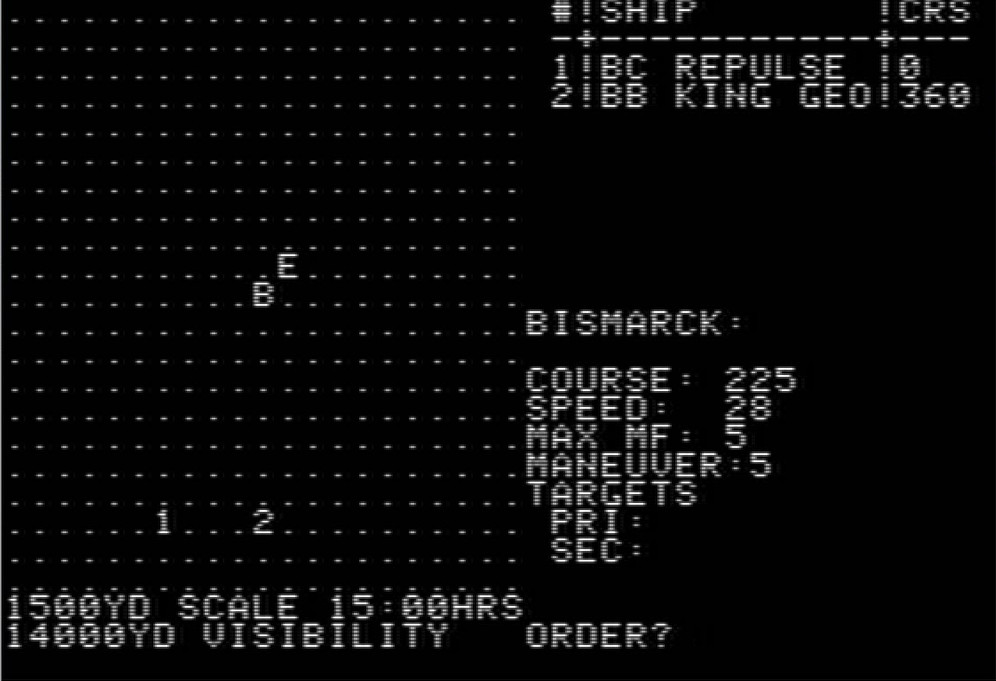
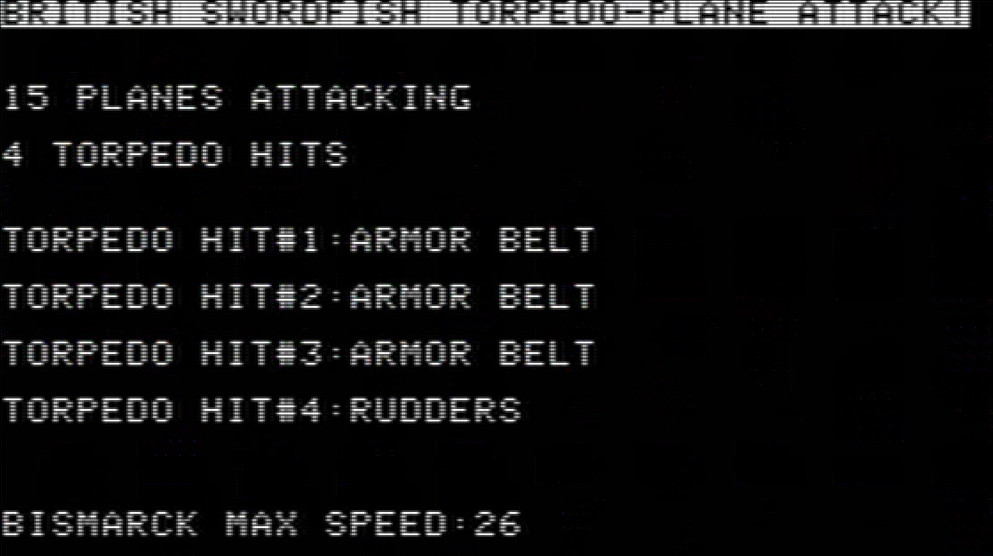
As I escape, my guns (range: 39 000 yards) target the Repulse, whose firepower is comparable to King Georges V‘s, but whose armour is much thinner. Luck was on my side—my first salvo landed three solid hits on the Repulse:
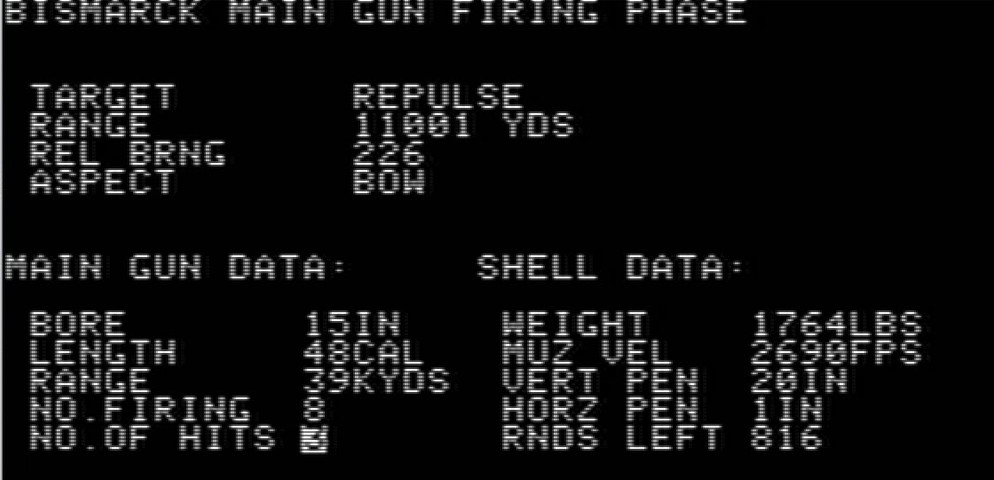
The first salvo destroys a primary turret, another takes out some secondaries, and the third devastates the bridge.
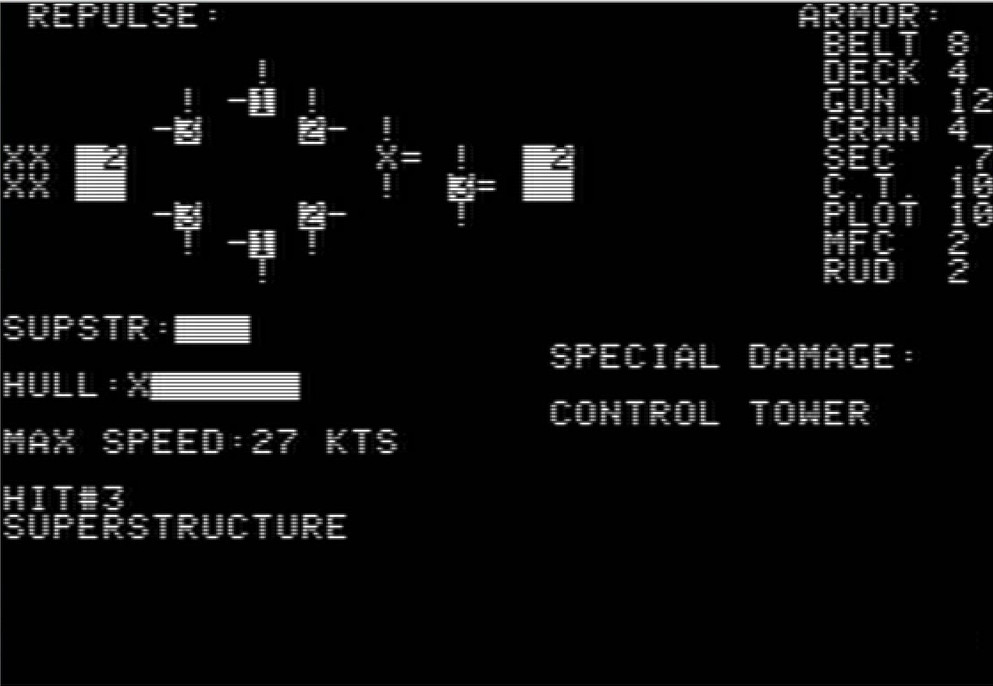
Later hits from both the Bismarck and the Prinz Eugen destroy most of the superstructure and half of the secondaries. With her firepower halved (her rear guns can’t shoot while in pursuit), the HMS Repulse turns to port and disengages.
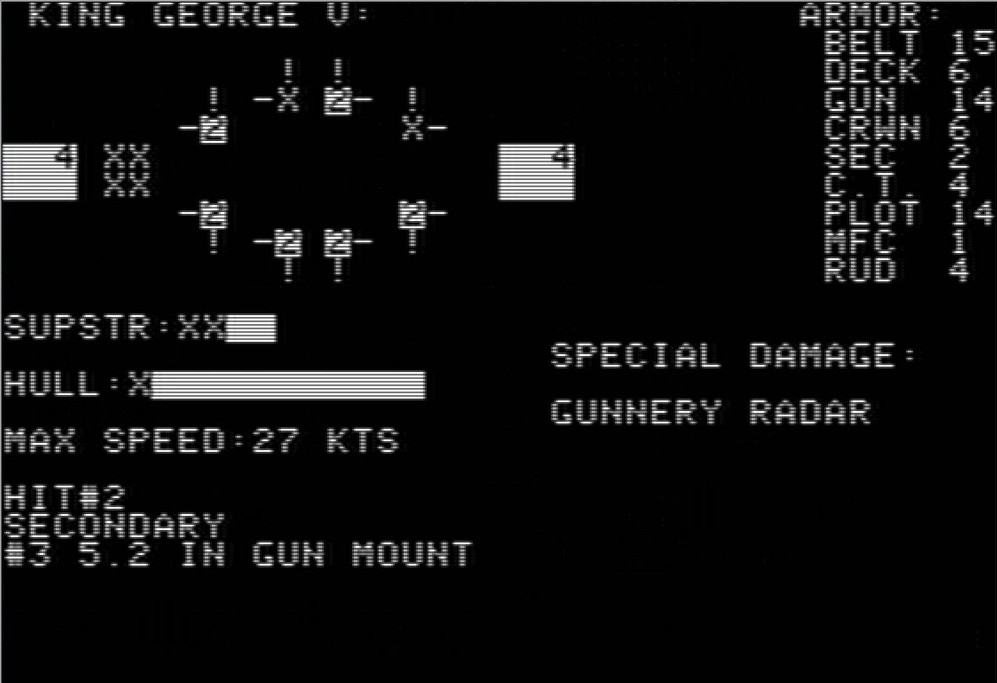
This leaves the King George V behind me. The Prinz Eugen manages to disable the British battleship’s gunnery radar early on, and later the Bismarck destroys her frontal turret. Eventually, my speed advantage pays off and I escape.
During this 10-hour-long battle, I suffered marginal damage, with only a pair of secondaries destroyed on the Bismarck and another on the Prinz Eugen.

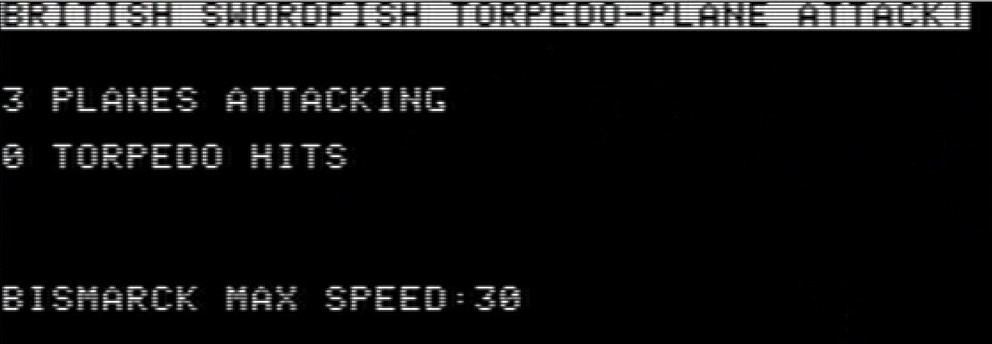
Once back on the strategic view I head West, where I am attacked by a patrol of Swordfish, which miss me.
Heading South again I encounter a new battleship: the HMS Rodney
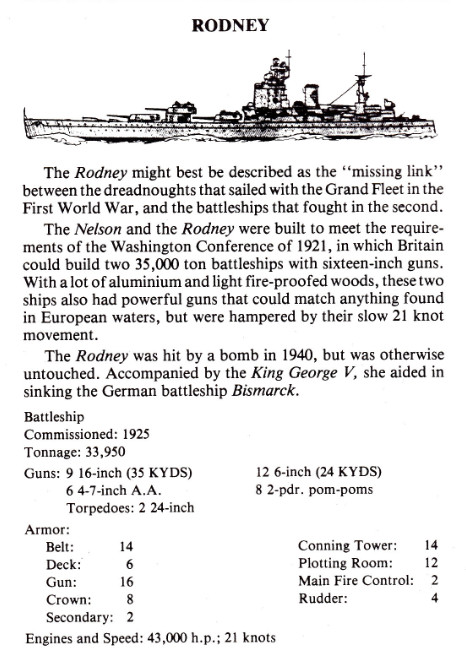
The Rodney has heavier guns than the Bismarck and more of them, for a comparable armour. That’s another battle I want to avoid, but as I escape I manage to destroy 2 of the 3 batteries of the British battleship!
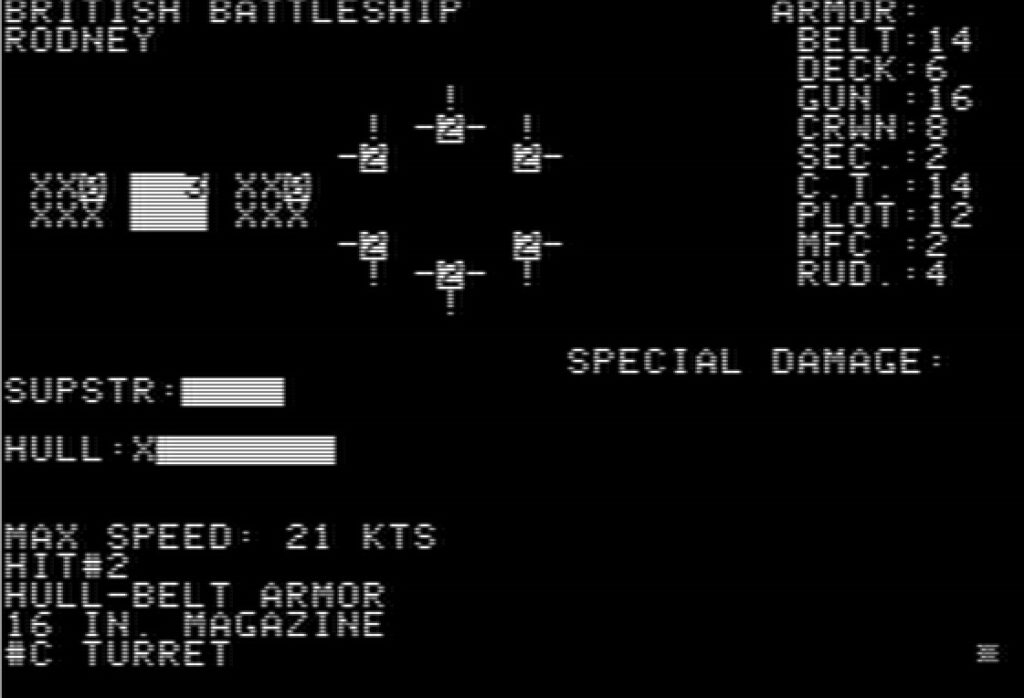
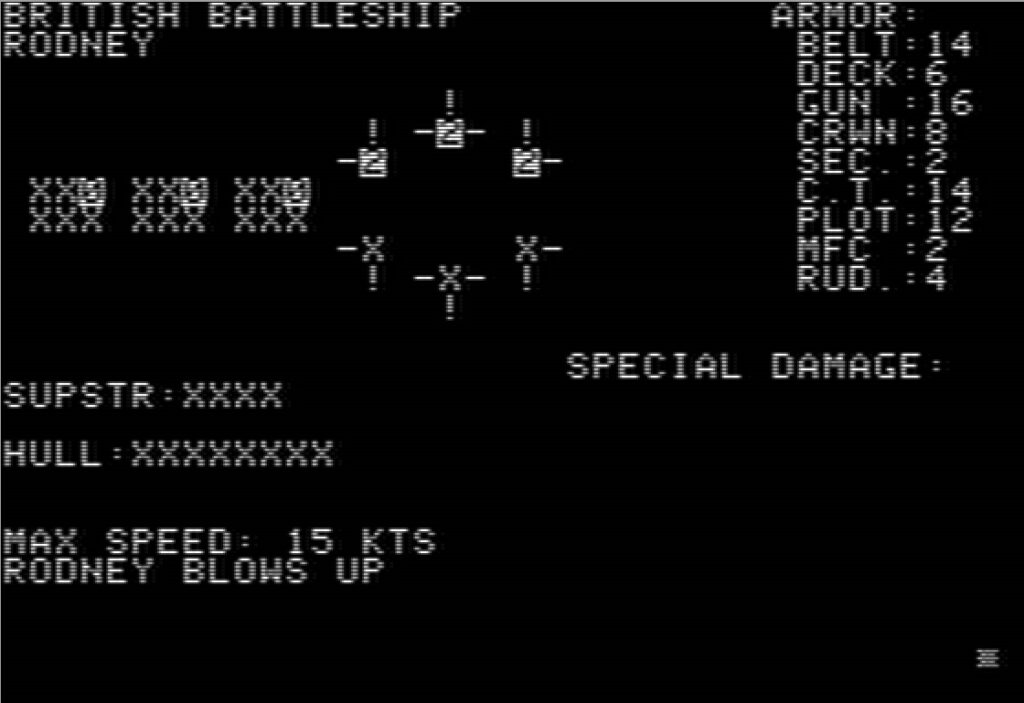
Maybe I don’t have to flee after all? I turn to port and engage the Rodney at almost maximum range. I miscalculate occasionally and let the Rodney shoot at me a few times, but she never hits me. There is no reinforcements nor air support during battles in Dreadnoughts, so once the third main turret is destroyed it is just a question of time before the Rodney is sunk!
With this victory, the blockade is passed! Time to check the British convoy routes:
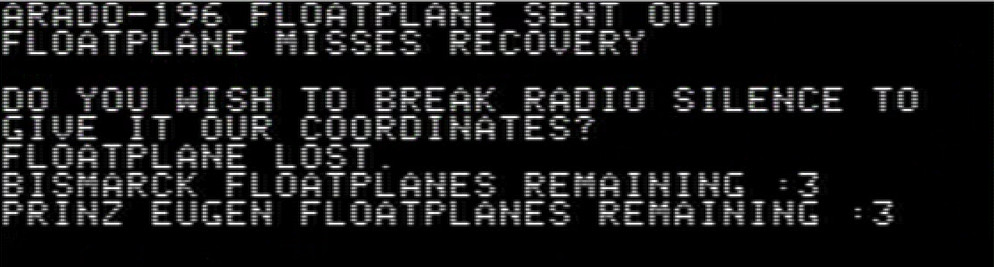
I follow the route for a bit and initially don’t find anything – forcing me on the 24th of May to send an Arado floatplane. The first one is lost…
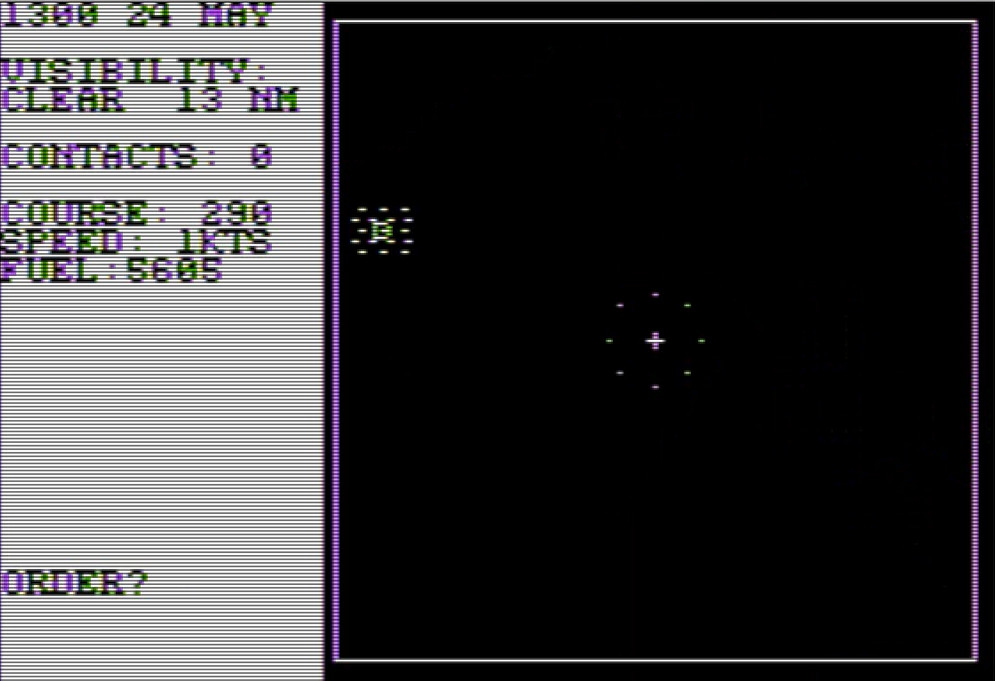
… but the second one spots something slightly North of the route.
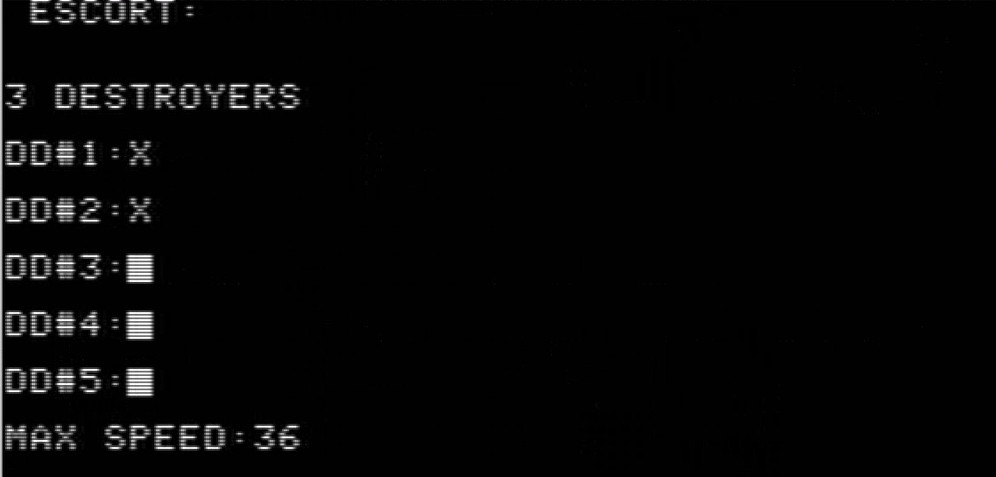
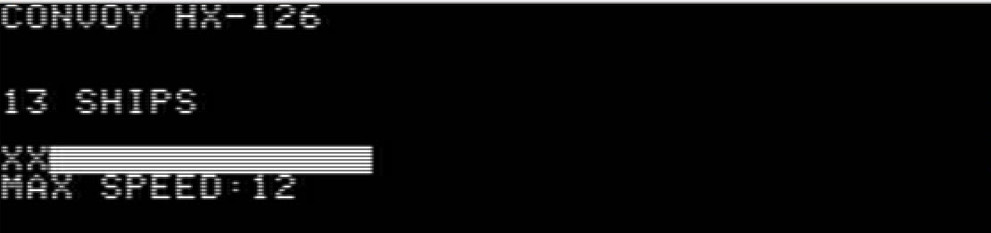
After more effort than I should admit, I find a convoy with a light destroyer escort.
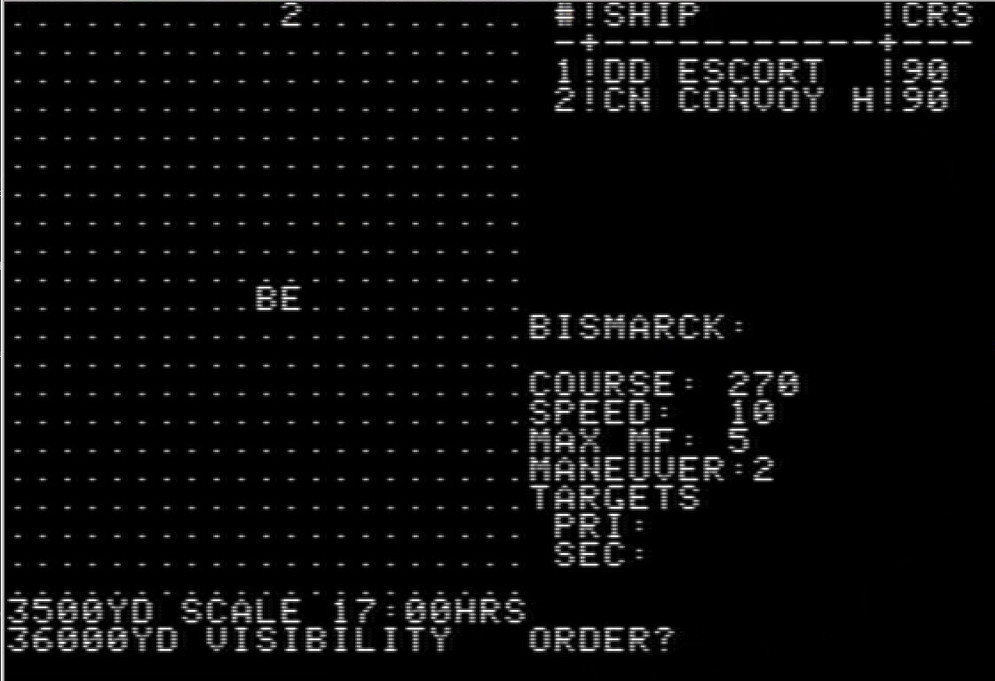
The destroyers are almost immediately dispatched…
… and then it is time to destroy the merchant ships.
I continue heading West, occasionally sending planes, until my planes spot a second convoy on the 26th that I don’t manage to actually find before the 27th. Its escort is even lighter (3 destroyers) and it is easily destroyed.
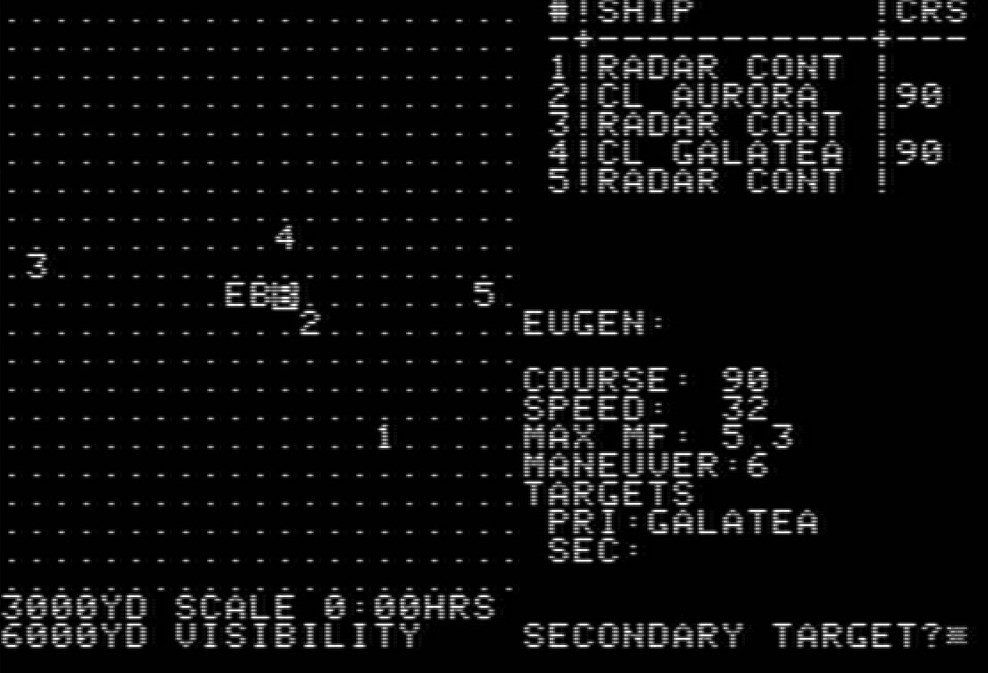
The Bismarck had a surface radar, but its capacities and range are limited. Nonetheless, during the middle of a rainy night, it beeps for the first time in the campaign and tells me I am surrounded by enemy ships:
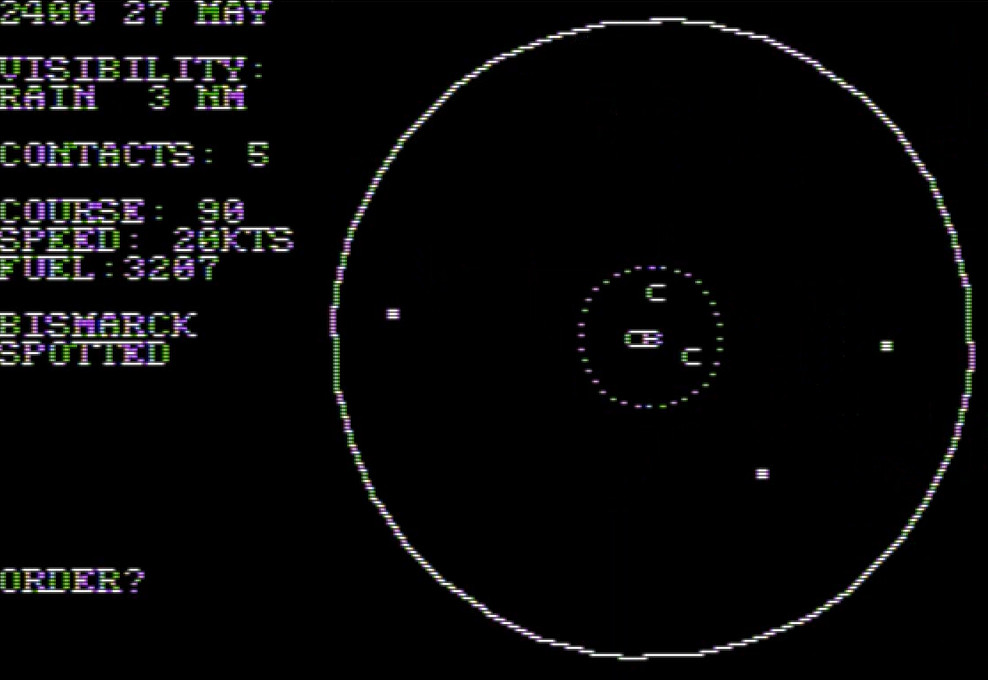
I am now shadowed by several British ships, and in the poor visibility some of them approached so much that I am forced into battle. The visibility, however, is poor (6000 yards – 5 km), and no one hits anything before I disappear into the night.
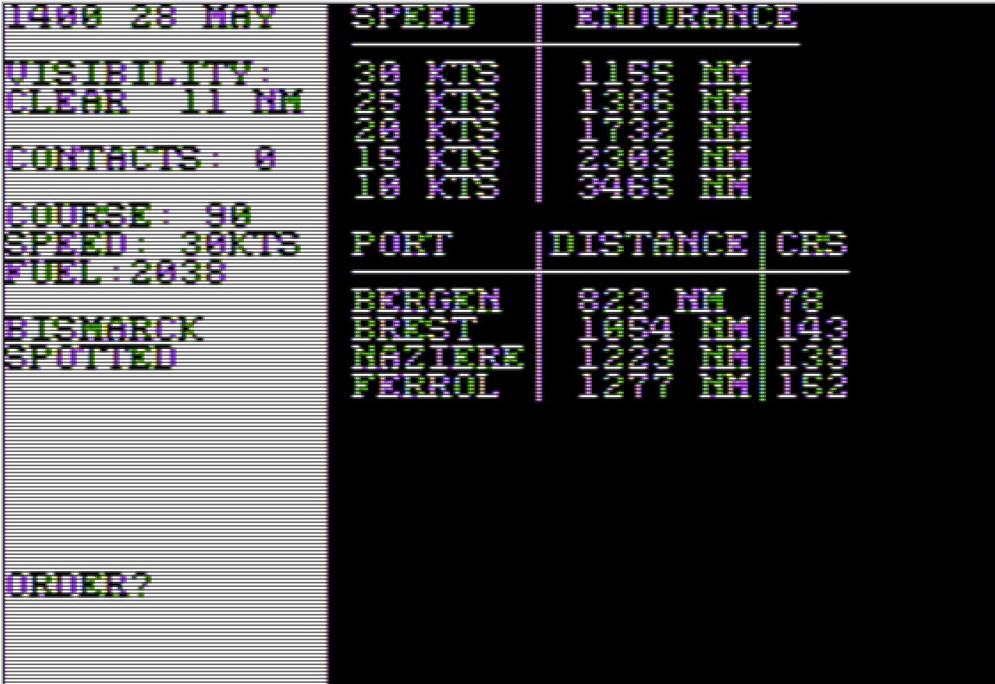
On the 28th of May, I realize my fuel reserves are reaching their end and it is time to go home. There are 4 possible ports, out of which I choose Bergen: Brest is on the wrong side of the UK, Naziere is not a real place and Ferrol is in Spain, which means internment.
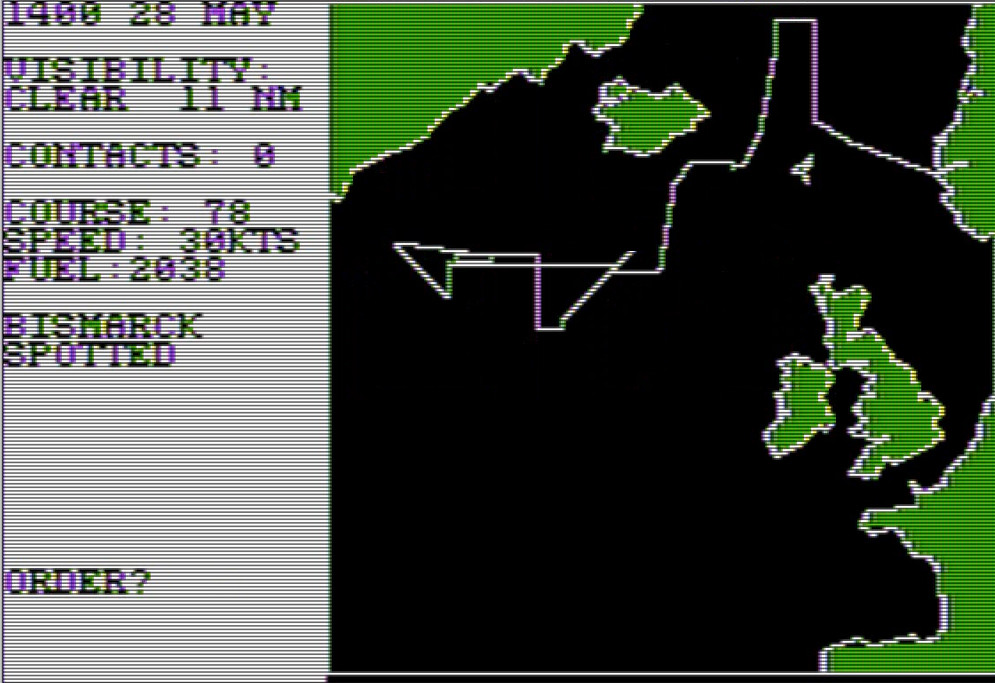
I need to pass the British blockade in the other direction, but I surmise the British warships are currently looking for me along the convoy routes. And indeed, while I encounter a fleet South of the Faroes, it does not include any battleship:
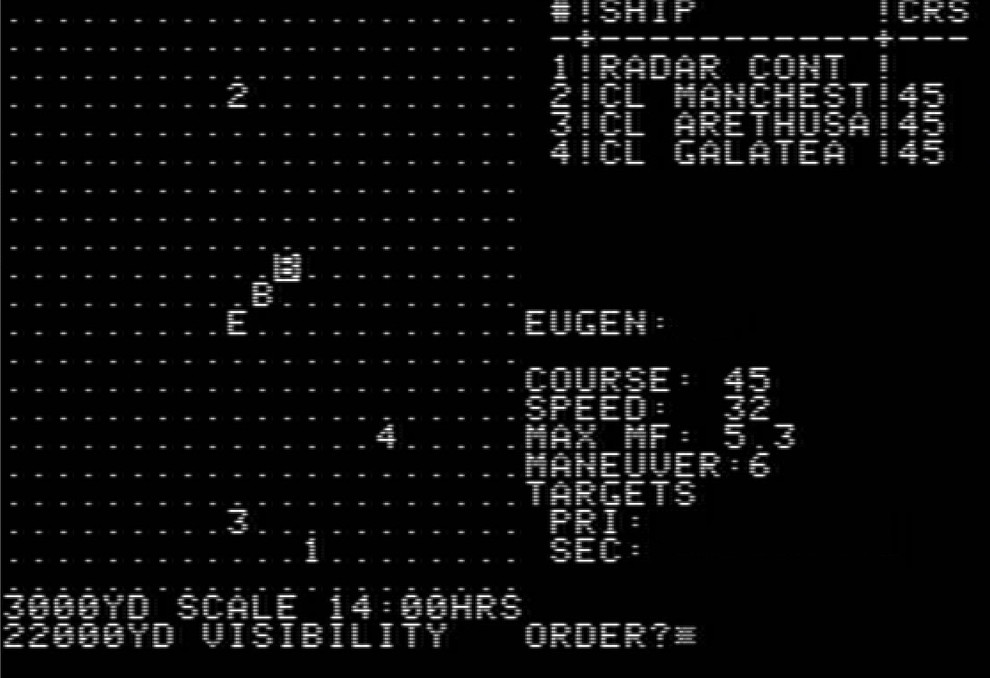
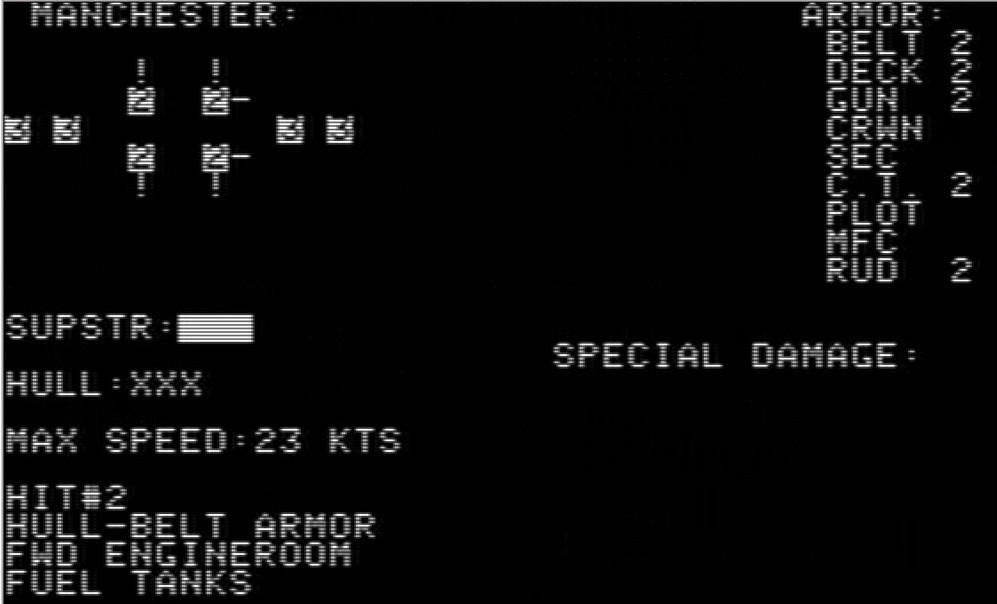
The HMS Manchester is destroyed by one combined salvo of the Bismarck and the Prinz Eugen. The other cruisers find it wise to scamp off.
That’s the last battle, and the rest of the return to Bergen is eventless.
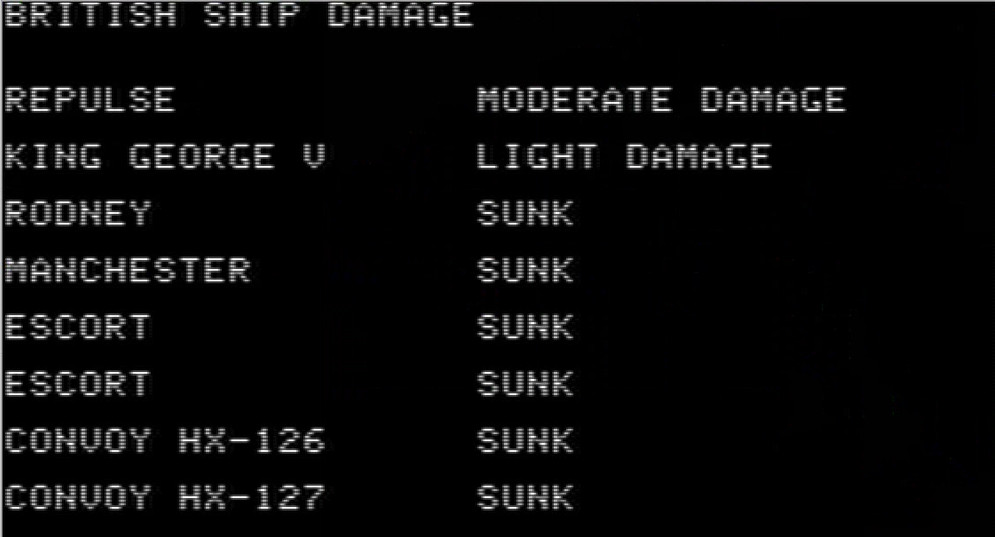
The result of the operation put the U-boat arm of the Kriegsmarine to shame, the Bismarck and the Prinz Eugen destroyed one battleship, one cruiser, 8 destroyers and more than 20 merchant ships for only moderate damage. A decisive German victory which, I hope, will leave the course of the war unchanged.

Ratings & Reviews
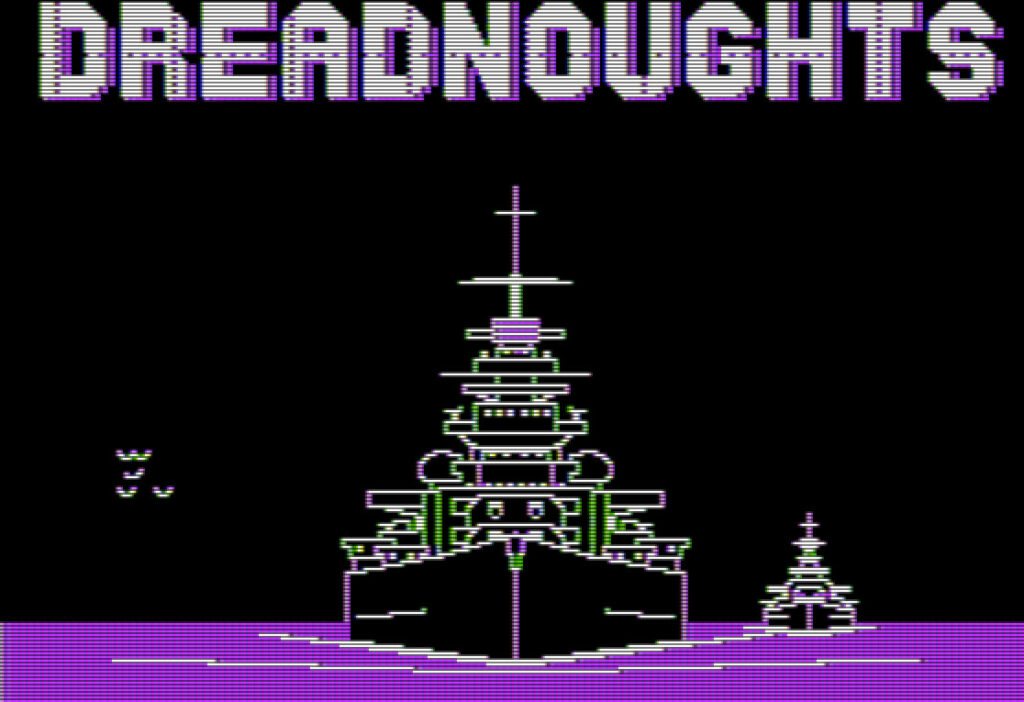
Dreadnoughts by Thomas A. Dowell, published by Avalon Hill, USA
First release: October 1984 on Apple II
Genre: Naval Operations
Average duration of a campaign: Up to 45 minutes at warp speed. Potentially hours at historical speed.
Total time played: 5 hours
Complexity: Low (1/5)
Rating: ☆☆
Ranking at the time of review: 20/155
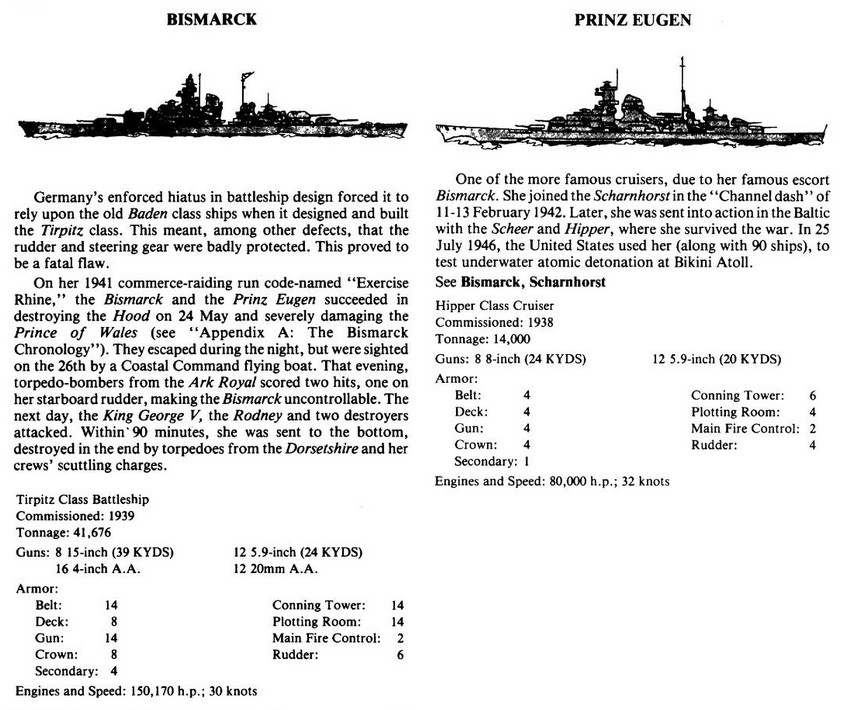
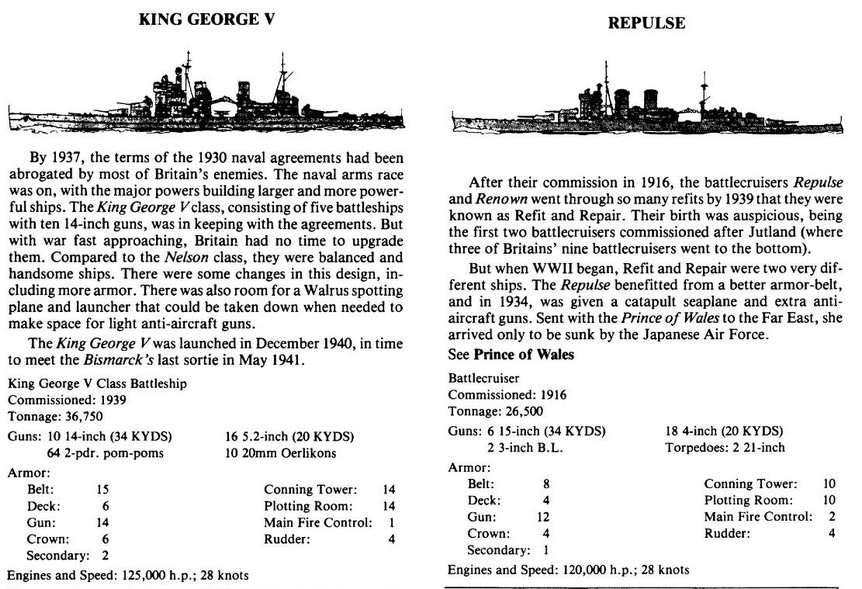
Context – I have very little to add here: I have no information on Thomas A. Dowell, who never worked on another game, and I’ve run out of things to say about Avalon Hill. All I can note is that despite its theme, Dreadnoughts is not a port of the famous Avalon Hill Bismarck board game. It was released in October 1984 on the Apple II for $30, with a Commodore 64 port following in mid-1985. Its documentation is excellent, including a short history of the Bismarck’s final sortie and descriptions of most of the 44 battleships, battlecruisers, carriers, and cruisers featured in the game.
Traits – Dreadnoughts essentially comprises two different games: a solitaire “campaign mode,” which I played, and a “battle program,” which is multiplayer-only except when called by the campaign mode.
I found the campaign mode far more engaging than earlier Bismarck or Graf Spee games that attempt a similar “chase” dynamic. What makes Dreadnoughts enjoyable, unlike its predecessors, is that it offers enough tools to plan and adapt. Instead of blindly forging ahead and hoping for the best, you can rely on a short-range radar (passive/automatic) and scout planes (“active”). The game also includes weather conditions and a day/night cycle, giving players additional opportunities to slither after being spotted.
Compounding the impact of the strategic layer, the “battle program” is also the best one I have played for the blog thus far. The attention to detail is remarkable: not only do turrets (including secondary guns) have specific firing arcs, but damage is directional. Guns facing the enemy are more likely to be destroyed than those on the opposite side of the ship. Watching damage accumulate on the ASCII-rendered ship models is also very rewarding – take notes, Rule the Waves.
I found the AI to be not only competent but also realistic in combat. On the strategic map, it will shadow you with its cruisers but only engage you if a battleship is present. During battle, the AI will turn its ships as necessary to show you as many guns as possible, and gradually disengage them if they receive too much damage – damage that are recorded between battles.
It is not to say that the game is without flaws. On the strategic map, you can’t detach the Prinz Eugen, and navigating to enemy convoys detected by radar or seaplane is a lot harder than it should be; overall once you have passed the blockade the game becomes a bit stale. As for the battle program. The most glaring issue is the lack of torpedo and smoke simulation, which means that destroyers are harmless ships that move toward you rather than away from you in combat! Transport ships are also considered a single unit in combat, so instead of dispersing on all directions as they historically did they stay together and die like Romans.
Finally, the game has two additional issues that were probably acute in 1984 but are now irrelevant: it is slow at historical computer speed, particularly when it issues a radar/sighting report every hour as British cruisers are shadowing you, and the stand alone battle program is two-player only. Given that it (obviously) works in solitaire when called as part of the strategic campaign, I don’t understand why Dowell removed this option.
Did I make interesting decisions? Yes, especially in the first half of the game when trying to pass the blockade (“should I continue or should I retreat and wait for a better opportunity?“). Alas, once the blockade is passed, the game plays a lot more in auto-mode.
Final rating: ☆☆. Dreadnoughts is sometimes clunky, but both its strategic layer and its battles will keep you engaged. If you can stomach the lack of graphics, it is a fun wargame that’s also easier to pick up than most of what I played.
Reception
Dreadnoughts left a mediocre memory (1 star and half) to wargame specialist Evan Brooks, but the first review for Dreadnoughts that came out in Computer Gaming World (December 1984) was more positive. Johnny Wilson had some issues with bugs in multiplayer combat and with how slow the game can be, particularly on the strategic map when you receive contact reports every hour by cruisers that will not engage you, but still found the game “extremely enjoyable against the computer“. Wilson was later joined in this assessment by Jay Selover, who in an article on Fog of War in September 1985 stated that Dreadnoughts was better than Carriers at War or anything done by Gary Grigsby in its management of limited intelligence.
As positive as it was, Wilson’s review triggered a response from Avalon Hill employee Bill Peschel, who started his letter to the editor with: “Upon reading your review of our Dreadnoughts game, I noticed that there were one or two minor points that needed clearing up” and then proceeded to list 6 items that were little more than nitpicks, making the whole letter petty. Peschel should have saved his ink for Electronic Games, in which Neil Shapiro stated bluntly (March 1985): “The strategic program is one of the more lifeless simulations of the often-simulated Bismarck scenario. The battle program, however, saves this game.” Shapiro disliked the strategic part (and its primitive graphics, even relative to 1984) but noted that “the real fun lies in experimenting with the many, many ships supplied on disk in truly mind-boggling ocean melees“.
I have to mention the Family Computing review in July 1985, in which James Delson introduces the game with the cringe “You control the German war vessel, the Bismarck, the most powerful ship ever to sail the seas”. Check the stat blocks, Delson! The Bismarck is not even the most powerful ship in Dreadnoughts!
In any case, Delson found the game “entertaining“, but on the easy side: “I won the war in North Africa for Rommel”
The last significant review I found for Dreadnoughts is by Jeff Seiken in Commodore Power Play (June 1986) and it most closely mirrors my opinion. Seiken has some issues with the realism of the game (issues I mentioned: lack of torpedoes, no splitting of the Prinz Eugen and of the convoys) and notes that it is slow to play. He also states that once detected, it is almost impossible to shake off pursuers, which is not my experience at least in the Apple II version. Still: “For players blessed with patience, Dreadnoughts should provide enough action and drama to offset the numbing effect of the periods spent staring at the screen and waiting for the computer.” The good news is that in 2025, you don’t need to be blessed with patience anymore, so try it and tell me your score!