[ZX Spectrum, Firebird Software]

Almost one year ago, I covered Mark Lucas’ Battle 1917, a typical fun-idea bad-execution game that nonetheless won the 1983 “Cambridge Award” organized by Sinclair User and Cases Computer Simulations (CCS). Back then, commenter Goldfinch warned me about a “pseudo-sequel” and much superior game by the same author: Viking Raiders – and here we are.
Viking Raiders allows solitaire, but it is designed first and foremost as a multiplayer game, so once again I called the commenters to the rescue: [Operative] Lynx, KarbonKitty (as “Barachel of Ammon” below), Dayyalu and myself. Those are the players that had to plow through Apocalypse and I had to make up for that somewhat.

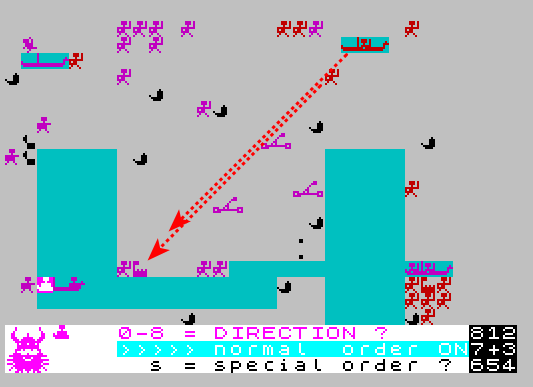
After a false start (KarbonKitty was eliminated before he could even play) and a lot of map generation, we agreed on the following terrain:
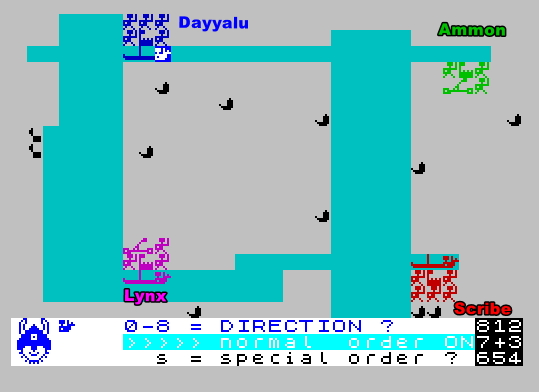
Viking Raiders is a simple game, with only 6 elements on the map:
- The castle, around which reinforcements are deployed. If it is taken, it is game over,
- The three units bought from the castle: the vikings, the catapults and the longboats,
- Two “items of interest”: the drinking horns, which are automatically drunk by vikings stumbling upon them, and the treasure chests, which are the only source of income when brought back to the castle.
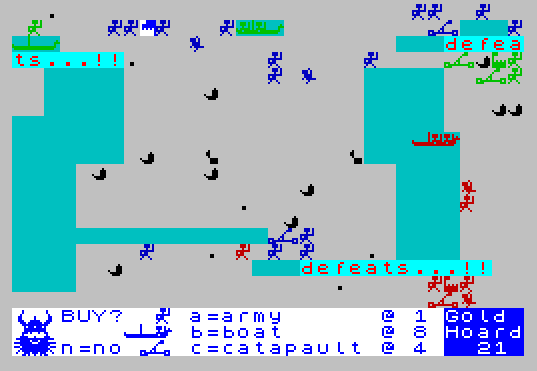
I started far away from the treasure chest, so I know I will have to work with my starting hoard (=the gold in my coffers) to recruit all my units and can’t count on future revenue. However, the starting hoard is pretty big and the limit to my recruitment for now is time: players can only recruit a maximum of 5 vikings every turn, plus one if they accept to pay premium for a longboat. Due to this, my strategy is therefore to strike my neighbours before the treasure chests make any difference. After a first turn that everyone spends recruiting a combination of ships, vikings and catapults, I immediately attack Barachel and prepare a landing against Lynx!
The strategy pays off in the North, as the following turn I capture Barachel of Ammon’s castle, removing him from the game and turning all his surviving units into mine.
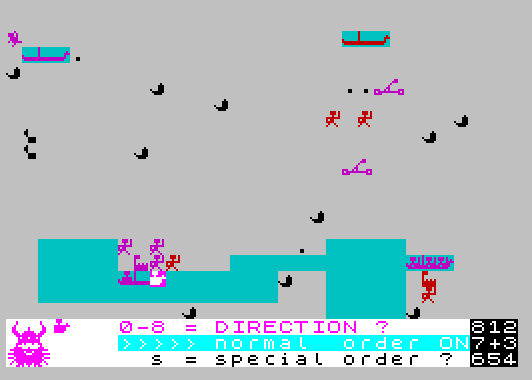
The following turn, my attempt to nip Lynx in the bud fails. Meanwhile, Dayyalu and him are fighting for the treasures, and Dayyalu sends a large force in my direction. I refocus my effort on Dayyalu and plan a surprise landing to eliminate him quickly
The landing itself works well, but my men are stopped dead by one of Dayyalu’s vikings.
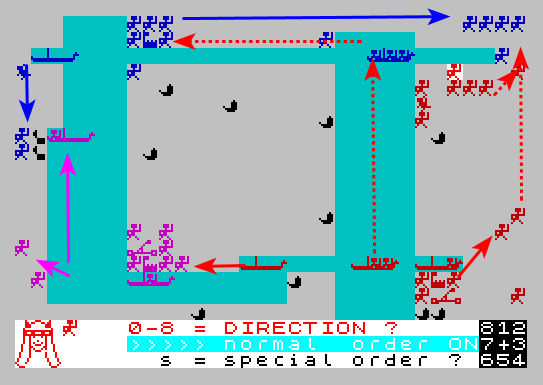
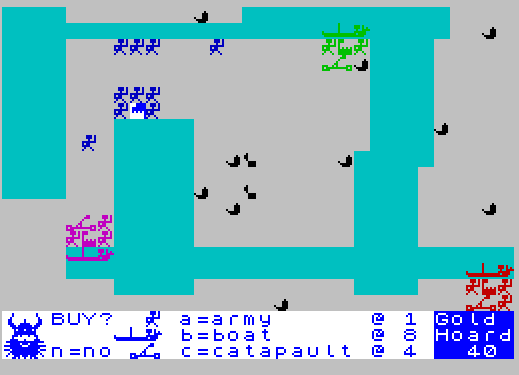
At this point, the water is starting to freeze, and Dayyalu’s natural defense disappears. As his attention is fully focused on Lynx, I prepare a conga line of attack:
Meanwhile, Lynx takes the advantage against Dayyalu, as he has 3 catapults and these never miss their targets if you know how to use them. Dayyalu, put under pressure by two players, seems doomed. The question is “who will kill him first and get his vikings”?
Alas, my conga line fails, so Lynx gets that privilege!
With Dayyalu’s vikings joining Lynx, I am in a terrible situation: I am out of cash, have no access to the treasure chests and don’t have catapults either. My only chance is a sneak attack from an angle Lynx does not expect.
It actually works, and Lynx neglects to kill one of the Vikings with a diagonal to his castle… but said Viking fails in his attack!
That’s the end! I win more battles than Lynx, but I lose two units every turn to Lynx’s catapults, units that I can’t replace. There is nothing I can do to stop my last opponent.

Still, I am giving everything, and I even manage to once more reach a tile next to Lynx’s castle:
But that’s the closest I ever get to victory. One turn later, Lynx takes my castle and ends the game.

This is Lynx’s first victory in our multiplayer game, and well-deserved. If I had to replay the game in multiplayer, I would deploy a lot more catapults – they’re really powerful with their pinpoint accuracy. Congratulations to Lynx for understanding that faster than I did.
Rating & Review

Viking Raiders by Mark Lucas, published by Firebird, UK
First release: October 1984 on Spectrum
Genre: Direct Production Strategy
Average duration of a battle: 15-20 minutes at emulation speed 250%
Total time played: Around 2 hours
Complexity: Low (1/5)
Final Rating: ☆
Ranking at the time of review: 54/159
Context -In July 1982, the Thatcher Government announced the privatisation of British Telecom, part of a broader wave of high-profile privatisations aimed at strengthening the British economy. In the case of British Telecom, the stated goal was to give the company “freedom to grow, to operate overseas, and to make acquisitions.” After several delays, the privatisation was completed in August 1984, with roughly half of the company’s shares sold to the public in November of that year. Valued at £8 billion, this was the largest privatisation of its kind, both in the UK and internationally.
Privatisation remains a contentious issue, but British Telecom was luckier than most: the company remained intact, and competition was largely nominal. Mercury, its designated competitor in the fixed-line segment, never posed a serious challenge. However, capped prices and limited growth in the mature telecommunications sector meant that if British Telecom wanted to expand, it had to innovate and diversify.
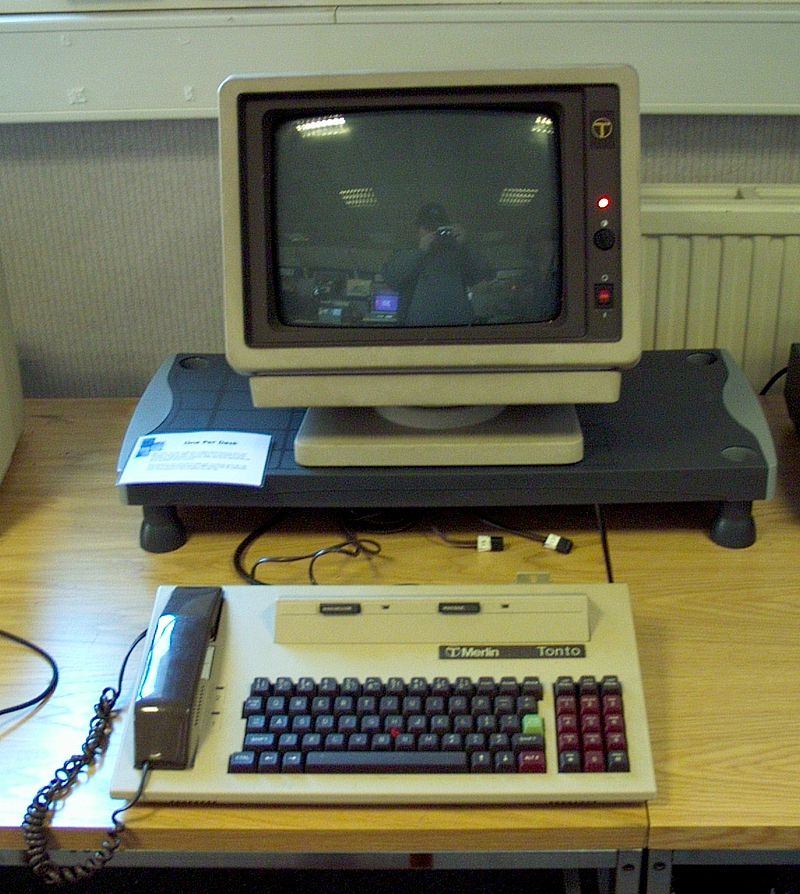
Of course, in the early 1980s, a new market adjacent to telecommunications was experiencing explosive growth and government support: computing, both hardware and software. On the hardware side, British Telecom attempted to break into the industry with the Merlin range of computers. These machines found niche appeal among professionals and institutions due to their integration with telecommunications, but ultimately failed due to their lack of compatibility with the more common IBM architecture.
On the software side, British Telecom launched a division called Telecomsoft, with the ambitious goal of becoming the Penguin of digital content. Initially, Telecomsoft wanted to publish both personal and professional software. However, the latter required maintenance and quality assurance teams, which the new division did not want to commit too early in its development. Furthermore, the demand for games was massive and easy to address, so almost immediately Telecomsoft went with the momentum and focused on gaming, eventually branding the gaming division “Firebird software”.
To build a catalogue, Telecomsoft followed a familiar strategy: in the spring of 1984, it flooded magazines with advertisements inviting developers to submit software. While British Telecom had no prior experience in the video game industry, it had two advantages that set it apart from other would-be publishers: substantial financial resources (and being well-known for having them) and an excellent reputation. In an industry rife with unreliable if not downright sketchy publishers who oftentimes failed to pay developers, it made the difference.

Given the choice between British Telecom and obscure, unproven companies, developers naturally preferred to submit to the telecom giant. The response was overwhelming: Telecomsoft received around 2000 submissions, amongst them, presumably, Mark Lucas’ Viking Raiders. Around this time, Telecomsoft also appointed Tony Rainbird as its operations manager. Rainbird, a warehouse supervisor, had recently founded a short-lived software marketing company called Micro Gold, whose games were transferred to Firebird’s portfolio. Rainbird’s vision for Micro Gold was a mix of low-ish price and quality, a strategy Micro Gold did not have the time to test given how quickly Rainbird moved to Telecomsoft. However, Rainbird saw Telecomsoft as the perfect place to implement his vision: British Telecom already had the public’s trust, and it could produce at scale, allowing it to reduce the price tremendously.

Telecomsoft’s marketing analysts suggested a pricing even more aggressive than what Rainbird had dreamt of back at Micro Gold: £2.50 only – worth around £8 today. It was lower than nearly anything else on the market and Rainbird was happy to follow suit. To assure customers that at that price they weren’t buying shovelware, Firebird consistently featured in-game screenshots on the covers of its releases. Meanwhile, large-scale advertisements emphasized that Firebird was part of British Telecom, Firebird leveraged the excellent reputation of British Telecom by mentioning its mother company in its ads. Firebird even featured the British Telecom logo on the cover of its games, which probably helped with the sales in the winter period, when non-tech savvy family members were browsing the stalls to find Christmas presents.
The first batch of ten Firebird games was released in October 1984, notably without a consistent platform strategy, spanning systems from the VIC-20 to the ZX Spectrum. Another ten games followed soon after. Out of these 20 games, only 2 were not arcade shooters: Viking Raiders and The Wild Bunch, an adventure game. I don’t know why Viking Raiders was chosen, as I could not find any information on this game specifically, nor interviews of its author Mark Lucas. I surmise that there were few non-arcade submissions that were easy to play, or that Lucas’ prior recognition – a Cambridge Award and an already published title – helped his submission stand out.
In any case, while I can’t say for Viking Raiders specifically, the Firebird line-up as a whole encountered success beyond expectations: 250 000 copies by the end of the winter holiday for the first batch. The second batch of games encountered a similar or greater success, with Booty being the first British game to ever pass 100 000 copies sold.
Traits – In my review of Battle 1917, I stated that this game had a great idea but did not run anywhere with it. Similarly, Viking Raiders is built around solid ideas, but the execution is lacklustre.
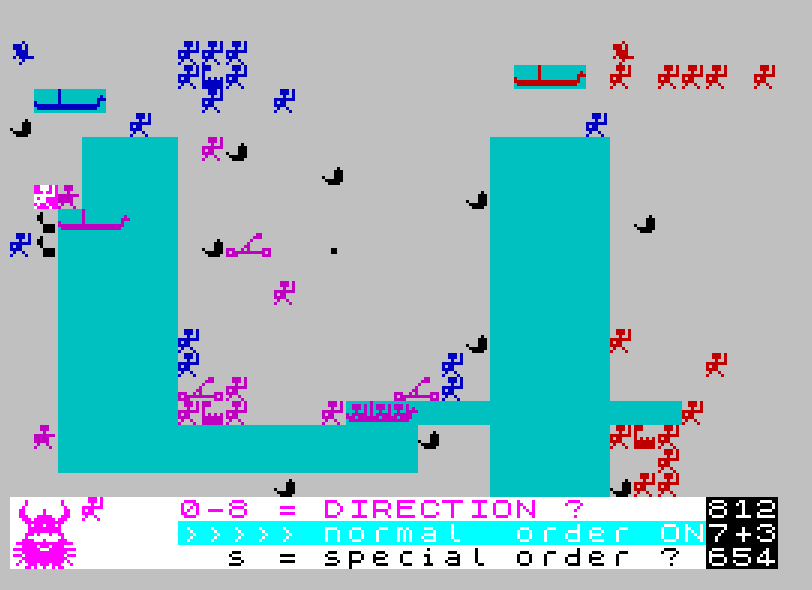
I like Viking Raiders’ casual approach to warfare, but it has issues that I cannot overlook and drag the game down. I am OK with the “chess-like” movement (Dayyalu called it a “schizo version of chess for the infantry” and I think it is a good description), but the terrain doesn’t look like a chessboard so it is frustrating to count squares, which of course you want to do given the number of obstacles on the battlefield. Worse, forced order (vikings having to move in the order in which they were created) is in my opinion a relic of 1980 or 1981 and something that I should not find anymore in 1984. And yet, here we are.
The game is not as lighthearted as it tries to be. I was for instance disappointed by the lack of importance of the drinking horns. A drunk viking is worse than useless (he will switch side if engaged), so there is no reason to ever drink, which means that one of the distinguishing features of Viking Raiders is never seen, at least in multiplayer. I would have preferred the horns to have been a high-risk high-reward feature, maybe by making a drunk viking still impossible to control, but also super strong in combat? As it is, there is no reward associated with the feature.
Similarly, I am puzzled as to why Lucas made hand-to-hand combat so random while making the catapults so perfectly accurate. Inaccurate catapults would have been perfectly on-theme and would have generated zany situations. Instead, we have oppressive catapults that considerably slow down the game by suppressing any movement by longboat (longboats cost 8, so 8 times more than a viking – but are destroyed in one hit like the rest) and generally by forcing the players to keep counting squares to either aim or put the vikings out of harm’s way; as I said above, counting is not fun to start with and it’s downright terrible on a white terrain.
I reckon that those issues were particularly irritating because I played Viking Raiders in PBEM, which requires an emotional and time commitment that does not exist in hotseat. I can see myself playing in hotseat with my brother and having fun as the game is easy to launch and quick to play; of course there would be endless squabbles about whether one of us won by skill or by luck. Even more, even though the game is designed for multiplayer, its most glaring issues disappear in solitaire, making it a fun way to spend time:
- Instead of aiming with its catapult, the AI hits a random location on the map (with a more-than-random chance to hit something, whether your unit or something else), so your longboats are relatively safe to use,
- Because the AI is stupid, it has no issue with sending its vikings toward horns, so quickly enough a large number of drunk vikings roam the map,
- You can move your vikings based on vibes without being punished by another player putting more effort than you in the way they play,
- Randomness does not matter when you can just start a new game in a few seconds,
It is still a game that wears off fast, but I had fun for the 3 or 4 solo sessions I played, and that’s better than I can say about many of the games I have played on this blog.
Did I make interesting decisions? Yes, for the first half of the game. However, sometimes you can lose whatever you do because you were just unlucky today.
Final rating: ☆. Viking Raiders is an attempt to casualize tactical games, and at this it is somewhat successful. However, it is not as quirky and whimsical as it pretends to be, and it is a better game in solitaire than in multiplayer.
You can read the reviews of Operative Lynx and Dayyalu on the forum – Dayyalu’s opinion mirrors mine while Operative Lynx is a bit more negative.
Sources:
- Most of the information comes from Richard Hewison’s retired site on Firebird. Hewison released a book about Firebird (Memories of Firebird), but I did not read it. A second volume is currently in the works, concentrating on the Rainbird and Beyond Software labels. Hewison also reviewed what I wrote, and I thank him for this!
- Rainbird’s revenge in Personal Computer World, February 1984,
- Ring of Confidence in Popular Computing Weekly, March 1985
- The Boys from Buzby, in Crash, May 1985
Contemporary Reviews
Viking Raiders did not gather a lot of reviews, and depending on what you read, it was either a hard pass or a hard buy. Home Computing Weekly gave it 5 stars in January 1985, describing it as “an excellently conceived, absorbing game which required some cerebral activity and is unlikely to be discarded and quickly forgotten.” Computer & Video Games in March 1985 is more nuanced, but still concludes that given the price it is a good value. On the other hand, Your Spectrum in May 1985 gives it, depending on the reviewer, between 1/5 and 2.5/5, with the main review stating: “I failed to find the fun and my concentration swiftly withered into plug-pulling boredom.”
We are done with Mark Lucas, but not with Firebird Software, which will return for various tactical games, not least with Julian Gollop’s Rebelstar. That’s in 1986 however, so we have a lot of games to cover before that.